Introduction NESU 2000
on Win2000 platform
Chapter 1: NESU Tutorial
 The principle behind NESU
Running
an experiment
The Stimulus
Stack File (SSF)
The structure
of the SSF file and the experiment design
The TTS
and EAT files: Introduction to the EAT Builder
The relation
between the TTS, the EAT and SSF files
More
about TTS: creating blocks, binding events
Recording
events
Chapter 2: General overview of the EAT Builder
Chapter 3: Working with the EAT Builder
Introduction
The Goal of this manual is to present the features and functions
of the new NESU for Windows. It is aimed for people with prior experience
with the DOS-based NESU, as well as for people who have never worked with
NESU.
This manual will NOT deal with aspects regarding the NESU hardware.
Furthermore, it is assumed that the reader is acquainted with the Windows
environment. Aspects of Windows will only be explained to the extent that
is necessary for setting up and running experiments with NESU. In other
words, this manual is restricted to the NESU software involved in designing
(the TTS, the EAT file, and the Stimulus Stack File) and running experiments
(the Experiment Runner).
If you have never used NESU before, it is recommended that you follow
the NESU tutorial (chapter 1). The main aim of the tutorial is to demonstrate
the interaction between the different NESU components, so that the operating
principle is thoroughly understood. Others might also profit from following
the tutorial, because it gives a clear step-by-step introduction to the
new NESU.
Chapter 1: NESU Tutorial
NESU stands for Nijmegen Experiment Set Up. It is a relatively simple-to-use
program for designing and running experiments in cognitive psychology,
especially in the field of psycholinguistics. The uniqueness of NESU is
that it contains a visual, interactive tool (called the TTS) with which
the user can design a trial in an experiment. NESU then automatically translates
the visual information that the user specified to computer code (a so called
EAT file). This means that there is no need for the user to learn complicated
programming codes. However, to profit from this advantage, the user
needs to understand the operating principle of NESU. More specifically,
the user needs to understand the interaction between the components involved
in designing an experiment in NESU.
The Principle Behind NESU
There are three components involved in designing a NESU experiment.
In this section they will be introduced. Then, using simple examples, the
way they interact will be illustrated.
Components of Designing an Experiment
-
The TTS TTS stands for Trial Timing Scheme. This is a graphic interface
with which the user creates a scheme. This scheme specifies the events
and the timing of these events that happen within ONE experimental trial.
It also specifies, if needed, in which field in the .SSF file (see below)
the files containing the stimuli for this trial are.
-
EAT file The NESU environment, SmallTalk, automatically generates the
computer code for the design that the user graphically specified with the
TTS and saves it in a file with the extension .EAT. It is this file that
is used when running the experiment.
-
The Stimulus Stack File (.SSF) while the TTS and EAT file specify the
events within ONE trial in the experiment, the .SSF file contains the information
about the order of trials in the experiment as a whole. The structure of
this file is as follows: each line in the .SSF file represents one trial
in the experiment. The first field of each line ALWAYS has the name of
the EAT file that will be used in the current trial. The following fields
specify the names of the files containing the stimuli that is to be presented
in this trial, according to the event and timing specification given in
the EAT file (and the Trial Timing Scheme).
This probably seems very vague. We will therefore demonstrate the working
of these components, starting with a very simple example. We want to present
to the subject on a computer screen the word ATTENTIE for 2 seconds. Our
"experiment" in this case consists of one trial in which a visual stimuli
(a file called attentie.BMP, containing a picture with the word ATTENTIE)
is presented for 2 seconds.
As there is only one trial, the .SSF file for this example has one line:
showpict attentie.BMP
The first field points to a EAT file called showpict.EAT. NESU looks
in this EAT file. This file contains the command: present the file that
is in the second field of this line on the screen for 2 seconds. NESU looks
in the directory for a file called attentie.BMP and executes the command.
The files for this "experiment" already exist in the directory for this
tutorial (C:\Tutorial). We will first run this experiment and then modify
different aspects in different components. Hopefully this will clarify
how the components work together. You will also get acquainted with the
NESU software that runs the experiments the Experiment Runner.
Task 1
Goal: Getting acquainted with NESU by observing how an experiment
is run.
NOTE: All file extensions in this manual are written with
capital letters, but NESU is not case sensitive, i.e., it makes no difference
between capital and small letters,
Example 1 Presenting a picture on the screen
Double-click on the NESU icon to start NESU. In the NESU starting screen
(Figure 1.1) click on "run" on the menu bar and select "run experiment".

Figure 1.1: The NESU starting screen
A window will "pop-up" (Figure 2.2), in which NESU will ask you to enter
your working directorys name.
à Type in C:\Tutorial and click
"OK" (or press "Enter")

Figure 1.2: Pop up window to go to the Experiment Runner
NESU will ask for the experiments name. Just press "Enter" (or click
"OK")
The screen has now changed from the NESU starting screen to the Experiment
Runner screen (Figure 1.3).

Figure 1.3: The Experiment Runner screen
There are a lot of lines and fields, and we will for now ignore most
of them.
When running an experiment there are 5 distinct steps:
-
Start
-
Enter SSF name (press backspace and then "OK" to move to the next step).
-
Enter result file name
-
Enter subject(s) ID (press backspace and then "OK" to move to the next
step).
-
Start experiment
You will now be lead through these steps.
-
Move the arrow with the mouse to the bottom left corner and click on the
word Start.
NESU checks the hardware and prints messages on the right hand side
of the screen (move the "pop up" box to see this as in Figure 1.4). These
should end with the message:
***START Session***

Figure 1.4: Starting an experimental session.
-
NESU prompts you to enter the trial file name (this is another name for
.SSF file) in the "pop up" window (Figure 1.5).
à Type in: Oneword.SSF and press
"Enter" or click "OK

Figure 1.5: Pop up window for .SSF file
On the right of the screen, NESU prints the name of the file and its
contents (move the pop up box to see this as in Figure 1.6):

Figure 1.6: A stack file has been loaded
As there is only one trial, the .SSF file has only one line. NESU looks
in the directory for a file called showpict.EAT and for attentie.BMP. As
both these files are present, there are no errors.
Click on backspace and then "Enter" (or "OK") to move to the next step.
-
Another pop up window appears, in which you will be asked to enter a result
file name.
à Type for instance: test.res
(Figure 1.7) and press "Enter" or "OK"

Figure 1.7: Pop up window for result file name.
The name you have typed will be printed on the right hand side of the
screen:
TOTAL ERRORS: 0
-c:\tutorial\test.res
4. NESU will now ask the subject ID.
à Type, for instance: ikke, then
press "Enter" or "OK"
This information, too is printed on the right side of the screen:
TOTAL ERRORS: 0
-c:\tutorial\test.res
su: ikke
As it is possible to have more than one subject, NESU asks again for
the subject ID, but at the moment one will do.
Press backspace and then "Enter" to move to the next step.
5. NESU will ask you if you want to start the experiment (Figure 1.8).

Figure 1.8: Starting the experiment.
Click on the Yes option (or press the Enter button).
On the right screen, which shows you what the subject sees, you will
see the word ATTENTIE appear for 2 seconds.
The Beep that you hear means that the experiment is over.
On the right hand side of the NESU screen messages related to the experiment
are shown:

Figure 1.9: The Experiment Runner screen at the end of the session.
Move the arrow with the mouse to the top of the screen and click on
"File" and then on "Exit" (Figure 1.10) to return to the NESU start screen.

Figure 1.10: Exiting the Experiment Runner.
Example 2 - Playing a sound file
Here is another simple example: we want to present to the subject audio
stimuli, in this case, a sound file called boing.WAV. All the materials
for doing this have already been created: an EAT file called "play", the
boing.WAV sound file and an .SSF file called "onesound". So, repeat the
steps from the first example, except that the .SSF file name that should
be filled in is onesound.SSF:

Figure 1.11: Entering the name of the stack file.
Can you see what the content of the .SSF file is?
On the right of the screen NESU prints the file contents. You can see
that there is, again, only one trial in this example:
play boing.WAV
When entering the result file name (test.res), NESU will ask you to
confirm using the already existing file. Just click "OK" or press "Enter".
Hopefully, youve correctly carried out all the steps and have heard
the sound being played. Move the arrow with the mouse to the top of the
screen and click on "File" and then on "Exit" to return to the NESU start
screen.
In the next tasks you will be shown how to change different elements
in the experiment, starting with which stimuli is presented.
Task 2
Goal: Get insight of how the .SSF functions and how to change
the .SSF file.
Example 1 - Presenting a different word on the screen
Instead of the word ATTENTIE, we want to present the word PAUZE. There
is already a pauze.BMP file in the directory. But we need to tell NESU
that it should present this file. This is done by changing the .SSF file.
Go to the directory of this tutorial (C:\tutorial) using "My computer"
or "Windows explorer."
Copy the files in C:\tutorial to a directory with your own name.
Do this, for instance, by clicking Ctrl+A to select all the files in
C:\Tutorial, then Ctrl+C to copy them all. Next, create a directory with
your own name, go in this directory and click Ctrl+V to paste all the copied
files.
Open the file oneword.ssf in your favourite text editor (e.g., WordPad)
You can now change the .SSF file. Instead of attentie.BMP type pauze.BMP.
Save the file and return to NESU.
IMPORTANT!!
When you save the edited .SSF file, make sure that the file is NOT
saved as a text (*.txt) file by selecting All Files (*.*) in the filter
box.
Repeat the steps from Task 1. Now when NESU asks you for you working
directory you fill in C:\tutorial\your_name. Follow carefully steps
1 to 5. If all is well, the word PAUZE should appear on the screen. Move
the arrow with the mouse to the top of the screen and click on "File" and
then on "Exit" to return to the NESU start screen.
Example 2 - playing a different audio stimulus
In your directory there is a sound file called weee.WAV. Change the
onesound.SSF file, by following the same procedure we used in the previous
example, so weee.WAV is played instead of boing.WAV.
Task 3
Goal: Further understanding of the relation between the .SSF
structure and the design of the experiment.
Until now we have only run "experiments" with one trial. Our .SSF file
contained only one line. The first field of this line always pointed to
a .EAT file: either to showpict.EAT (which displays pictures on the screen)
or to play.EAT (which plays sound files). Most experiments are of course
made up of many trials. The same .EAT file can be used to present different
stimuli and different .EAT files can be used within one .SSF.
Example 1 creating a .SSF file with more than one trial
Open oneword.SSF in a text editor. The file contains one line (probably
showpict pauze.BMP). Modify the file so that it contains the following
lines:
showpict attentie.BMP
showpict dolfijn.BMP
showpict einde.BMP
Each line is a trial in which the program (.EAT file) showpict is run
and displays a picture on the screen.
Save the file under a new name (e.g., trials.ssf make sure the file
is not saved as a *.txt file) and return to NESU.
Follow the procedure as explained in Task 1, and run the .SSF file you
have now changed (e.g., trials.SSF). If the file is in order, you should
have three trials presented to you: first the word ATTENTIE, then a picture,
then the word EINDE.
Click on File and on Exit to return to the NESU starting screen.
Example 2 an .SSF file with more than one .EAT file
In your directory you will find a number of picture (*.BMP files) and
sound files (*.WAV files).
In your favourite text editor, create a new .SSF file of, perhaps 10
trials, that will present some sounds and some pictures from the directory.
Each line, or trial, should have in the first field the name of the .EAT
file that you want to use (showpict or play) and the name of the appropriate
audio or visual stimuli (between apostrophes - ) in the second field,
that is:
showpict picture_name.BMP
play soundfile_name.WAV
You can have as many trials as you wish. Dont forget to make sure that
the file is not saved as a *.txt file, by selecting All Files (*.*) in
the filter. After saving the file, return to NESU.
Run the experiment. If everything proceeds smoothly, you should be presented
with the sounds and pictures in the order that you put them in the .SSF
file. You can repeat this exercise, using different stimuli, by changing
the SSF file.
The TTS and EAT files
By now you, hopefully, get the hang of how the .EAT file and .SSF file
relate to each other. So far, however, you have been using EAT files that
were created for you. It is these EAT files that contain the actual "programming".
In this section you will become acquainted with the program that creates
these EAT files - the EAT Builder.
Task 4
Goal: Introduction to the EAT Builder
Example 1 - Looking at the TTS of showpict.EAT
In the NESU starting screen, click on the word "build" on the top of
the screen and select "run tts" (Figure 1.12).
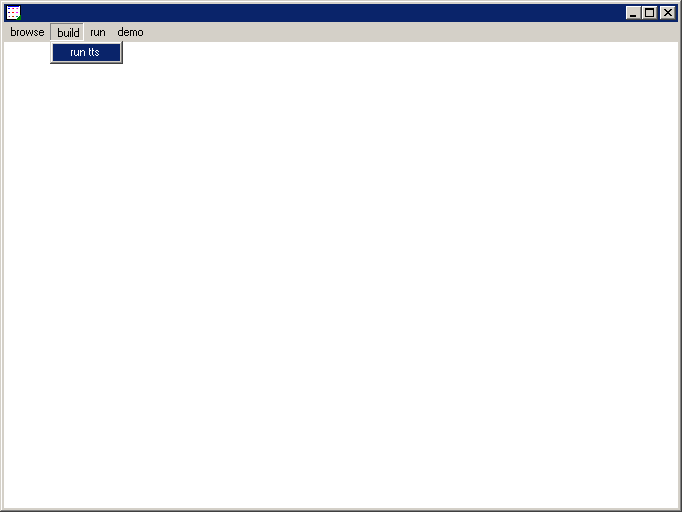
Figure 1.12: Starting the EAT Builder
After a few seconds the EAT Builder will appear (see Figure 1.13).

Figure 1.13: The starting screen of the EAT Builder
On the left side of the screen you can see a directory tree and underneath
it a window displaying the content of the current directory (Figure 1.14).

Figure 1.14: The current directory and its contents
Scroll down the upper window and select your own directory in the directory
tree. When you do that you will see the names of the EAT files in your
directory (Figure 1.15).

Figure 1.15: The EAT files in your directory
Double-click in the bottom window on Showpict.EAT to see the TTS and
EAT Code of the file (Figure 1.16).

Figure 1.16: The TTS representation of Showpict.EAT.
The top right part of the screen shows the TTS representation, while
the bottom part shows the EAT code of the program. In the TTS representation,
on the left side of the screen under the title "Name", the devices that
are used are stated. In this case, as were presenting pictures, VGA, i.e.
monitor, is used. Each line in the TTS stands for an action, or an event,
that happens within one trial. Each event is symbolised by a coloured block
on the right side. On top of the screen, under the menu bar, a horizontal
axis representing time (in milliseconds) indicates how long each action
takes.
In order to present a picture on the screen, as is done in showpict,
a file that contains the picture (.BMP file) needs to be loaded, then displayed.
These two actions are represented in this TTS program. In the first line
of the program the action of loading a file is represented by the little
block. The loading of the file starts at time=0, as can be seen on the
time ax. You can also see how long it takes to load the file. (50 msec
this is a bit difficult to tell).
The block on the second line represents displaying the picture (the
loaded file). You can see on the time ax that the display starts (onset)
right after the loading of the file is done. Can you see for how long the
picture is presented on the screen?
The length of the second block is 2000 milliseconds. The display offset
is at 2050 milliseconds.
This information also appears in EAT code on the bottom part of the
screen under initialize Trial.
Return to the NESU starting screen by clicking on "File" on the menu
bar and selecting "Quit".
Example 2 - the TTS of play.EAT
Look at the TTS of play.EAT, using the same procedure described for
Example 1. Similar to showpict, also in this program a file needs to loaded
and played. However, in this case, because the file contains audio stimuli,
the device used is Speech Device (SpeechIO). The red block on the first
line represents the loading of the sound file. You can see that it takes
longer to load a sound file than a picture file. (150 msec vs. 50 msec).
The block on the second line represents the playing of the file. You
might notice that, unlike in showpict where the block on the second line
was a simple rectangle, here the block representing the playing of the
sound file contains a little bar in the middle and has no line on the right
side (you can load showpict again to witness this). This represents a dynamic
offset.
You might recall that in Example 1, the picture was presented for 2 seconds.
Sound files, however, can be of different time lengths. Imagine that in
an experiment a subject gets to hear the word "hat" in one trial and "encyclopaedia"
in another trial. Obviously, the playing of the sound file in the latter
trial will take more time than in the former trial. So the offset time
in the "hat" case is earlier than with "encyclopaedia". We would need two
programs: one in which the offset of the playing of the sound file matches
the length of "hat" and one which matches "encyclopaedia". Now imagine
that you have an experiment with 200 different sound files!
Dynamic presentation means that the offset of the stimuli is not a fixed
time interval but dependent on another event, in this case, reaching the
end of the sound file.
Return to the NESU start screen.
Task 5
Goal: Get insight into the relation between the TTS, EAT and
SSF files. Learn to use the EAT Builder.
Example - change the presentation time of a picture
Remember we started this tutorial with the example of wanting to present
the word ATTENTIE on the screen for two seconds (Task 1). The .SSF file
was:
showpict attentie.BMP
Lets say we now want to present the word on the screen for only one
second. For that, we need to change something in the showpict.EAT file.
Open showpict.EAT in the EAT Builder (see Task 4, example 1). You will
see, again, the TTS representation on the top part of the screen and the
EAT code for that TTS on the bottom part of the screen.
à On the left side of the TTS,
under the title Name, move the arrow with the mouse and double-click on
line number 2.
A window should appear (see Figure 1.17). This window tells you all kind
of information about the specified event.
Figure 1.17: The View Block window
This "View Block" window contains 4 parts. On top, in the "Identity"
part, the kind of device that is used is specified. Under "Parameters"
the user enters the required variables, e.g., which picture or sound file
should be presented. In the third part the user specifies the onset and
offset of the event. When NESU generates an EAT file from the TTS, all
the information specified by the user is "translated" to code which can
be understood by NESU (SmallTalk Code). On the bottom part of the
"View Block" window, under "Code", you can see the SmallTalk code for this
block. The code for this block says something like "at time=50 milliseconds,
take the graphic device, a VGA in this case, and present the loaded file
for 2000 milliseconds".
à Exit the "View Block" window
by clicking on OK, or Cancel
We want to shorten the presentation length to 1000 milliseconds.
à Click on the Menu bar at the
top of the screen on Tools and then on Modify Block.
à Move the cursor to the right
side of the TTS (the area with the blocks or "Graph pane"). Place
the cursor so that the arrows are on the blue block on line 2 and double-click.
A window similar to the "View Block" window will appear. The difference
is that in this window you can modify the specified parameters. What we
want to do is to change the offset of the event so that the picture appears
for 1000 ms.
à In the part of the window that
specifies Offset, change the entry in the Delay box from 2000 to 1000.
You can see that, as you type in the new offset duration, the SmallTalk
code at the bottom of the screen changes.
à Click on OK
The EAT Builder has now updated the block which represents the displaying
of the picture (see Figure 1.18). You can see that the block for this event
is shorter now.

Figure 1.18: The edited TTS representation of showpict.eat.
You can also see that the edited code for this block appears in the
EAT code for this TTS, on the bottom of the screen (under initialize Trial).
So, we have a program which loads a file and then presents it for one
second. But how does it know which file to load? If you look at the SmallTalk
code for the first line it says that at time=0 it should load anImage.
This just means that at the beginning of each trial it should load a file
with a visual stimuli. How can we tell the program that the Image
should be our attentie.BMP file? Or rather, we want to tell the program
that whenever there is a showpict trial, that is to say, a line in the
.SSF file that begins with showpict, it should load the file that is specified
in the second field of that line in the .SSF file - in this case attentie.BMP.
The link between the second field of the .SSF file and the file to be
loaded as Image is specified as a variable. On the Menu Bar at the
top of the screen, click on Trial and then on Variables. In the window
that appears (see Figure 1.19), you can see that line #2 specifies a variable
called anImage. What this means is that field number 2 in the SSF file
should contain the name of the file to be presented as a picture. You can
also see that line #1 specifies no variable. This is because the first
field in the SSF file is always reserved for the name of the EAT name.

Figure 1.19: The variables used in showpict.eat.
à Click on File and Quit.
You will be asked to save the experiment
à Click on "Yes" to save the experiment.
You are back at the NESU start screen.
If you now run oneword.SSF or one of the other .SSF files that uses
showpict.EAT, you should notice the difference in the presentation time
of the pictures.
Task 6
Goal: Learn more about the TTS: creating blocks, binding events.
Example - presenting a sound and a picture in one trial
Suppose we wanted to present in each trial a sound followed by a picture
or a written word. We already have a file - play.TTS - that can play sounds.
We can modify the program so after playing the sound a picture file is
presented. In other words, each trial, or line, in the SSF file will look
like this:
play sound_file.WAV picture_file.BMP
What needs to be changed in play.TTS? We need to add the actions of
loading the picture file (which is specified in the third field of the
.SSF file) and presenting it on the screen. In other words, what we are
doing is adding the exact same actions that are done in showpict.TTS and
combining them with play.TTS.
We will do this by first making a copy of the play program, which we
will call playpic. Then we will modify the playpic program so it will include
the actions of loading and presenting the visual stimuli. This is a safe
procedure because it leaves the play program unmodified as a sort of back
up.
à Open play.EAT in any text editor.
à In the first line of the program,
change #Play to #Playpic
à Save the modified file under
the name Playpic.EAT (make sure the file is not saved as a .txt file, by
selecting All Files (*.*) in the filter box).
In the NESU start screen, click on "build", and select "run tts". In the
EAT Builder screen, find your directory in the directory tree on the left
side and open Playpic.EAT. The EAT Builder screen should display the events
specified, so far, in playpic. These are, of course, the loading and playing
of the sound file, as the were in the original play.EAT file.
We need to specify two more events: loading the image (picture) file
and presenting it on the screen.
To load an image file:
à Go with the mouse to the Graph
pane (the right side of the TTS screen that contains the blocks) and double-click
with the left mouse button on line number three.
A window similar to the "View Block" window (see Figure 1.17 above) will
pop up. The difference is that we now have to fill in the different fields.
In the first part of the "Insert Block" window - "Identity" we need
to tell NESU which device is involved in the event we want to specify.
Since we want to load a picture, we need to specify a Graphic Device.
à Click on the arrow next to
"Alias" and in the drop-down menu click on Graphic Device.
The Name box has now changed to Vga (see Figure 1.20). That is to say,
the default graphic device is a VGA screen (a computer monitor). In the
Block box it says "load" which is the default action for this device.

Figure 1.20: Specifying a graphic device.
Next, we want to tell NESU where to find the name of the file to be
loaded. Under the section of Parameters, you can see that the argument
for the action of loading a file is given the default value anImage (see
Figure 1.21). So we are loading a variable which is called anImage (it
is possible to change the variable name, and this recommended if you are
working with more than one image, but in this case it is not necessary).

Figure 1.21: Default parameters of loading a picture file.
What we need to do now is to link the variable anImage with the SSF
position that has the visual stimuli. You might recall that we were thinking
of an .SSF file with this structure:
playpic "sound_file.WAV" "picture_file.BMP"
So the picture file is in position 3.
à At the bottom of the Insert
Block window, click on the button "Variables
"
The Variables window appear (see Figure 1.22). As you can see, so far there
is only one variable specified aSegment (a segment to a sound file is
like an image to a picture file). This variables number (#2) points to
the second field of the SSF file, i.e., to the .WAV file that appears in
that position.

Figure 1.22: The Variables window of Playpic.
We want to insert a new variable, called anImage, at position #3.
à Click on the Insert button.
A new window will appear, the Insert Variable window (see Figure 1.23).

Figure 1.23: The Insert Variable window.
à In the "Suggested name" box type
in: anImage
à In the "#" box type in: 3
à Click on "OK".
You can now see the updated variables window.
àClick on "OK".
Back at the Insert Block window, the next step is to specify when the
event of loading the image should occur. Lets assume that we want to load
the file right at the beginning of the trial. Go to the Onset section and
under Delay enter the value 0 see Figure 1.24).

Figure 1.24: Entering event onset.
As the event of loading a visual stimuli file has a fixed time duration
(50 msec) you do not have to enter a value for the offset of the event.
à Click on the "OK" button at the
bottom of the screen.
A green-blue block will appear on line 3. What is happening is that
in the beginning of the trial (time=0) two stimuli (a visual and an audio)
are loaded. Then, after the sound file is loaded, it is played. You can
see that this is the case, by looking at the SmallTalk Code for the block
on the second line, either by opening the "View Block" window for the second
line (see Task), or simply read the EAT code at the bottom of the screen
(under initialize Trial). It says, at time=150 msec (the time it takes
to load a sound file), play the loaded segment.
Now, we want to add the action of presenting the loaded image. Suppose
we want to display the picture for 1500 msec, starting exactly when the
sound file is over. However, you might recall that the offset of the speech
file is dynamic (see Task 4, example 2). If we want the onset of
the picture to coincide with the end of the speech file, we can not do
this by saying "start the display at a fixed time point" because the end
of the speech file is not a fixed time point. That is to say, the sound
file can be of varying lengths. Therefore, what we do is bind these
two events. In the following section you will be shown how to present the
loaded image, and how to bind it with the end of the speech presentation
event.
à Go with the mouse to the Graph
pane and double-click with the left mouse button on line number four.
The Insert Block window should appear.
The action of displaying the loaded image involves, again, the VGA monitor,
so we need to select again the graphic device:
à Click on the arrow next to
"Alias" and in the drop-down menu click on Graphic Device. You can see
that the VGA is chosen.
To specify that the action we want to perform with the VGA is to present
the loaded image:
à Click on the arrow next to
the "Block" box and select "show Plane" in the drop-down menu.
Now we need to enter the timing of the event. We want to bind the onset
of the picture presentation with the end of the playing of the sound file.
In NESU terms, the playing of the sound file is the parent of the
picture display. To indicate this:
à In the Onset section, click
on the arrow by the "Parent" box. In the drop-down menu you need to choose
the line number in which the parent event appears. Therefore, choose number
2.
à Click on the arrow by the "Pin"
box, and choose "outBoth". This indicates that the parent event is the
END (out) of the PLAYING of the sound file.
à In the Delay box, enter the value
0. This means that we want the picture presentation to begin immediately
after
the sound file has been played.
We want the picture to appear on the screen for 1500 msec.
à In the Offset section, enter
the value 1500 in the Delay box.
à Click on the "OK" button at the
bottom of the Insert Block window.
The TTS has now been updated. To get a better overview of the whole
TTS, place the cursor in the Graph pane, under the block of the last line
and click on the RIGHT mouse button. In the menu that has opened (see Figure
1.25), move to "Scale", then click on "Best fit".

Figure 1.25: The drop-down menu for the TTS block area.
In the updated TTS (see Figure 1.26), a new block has appeared symbolising
the presentation of the picture. You might notice that the EAT Builder
has changed the order of lines in the TTS. The blue line connecting the
picture presentation block (line 3) with the block on line 2 represents
the binding of the two events.

Figure 1.26: The TTS representation of playpic.eat.
Save the file and exit the EAT Builder.
We are going to make a little .SSF file and run it, to test our playpic
program.
à In a text editor create a file
called testpp.SSF (or a better name)
Fill in a few trial lines, such as:
playpic zon.WAV maan.BMP
playpic muis.WAV eekhoorn.BMP
playpic zon.WAV kerk.BMP
(See Task 3, example 2 for how to see which stimuli are in the directory).
Save the .SSF file (make sure it is not saved as a *.txt file).
Go to the Experiment Runner and run the .SSF file you have just created.
If all goes well you should end with a screen that is similar to Figure
1.27.

Figure 1.27: The Experiment Runner after running an experiment using
playpic.eat.
Task 7
Goal: describe the events associated with recording responses;
create a complete TTS program that describes a possible experiment.
Example recording reaction time with a button box
So far, our so called experiments were only stimuli presentations. In
real experiments, of course, we want the subject to give a certain reaction.
In a very common experimental paradigm, the subject has a button box with
two buttons and in each trials has to press one of these buttons. For instance,
suppose in our playpic experiment the subject has to press one button if
the presented picture is an animate object, the other button if it is an
inanimate object. The subjects reactions - which button the subject pressed
as well as the reaction time ( the time from the beginning of the presentation
of the stimuli until the pressing of the button ) - should then be written
to a results file. It is also common to have the subjects reactions presented
during the experiment on the experimenters screen. In this section you
will be shown how to build these actions in the TTS program, by modifying
the playpic program.
First, however, it is recommended that you create a back up for the
playpic program. You can do this either by copying and pasting the file
playpic.EAT (in Windows Explorer) or by opening playpic.EAT in a text editor
and saving it under another name (such as backuppp.EAT or a better name).
In the NESU start screen, click on "build" and select "run tts".
We are now in the EAT Builder. Select the playpic program in your directory
(as we have in Task 6). Playpic has, for now, 4 lines that load and present
an audio then a visual stimuli. We are going to add three events to this
program:
-
The event of recording the subject pressing a button,
-
Presenting the subjects reaction on the experimenters screen and
-
Writing the subjects reaction to a result file.
To carry out the first of these three, we need to specify a reaction device
with two buttons:
à In the Graph pane, double-click
with the left mouse button on line number five.
The Insert Block window should appear.
à Click on the arrow next to
"Alias" and in the drop-down menu click on Reaction Device.
à Click on the arrow next to the
"Name" box and in the drop-down menu click on Dual Box (see Figure 1.28).

Figure 1.28: Specifying a Button box reaction device.
We want the subject to be able to categorize the presented picture,
but only from the moment that the picture is presented on the screen. In
other words, we want to bind the onset of the reaction box, to the onset
of the visual stimuli.
à In the Onset section, click
on the arrow next to the "Parent" box. Select the beginning of the visual
display as the parent event, i.e., choose the number that corresponds line
number of that event (line 3).
à In the Delay box enter the value
0.
Lets assume we want the subject to be able to react as long as the picture
is displayed:
à In the Offset section fill
in 1500 in the Delay box (see Figure 1.29)
à Click on the "OK" button at the
bottom of the Insert Block window.

Figure 1.29: The onset and offset values for the reaction device
A green block connected with an arrow to the block from line 3 has now
appeared on line 4.
To present the subjects reactions on the experimenters screen:
à Double-click in the Graph pane
on line 6.
à In the Insert Block window,
click on the arrow next to "Alias" and choose Feedback Device in the drop-down
menu.
In the "Name" box the name of the default feedback device - Experimenter
Monitor - will appear (Figure 1.30).

Figure 1.30: Selecting the Experimenters screen as feedback device.
To specify the onset of the event:
à In the Onset section, click
on the arrow next to the "Parent" box. Select the number that corresponds
with the Dual Box event, i.e., line 4.
à Click on the arrow by the "Pin"
box and select "out Both".
à In the Delay box enter the value
0.
à Click on "OK" at the bottom of
the "Insert block" window
A dark blue block has appeared on line 5. It is connected to the green
block in line 4. This means that the feedback the experimenters screen
is coupled to the subjects reaction.
To write the results to a file:
à Double-click in the Graph pane
on line 7.
à In the Insert Block window,
click on the arrow next to "Alias" and choose Result Device in the drop-down
menu.
à Click on "OK" at the bottom of
the window
In the "Name" box it should now say "Hard Disk".
Bind the event to the subjects reaction, as we did with the feedback
event. That is:
à In the Onset section, select
the number that corresponds with the Dual Box event, i.e., line 4.
à Click on the arrow by the "Pin"
box and select "out Both".
à In the Delay box enter the value
0.
à Click on "OK" at the bottom of
the "Insert block" window
Another dark blue block has appeared. Like Experimenters Feedback (line
5) the writing of the data to the hard disk is also coupled to the subjects
reaction.
The experiment is now ready and should look like Figure 1.31.

Figure 1.31: The TTS representation of the edited playpic.eat.
Save the file and quit the EAT Builder.
From the NESU starting screen go to the Experiment Runner and run the
testpp.SSF file. Using a button box, you can now run a realistic experiment.
You can see on top of the experimenters screen which trial is being run
and what the subjects reaction and reaction time was. These reactions
also appear in the left window in the middle of the screen under the subjects
ID (this is because more than one subject can be run at a time). After
the experiment is over you can look at the result file using any text editor
(go first out of the experiment runner).
The first column of the result file shows the subjects ID, then the
trial number, followed by the reaction time, reaction button (ignore the
question mark) and then the line of the .SSF file which was run during
this trial.
This is the end of this tutorial. Hopefully, this tutorial has taught
you the fundamentals of NESU. You know how to survive in the NESU environment,
how the different components of NESU basically work together, how to run
an experiment and how to work with the EAT Builder.
Chapter 2: General overview of the EAT Builder
The new EAT Builder has many features typical of the Windows environment.
In the EAT Builder starting window that opens when you start the program
(Figure 2.1), there is a menu bar at the top of the screen and a row of
shortcut buttons underneath it. Further, the screen contains 4 panes:
-
The File pane in which directory browsing is done
-
The Table pane which lists information about trial events
-
The Graph pane which displays the trial events graphically (the
Table and Graph panes together constitute the Trial Timing Scheme or TTS)
-
The Code pane which gives the EAT code for the TTS.
In addition, the bar at the bottom of the EAT Builder window displays various
information concerning the trial events.

Figure 2.1: The EAT Builder starting screen
Like in all Windows applications, the size of the panes can be increased
or decreased by placing the cursor on the edge of the pane (where the cursor
changes into an arrow) then clicking and dragging. The size of the whole
EAT Builder window can also be adjusted. Another characteristic of the
EAT Builder is that clicking on the right mouse button in each of the panes
opens a drop-down menu with which the user can change the appearance of
the pane and execute commands.
1. The File Pane - The top part of the File pane displays the
current directory. The bottom part displays the files in the directory
(Figure 2.2). Above the directory display one can choose the extension
filter. The default filter is *.eat, and can be changed to *.* (display
all files), by clicking on the filter or the arrow next to it.

Figure 2.2: The File pane
If you have made any changes in the content of the directory (e.g.,
copied a file), clicking on the right mouse button in the File pane gives
the option to Refresh, i.e., display the updated content of the directory.
In the Nesu directory there is a file called Pict1.EAT. To get an impression
of the other panes and features of the EAT Builder, open this EAT file.
This can be done either through the menu bar at the top of the screen,
or by clicking directly in the File pane. In the following sections the
panes will be described using Pict1.EAT as an example.
2. The Table Pane The default display of the Table pane looks
like Figure 2.3.

Figure 2.3: The default display of the Table pane
Each row in the Table pane is numbered (event number) and contains
a few columns that display information about one event in the trial. For
instance, the Name column, next to the event number, shows the name of
the device used in the event (e.g., a VGA). If you move the right edge
of the Table pane to the right, you can see some more information about
the event (see Figure 2.4).

Figure 2.4: More columns of the Table pane
The Block column lists the name of the action that is done with the
device (e.g., loading). The Argument column shows the name of the variable
on which the action is done (e.g., anImage). To display other informative
columns, place the cursor in the Table pane, click on the right mouse button
and select Columns. In the drop-down menu you can choose which columns
are displayed. For instance, select Onset to see the onset time of the
events or All to see all the available information (you might have to adjust
the size of the pane to be able to see all the information. The columns
width is also adjustable).
View Block - Double-clicking on one of the rows in the Table
pane will cause the View Block window to appear. This window shows
all the information regarding the event. The View Block window contains
4 parts.
-
On top, in the Identity section, the device and type of action involved
in an event are specified. The Index box shows the event number
to which the information refers. You can click on the arrow next to the
Index box to change the event number, i.e., see the information about the
other events in the TTS. The Alias and Name boxes specify
the device that is used in the event. The Instance box refers to
the device number. If there is only one device of a certain type this box
will say "1". If, however, there is more than one device of a certain type,
for instance, if there are two VGA monitors, then each VGA will be uniquely
identifiable by having a different Instance number. The Block box
shows which action is done with the device.
-
In the Parameters section information about the events arguments
and their values is displayed.
-
In the third part the timing of the event can be seen. The Parent
box in the Onset section says whether the events onset is bound to another
event in which case the number of that parent event appears in this box.
If there is such binding, the Pin box says what in the parenting
event indicates the onset point (e.g., outOnset indicates that the onset
of the parent event should be taken as the onset of the child event and
outBoth indicates that both execution and timeout of the parent event serve
as onset). The Type box then indicates whether the type of binding
is temporal (a synchronisation of two events) or causal (the parent event
is asynchronous, i.e., its timing is not known in advance). If there
is no parent event, the event onset is bound to the beginning of the trial
(as it says in the Pin box). The Delay box shows whether the event
should start immediately (delay=0) or whether some time (in milliseconds)
should elapse between the two events.
The Offset section is similar to the Onset section. If the offset
is not bound to another event, then the events offset is by default defined
as being bound to the events onset. In other words, the default is that
the parent event for the offset is the onset of the same event.
-
In the Code section at the bottom of the View Block window, the
SmallTalk code for all the information that is specified in the above sections
is shown. This is the code that will appear for this event in the EAT file.
Drop-down menu for the Table pane clicking on the right mouse
button while the cursor is in the Table pane opens a drop-down menu (see
Figure 2.5).

Figure 2.5: Drop-down menu of the Table pane.
Edit - Selecting Edit gives the options of Insert block (create
a new event), Modify block (change specifications of the current event)
Delete block (no need to explain) and View block (open the View block window).
Inserting and modifying blocks will be described in the next chapter.
Columns - allows selecting which informative columns will be
displayed.
Sort order by default, the rows appear according to
the order of their index number. By clicking on a columns title the sorting
criteria can be changed to that column (e.g., click on Block and the rows
will be sorted alphabetically on the Block column. By selecting Sort order
you can change whether the order will be Forward or Backward.
Parts display the tables grid.
Rows change the size of the rows.
3. The Graph pane right of the Table pane, the Graph pane gives
a visual overview of the events in the trial, their timing and the connections
between them. Each block represents an event. Lines connecting blocks represent
the binding of events.
Block Colours - The colours of the blocks are arbitrary and are
only used as a way of distinguishing between devices, e.g., events done
with a VGA appear in light blue and events with a Dual Box in green.
Pins - The upside-down triangles on the edges of the blocks
are called pins. You can see that at the onset of each block (on
the left side of the block) there are always two pins. These are the In
Onset (top triangle) and Out Onset (bottom triangle) pins. You
might also notice some blocks have two pins at their offset (on the right
side of the block), while other blocks have only one pin (on the bottom
right side). In NESU terminology, some events have both In Offset (top
triangle) and Out Offset (bottom triangle) pins, while other events
have only an Out Offset pin. Events that have a fixed time length
(e.g., loading an image or reporting trial to the hard disk) only have
an Out Offset pin. The binding of two events is always done between an
Out pin of the parent event and the In pin of the child event.
Asynchronous events asynchronous or dynamic events refer
to actions whose duration can vary. The two most common types of dynamic
events are:
-
Playing of sound files - sound files can be of varying lengths. Imagine
that in an experiment, a subject gets to hear the word "hat" in one trial
and "encyclopaedia" in another trial. Obviously, the playing of the sound
file in the former trial will take less time than in the latter trial.
In other words, the offset time in the "hat" case is earlier than with
"encyclopaedia". So we would need two programs: one in which the offset
of the playing of the sound file matches the length of "hat" and one which
matches "encyclopaedia". Now imagine that you have an experiment with 200
different sound files!
Defining the playing of a sound file as an asynchronous event means
that the offset of the event is when the end of the sound file has been
reached.
NOTE: for the playing of a sound file to be asynchronous,
the event offset needs to be defined as the end of trial. To do this select
"none" as the parent event in the Offset section, and select "end of trial"
in the Pin box. The block drawn should have no line on the right side.
-
Responding with a reaction device - obviously, the time at which a subject
will react can not be known in advance and varies from trial to trial.
The time interval from the onset of the reaction device (the moment at
which the device becomes active) until its offset (the subject has given
a response) is thus asynchronous. The offset value that is entered for
this type of event is called the timeout value. This is the maximal
amount of time in which the subject can respond. In other words, the real
offset time of a reaction device is caused either by the asynchronous event
(i.e., the subjects response) or by timeout.
NOTE: if you want a reaction event to be ONLY be asynchronous,
in other words, that the experiment will only continue after the subject
gave a response, the event offset needs to be defined as the end of trial.
To do this select "none" as the parent event in the Offset section, and
select "end of trial" in the Pin box. The block drawn should have no line
on the right side.
That an event is asynchronous is represented by the bar in the middle of
the block. Place the cursor in the Graph pane and click on the right mouse
button. In the drop-down menu, choose Parts then select in the second menu
the option "Async details". As you see, what appears as a bar is actually
made of three bars of different colours. Each bar also has its own pin
(triangle). From left to right these are the green Out Execute pin
(representing an asynchronous offset), the blue Out Both pin (either
asynchronous or timeout offset) and the red Out Timeout pin (timeout
offset).
Why do we need three different pins?
When an event is bound to the Out Execute pin, that means that the event
will take place if and when the subject reacts. An event bound to the Out
Timeout pin will only take place when the timeout period has elapsed. If
an event is bound to the Out Both pin, it will take place either when the
subject reacts or when timeout is reached (whichever occurs first).
Binding event binding is represented in the Graph pane
by lines connecting the blocks. The line colours convey information about
the type of binding:
-
Green - asynchronous binding, i.e., the child event is bound to
the Out Execute pin of the parent event.
-
Blue - the child event is bound to the Out Both pin of the parent event.
-
Red - the child event is bound to the Out Timeout pin of the parent event.
-
Light blue - delayed binding.
-
Black - take over binding, i.e., the child value takes over the time value
of the parent event.
Drop-down menu for the Graph pane clicking on the right mouse
button while the cursor is in the Graph pane opens a drop-down menu (see
Figure 2.6).

Figure 2.6: Drop-down menu of the Graph pane.
Tools the default of the Graph pane is the Insert block mode,
i.e., a mode in which one can create new blocks. Selecting Tools gives
the options of changing mode. In other modes you can either edit blocks
or edit connections between blocks (binding). Editing blocks can be done
with the tools of Insert block, Modify block and Delete block. Editing
connections is done with the Insert connection, Modify connection and Delete
connection tools. Working with these tools will be explained in the next
chapter.
Scale on top of the Graph pane is a time axis. The scale of
this axis can be changed by selecting Scale and either increasing or decreasing
the scale.
Parts selecting parts allows you to view features of the Graph
pane that are not part of the default display, such as the graph Grid,
Detours
(implicit connections) and (as we saw) Async details.
Rows change the size of the rows.
4. The Code pane In this part of the screen the EAT code for
the specified TTS is shown. This is the code that is saved into the EAT
file, which is the file that NESU uses when running an experiment. In principle,
each line in the Code pane under "initializeTrial" corresponds to a row
in the TTS, or, in other words, to the events in the trial. However, the
EAT consists of more than just the "initializeTrial" section. While the
cursor is in the Code pane, click on the right mouse button. In the drop-down
menu choose "Tabs", then select "All". On top of the Code pane, five "Tabs"
are now visible. From left to right , these are (click on the tab at the
top of the Code pane to move from one tab to the other):
-
Comment in the comment section a description of the EAT can be
given, including an explanation of what the EAT does, what the input and
output are and other information such as who wrote the EAT and when it
was last revised. This information can be helpful for future users of the
EAT.
-
Subclass in this section the names of variables used in the EAT
(e.g., anImage) are declared. Further, in the first line after "Experiment
Process subclass:" the name of the EAT is declared (after "#") . Because
the name of the EAT file is represented here, if you want to rename an
EAT file, the new EAT filename always needs to be also changed here in
the subclass section, so that the filename and the declared subclass name
match each other.
-
Configure Experiment in this section the devices that are used
in the trial are declared and named.
-
Initialize Trial this is the default tab that is visible when
the EAT Builder is opened, showing the events of the trial and their timing.
-
Trial Description in this section the variables that were declared
in the Subclass section are mapped on to the SSF file. That is to say,
for each variable that was declared in the subclass section a position
in the SSF file is declared. For instance, anImage:= (anArray at: 2)
means
that the value for the variable called anImage can be found in the second
position of the SSF file.
All this information appears in the EAT file.
One of the features of the EAT Builder is that one can change the code
in the Code pane and the EAT Builder will update the TTS (the graphic representation)
accordingly. This feature will be described in the next chapter.
Drop-down menu for the Code pane clicking on the right mouse
button while the cursor is in the Code pane opens a drop-down menu (see
Figure 2.7).

Figure 2.7: Drop-down menu of the Code pane.
File If one has made changes in the EAT code, clicking on "File"
gives the options of accepting or rejecting these changes. This will be
further explained in the next chapter. Another option is "Export as
",
which allows to save a copy of the EAT file in RTF format.
Tabs allows selecting which tabs are visible.
Edit the "Format" option allows displays the content of the
Code pane in a way that gives a good overview. Select "Format", to format
the current tab, and "Format all" to format all the tabs.
Search allows finding and replacing in the Code pane.
One can choose which panes are displayed by selecting "View" on the
menu bar at the top of the EAT Builder screen.
Chapter 3: Working with the EAT Builder
In this chapter, the different options of the menus will be described.
We will also describe the different ways to create and modify blocks or
connections, declare variables and add or remove devices.
Creating a new EAT file can be done either by pressing the "New"
shortcut button on the tool bar, or selecting "File" on the menu bar at
the top of the screen, and then choosing "New". The EAT Builder then prompts
the user to give a name to the new EAT file. The "Compatible Name" box
(Figure 3.1) displays the name that will be given to the new file, so that
a name containing an illegal character is transformed to a legal EAT name.

Figure 3.1: Giving a name to the new EAT file
Creating a new block new blocks defining events in the trial
are entered through the "Insert Block" window. This window can be opened
in three ways:
-
Through the Table pane: click on the row that says ""[none]", then click
on the right mouse button and select "Edit" then select "Insert Block"
(Figure 3.2).

Figure 3.2: Creating a new block through the Table pane
-
Through the Graph pane: double clicking on the empty row in the
Graph pane will open the "Insert Block" window, provided that you are in
the "Insert Block" mode, as indicated by the shape of the cursor in the
Graph pane (Figure 3.3).

Figure 3.3: The shape of the "Insert block" cursor in the Graph pane
-
Drawing blocks in the Graph pane yet another way of creating a new block
through the Graph pane is by clicking and dragging the mouse (while still
holding the mouse button). As long as you hold the mouse button down, you
can see a rectangular shape on the screen. Once you let go of the mouse
button, the "Insert Block" window will appear.
To understand better how the "Insert Block" window is opened through the
Graph pane it is recommended that you read the next section.
The information bar at the bottom of the screen:
At the bottom of the screen several slots display some information about
the current TTS. From left to right these are (Figure 3.4):

Figure 3.4: The information bar
-
Name displays the TTS name
-
Sorting order shows the order in which the rows in the Table pane are
sorted (Forward or Backward) and which column serves as the criteria column
for sorting (default is #index)
-
Row size indicates whether the size of the rows has been increased or
decreased
-
Onset time as you move the cursor in the Graph pane, the values in this
slot change. When you open the "Insert Block" window through the Graph
pane (as described in items 2 and 3 above), the value in this slot is set
as the blocks onset time (the beginning of the trial is the parent event
and the value in the Delay box equals the value in the Onset slot). Thus,
by opening the "Insert Block" window through the Graph pane, one can already
fill in certain sections of the window (one can, of course, subsequently
change these values).
-
The duration and offset slots while the cursor is in the Graph pane,
press and hold the mouse button. If you dont move the mouse, the duration
slot will say "0" and the value of the offset slot will be the same as
in the onset slot. If you move the mouse, and all the while holding the
mouse button (as was described in item 3 above), the values of the duration
and offset slot will change with the mouse movement. Once you let go of
the mouse button, the "Insert Window" will appear. The events offset (as
indicated by the Delay box in the Offset section) will be set to the equal
the value in the duration slot and the offset time will equal the value
in the offset slot.
As you can see, the new EAT Builder has thus the option to enter the events
onset and offset values through the graphic interface and not just by entering
the values in the appropriate "Insert Block" boxes. (This does increase
the chance of developing RSI). You might also realize that items 2 and
3 described above are not really different ways of opening the "Insert
Block" window. Actually, item 2 is the same as 3, except that the duration
in 2 is set to 0 (because double clicking is like not moving with the mouse).
Binding blocks creating connections can also be done in several
ways. One way is to specify the parent event while creating the block.
For instance, in the examples in Chapter 1, the parent event is declared
in the appropriate box in the "Insert Block" window. If you create a block
by drawing in the Graph pane, you can bind the onset of the block to another
event by placing the starting point of the block on the pin of the parent
event. That is to say, if you put the cursor on the pin that represents
the parent event (e.g., outOnset or outBoth pin), you will see that the
colour of the pin changes to purple. If you draw a block now by clicking
and dragging (see Figure 3.5), the "Insert Block" window will open with
the clicked-on pin specified as the parenting event in the Onset section.

Figure 3.5: Binding an event by drawing in the Graph pane
Connections can be also inserted between existing blocks, i.e., after
the block has been created. This is done by using the "Insert connection"
tool, which can be selected by clicking on the "Insert connection" shortcut
button on the tool bar, or by standing in the Graph pane and clicking on
the right mouse button, then selecting Tools and "Insert connection". While
in the "Insert connection" mode, the shape of the cursor in the Graph pane
should look like Figure 3.6.

Figure 3.6: The shape of the "Insert connection" cursor in the Graph
pane
Using the "Insert connection" tool, you need to open and fill in the
"Insert connection" window. If you open this window by double-clicking
in the Graph pane, you need to specify in the appropriate boxes the parent
and child events that should be connected (by selecting the events index
number and the appropriate pin). You can also specify whether there should
be a delay. Another way of creating a connection is to place the cursor
in the Graph pane on the pin of the parent event (the colour of the pin
should turn to purple), then click on the left mouse button and while holding
the button, drag the mouse so that a line is drawn that connects the parent
pin to the child event pin. When you release the mouse button the "Insert
connection" window will open in which the parent and child event should
appear in their respective boxes.
Deleting blocks can be done in several ways. In the Table pane,
you can stand on the row that you wish to delete, then either click on
the right mouse button and select Edit and Delete block, or press the Delete
shortcut button on the tool bar, or choose Edit on the menu bar the select
Delete. The EAT Builder presents the information regarding the block that
is to be deleted and prompts you to confirm the deletion by selecting "OK".
Deleting blocks can also be done in the Graph pane. Change the mode
to "Delete block" by either pressing the right mouse button in the Graph
pane and selecting Tools and then Delete block, or through the "Delete
block" shortcut button on the tool bar, or by selecting "Tools" on the
menu bar and clicking on "Delete block". The cursor shape should change
(see Figure 3.7). Double-click on the block you wish to delete.

Figure 3.7: The shape of the "Delete block" cursor in the Graph pane
Deleting connections - is done in the Graph pane. Select the
"Delete connection" tool (using the right mouse button or the shortcut
button or through the Tools option on the menu bar). The cursor shape in
the Graph pane should look like Figure 3.8.

Figure 3.8: The shape of the "Delete connection" cursor
Click on the pin of the parent event. The "Delete connection"
window that is opened displays the information about the connection that
will be deleted. If necessary, change the specification of the Parent and/or
child event so that the correct connection is selected, and click on "OK"
to confirm the deletion.
Modifying blocks and connection using the "Modify Block" and
the "Modify connection" tools one can change the timing specifications
of events. To open the "Modify block" window either stand on the appropriate
row in the Table pane, click on the right mouse button and select Edit
then Modify block. Or, select the "Modify block" tool and double-click
in the Graph pane on the block to be modified. In the "Modify block" window,
the Delay boxes of the Onset and Offset of the event can be edited, thus
changing the timing of the event. Using the "Modify connection" tool, you
can open the "Modify connection" window, by double-clicking on the pin
of the parent event. In this window, you can select the connection whose
timing you want to modify (by choosing the appropriate Parent and child
events), and edit the timing in the Delay box.
Note: modifying blocks and connection only allows editing the
timing of events. Modifying other features, such as changing the parent
event or specifying a different device is NOT possible. To do that, one
needs to delete the block (or connection) and create a new one in its place.
Changing the EAT code it is possible to modify the EAT file
by editing the code in the Code pane. After editing, click on the right
mouse button, then select Edit and Accept (to implement the changes) or
Reject (to ignore them). Once you choose Accept the EAT builder will update
the TTS according to the changes in the code.
Modifying the timing of events via the code is relatively simple. Usually,
it involves identifying the code corresponding to the event and changing
the time value that appears there. If there are connections between blocks,
however, changing the code might sometimes result in loss of connections.
In this case, the EAT Builder will warn you and prompt you before making
the changes.
It is also possible to change the EAT file by using text utilities in
the Code pane. For example, Ctrl+C copies a highlighted section and there
are shortcut buttons on the tool bar for cutting, pasting etc. This allows,
among other things, to copy and paste events from other EAT files. However,
the EAT Builder will generate an error message (after you choose Accept)
if a pasted text contains devices and/or variables that are not declared
properly. That is to say, information regarding variables and devices that
appear in the pasted text should be declared in the "subclass", "configure
experiment" and "trial description" tabs. Thus, these tabs also needs to
be copied. In other words, working directly in the Code pane requires more
than rudimentary understanding of EAT.
Also good to know: your last action in the Code pane can be undone
by Ctrl+Z
Saving changes all changes (including modifications in the
Code pane) need to be saved by clicking on the "Save" shortcut button or
by selecting File (on the menu bar) and Save.
Note: the experiment subclass name, which appears under the subclass
tab can NOT be changed in the Code pane. See the section about "Changing
trial name" on how to modify it.
Declared devices the devices used in the trial can be seen
by clicking on Trial on the menu bar then selecting Devices. In the Devices
window (Figure 3.9), a long list containing all the possible devices is
displayed (under Alias).

Figure 3.9: The Devices window
As you can see, devices are grouped according to type (Tone device,
Speech device etc
) with mostly a maximum of 4 possible devices per group.
If a device is used in the trial, its name will appear under the Name column.
To add a device, select the row that has the Alias of the device you
wish to add, then click on "Insert". In the Insert Device window, select
the name of the device you wish to add (see Figure 3.10 for an example).
As long as no block using this device is specified in the TTS, the first
column in this table will say "N". Click on "OK" to confirm the adding
of the device. The device Alias and name will be declared in the EAT code,
which can be seen under the Configure Experiment tab. Of course, it is
also possible to change the code in this tab, and the Devices table will
be updated accordingly (if you select Accept).

Figure 3.10: Inserting a device
To delete a device, select its corresponding row in the Devices table,
click on the right mouse button and choose Delete (see Figure 3.11). If
a device is used in an event in the trial (has a "Y" in the first column
) it cannot be deleted this way. It is also possible to delete the device
declaration in the Code pane.
Figure 3.11: Deleting a device
The "Move up" and "Move down" buttons can be used to change the Aliases
of devices within each group.
Declared variables similar to the Devices table, the variables
declared and used in the experiment can be seen in the Variables table
(Figure 3.12), which is accessed by clicking on Trial on the menu bar and
selecting Variables. In this table, the first column points to the field
in the SSF file in which the variable can be found. The second column indicated
whether the variable is used in the trial. The third column lists the variables
name.
Figure 3.12: The variable window
To insert a new variable, click on the "Insert" button. In the "Insert
variable" window, the entered name of the variable is automatically adjusted
to a compatible name. The field in the SSF file in which the variable points
to also needs to be entered. The variable name and its position will be
declared in the EAT code under the "subclass" and "trial Description" tabs.
To change a variables name, select the row with the variable to be
changed, click on the right mouse button and select "Modify" (see Figure
3.13), or press the "Modify" button.

Figure 3.13: Modifying a variables name
In the "Modify variable" window (Figure 3.14) fill in the new variable
name and click on "OK" to confirm. The variables name will be changed
in all places in the EAT code.

Figure 3.14: The Modify variable window
To change a variables position, select that variable and use the "Move
up" and "Move down" buttons. Variables that are not used can be deleted
with the "Delete" button.
Changing the trial name if you wish to save an EAT file under
a different name this can be done by carrying out the following steps:
-
Click on Trial on the menu bar and select "Name". Enter the new name in
the Name window (Figure 3.15) and click on "OK".
-
Click on File on the menu bar and select "Save As
". The name of the file
will by default be the new trial name.

Figure 3.15: Changing the trial name
Another different way of saving an EAT file under a different name is
to open the EAT file in a text editor, change the internal name (that appears
on the first line after "#") and save the file under the same name (see
an example in chapter 1, Task 6).
The "Insert block" Window
In this section the different options and menus of the "Insert block"
window will be presented. In Chapter 1 you can find a general description
of this window. Here we will specifically describe the options appearing
in the "Identity" and "Parameters" sections.
Groups, Devices and Blocks
-
In the identity section, under "Alias", one of the 13 device groups
needs
to be chosen (some device groups include only one device, so officially
they are not a group, but thats a small detail). The following table shows
the available device groups and their type:
| Group Name |
Type of device |
Used for
|
| ToneDevice |
Acoustic |
Generating tones of different frequencies |
| SpeechDevice |
Acoustic |
Playing sound files |
| GraphicDevice |
Visual |
Presenting pictures, text and videos |
| ReactionDevice |
Reaction Devices |
Recording the subjects reactions |
| AuxDevice |
Reaction Devices |
Experimenter-paced experiments |
| ToneReadDevice |
Pulseread |
Reading trigger pulses from (stimuli) tape |
| TimerDevice |
Timer |
Measuring time |
| FeedbackDevice |
Feedback |
Information about the ongoing experiment |
| SystemDevice |
System Control |
Controlling the experiment |
| ResultDevice |
Results |
Writing the experiment data on hard-disk |
| TTLInDevice |
TTL |
Controlling interaction with other devices |
| TTLOutDevice |
TTL |
Controlling interaction with other devices |
| SpecialDevice |
Special Devices |
Eye-tracking and EEG experiments |
-
Next, in the "Name" box, the specific device of the group needs to be chosen.
The next table shows the available options, per group.
| Device group |
Device Name |
Used for
|
| ToneDevice |
PulseFixed |
A NESU-box generated tone |
| ToneDevice |
PulseVariable |
Generating a tone in a speech-server set-up |
| ToneDevice |
PCSpeaker |
a PC generated tone |
| SpeechDevice |
SpeechIO |
Playing a sound files of WAV format |
| GraphicDevice |
Vga |
Presenting pictures and text on the screen |
| GraphicDevice |
Video |
Presenting a video segment |
| ReactionDevice |
SingleBox |
A single key button box |
| ReactionDevice |
DualBox |
A reaction box with two buttons |
| ReactionDevice |
KeyBoard |
Experimenters keyboard |
| ReactionDevice |
VoiceKey |
Voice key response |
| ReactionDevice |
Mouse |
Response with mouse |
| AuxDevice |
AuxBox |
Experimenters device (e.g., button box) |
| ToneReadDevice |
ToneRead |
Reading trigger pulses from tape |
| TimerDevice |
Timer |
Measuring time |
| FeedbackDevice |
ExperimentatorMonitor |
Give feedback on experimenters monitor |
| FeedbackDevice |
SubjectMonitor |
Give feedback on subjects monitor |
| SystemDevice |
Cpu |
Controlling the experiment |
| ResultDevice |
HardDisk |
Writing the experiment data on hard-disk |
| TTLInDevice |
BitIn |
Controlling interaction with other devices |
| TTLOutDevice |
BitOut |
Controlling interaction with other devices |
| SpecialDevice |
EyeTracker |
Eye-tracking experiments |
| SpecialDevice |
Eeg |
EEG experiments |
-
Finally, in the "Block" box, the type of action that is to be done with
the selected device needs to be chosen. Certain actions require defining
certain parameters. These parameters appear in the "Parameters" section.
The Parameter Section
The first line in the parameter section (parameter #0) shows the name
of the action that has been chosen (in the Argument column). If that action
requires defining a variable, the default variable name appears in the
"Value" box. For instance, when choosing the action "load" for a VGA device,
the default variable name is "anImage". This name appears in the "Value"
box. Defining this variable means that there is a specified field in the
SSF file which this variable points to. If the variable has not yet been
defined, this needs to be done with the "Insert variable" window which
can be opened either through the "Variables" button on the bottom of the
screen (see Task 6 in the tutorial on Chapter 1 for an example) or by standing
in the "Value" box, clicking on the right mouse button and selecting "Insert
variable". The name of the variable to be defined will appear (see Figure
3.16). If you select it, the "Insert variable" window will open.
Figure 3.16: Inserting a variable
It is also possible to enter a constant value in the "Value" box. For
instance, the action of loading a visual stimuli might have fixation.BMP
entered in the "Value" box. This would mean that the same file will always
be loaded with this action.
If the chosen action does not require a variable, the word "nil" appears
in the "Value" box for that action.
In the following section the actions that can be done with each of the
devices are presented. Actions that are used often in many settings are
and explained along with the required parameters (if there are any) and
their default values.
Tone Device
| Device Name |
Block |
Action |
Parameters |
| PulseFixed |
startGenerator |
Generating a tone |
aGenerator |
| PulseVariable |
generate |
Generating a frequency |
Frequency (in Hz) |
| PCSpeaker |
startGenerator |
Generating a frequency |
aFrequnecy |
The startGenerator action of the PulseFixed device requires defining
a variable (default name aGenerator) that points to a SSF position specifying
the kind of generator to be used. In principle, there are 4 possible tone
generators, but their availability depends on the type of box used in the
experimental setting. The most commonly used generators are 1 (warning
signal to subject) and 2 (voice key trigger to DAT).
The "generate" action of the PulseVariable device is meant only for
settings that use a speech server (do not use this option in the Nijmegen).
This action requires entering the frequency of the tone to be generated
(default is 1000 Hz). The startGenerator action of the PCSpeaker device
requires defining a variable (default name aFrequency) which points to
the SSF position where the frequency to be generated can be found.
Speech Device
| Device Name |
Block |
Action |
Parameters |
| SpeechIO |
load |
loading a sound file |
aSegment |
| SpeechIO |
play |
playing the loaded file |
aSegment |
| SpeechIO |
out |
load and play |
aSegment |
The action of loading a audio file requires defining a variable (default
name aSegment), which points to the SSF position containing the name
of the file to be loaded. Of course, it is also possible to enter the name
of a sound file, as a constant, if you always want to load the same file.
The "play" action plays a loaded file (default is aSegment). Make sure
the value for the play action points to the loaded file that you wish to
play (this is especially important if you have loaded more than one file).
The "out" action combines the load and play actions, i.e., performs them
both one after the other. Choose the "out" action only if there are no
accuracy restrictions on the timing of the action.
Graphic Device
| Device Name |
Block |
Action |
Parameters |
| Vga |
load |
loading a visual stimulus |
anImage |
| |
load |
loading a visual stimulus |
plane number (default is 1) |
| |
load |
loading a visual stimulus |
horizontal position (default is 200) |
| |
load |
loading a visual stimulus |
vertical position (default is 40) |
The action of loading a visual requires defining a variable (default
name anImage), which points to the SSF position containing the name of
the file to be loaded (or a constant file name). On the second line in
the "Parameters" section, the name of the plane onto which the stimulus
is loaded appears (parameter #1).
If you scroll down the "Parameters" section, you see that the horizontal
(xOffset) and vertical position (yOffset) can be entered (parameters 2
and 3). That is to say, you can control where on the screen the stimulus
is loaded (the default is the middle of the screen). To change the position
of the loaded stimulus, choose the small white rectangle on the left of
xOffset or yOffset and enter the new value (see Figure 3.17 for an example).
Figure 3.17: changing the screen position of the image
| Device Name |
Block |
Action |
Parameters |
| Vga |
showPlane |
presenting a loaded stimulus |
anImage |
| Vga |
showPlane |
presenting a loaded stimulus |
foreground colour (default is white) |
| Vga |
showPlane |
presenting a loaded stimulus |
background colour (default is black) |
With the showPlane action you can display the image that has been loaded.
The first parameter you need to enter is the variable name. You can also
change the foreground and background colours (default is white and black).
At the end of this chapter you can find a table specifying the values for
some colours.
| Device Name |
Block |
Action |
Parameters |
| Vga |
display |
loading and showing a stimulus (use only if
no timing accuracy is not required) |
anImage, horizontal and vertical position, foreground
and background colours |
| Vga |
hidePlane |
end the stimulus display |
plane number (default is plane 1) |
| Vga |
unload |
unload an image |
anImage, horizontal and vertical positions |
| Vga |
textDisplay |
display a text |
aText, horizontal and vertical positions |
The action of textDisplay requires defining a variable (e.g., aText)
pointing to the SSF position where the text to be displayed appears.
| Device Name |
Block |
Action |
Parameters |
| Vga |
clearScreen |
clearing screen |
nil |
| Vga |
waitForRetrace |
wait for screen beam to reach top of screen |
nil |
| Vga |
startVideoTimer |
start a very accurate timer |
nil, horizontal and vertical positions, factor,
format |
| Vga |
stopVideoTimer |
stop the timer |
nil |
The waitForRetrace action is needed used mostly in settings with very
short SOA.
| Device Name |
Block |
Action |
Parameters |
| Vga |
loadAreas |
present a few pictures on the screen |
aDictionary |
| Vga |
displayRepeat |
rapid successive presentation of stimuli |
anImage, delay, horizontal and vertical positions |
| Vga |
movingPicture |
display a moving picture |
anImage, horizontal and vertical positions,
x and y displacement, colours, interval |
The action of displayRepeat is mostly used for dislaying a few words
after each other (e.g., to make a subject read a sentence).
The movingPicture action allows to present a picture so that it gives
the impression of motion. The horizontal and vertical positions (xOffset
and yOffset specify the initial position. The x and y displacements specify
the end position. The picture moves from the initial point to the end point
in a straight line and with equal steps.
| Device Name |
Block |
Action |
Parameters |
| Video |
play |
start a video display |
aTimeCode |
| Video |
stop |
stop the video |
nil |
Reaction Device
| Device Name |
Block |
Action |
Parameters |
| SingleBox |
enable |
enable the reaction device |
nil |
| DualBox |
enable |
enable the reaction device |
nil |
| KeyBoard |
enable |
enable the reaction device |
nil |
| VoiceKey |
enable |
enable the reaction device |
nil |
| VoiceKey |
enableOffset |
the offset of the voice key is marked |
nil |
| VoiceKey |
setRetriggerTime |
set the time allowed between triggering of voice
key |
default is 200 ms |
When working with reaction devices, reaction time (RT) is measured from
the moment the device has been enabled until the device is triggered, i.e.,
a response has been given. The enableOffset action is used when?
After a voice key has been triggered, there is by default 200 ms in
which re-triggering is not possible. To change this value, use the setRetriggerTime
action.
| Device Name |
Block |
Action |
Parameters |
| Mouse |
enable |
enable the reaction device |
nil |
| Mouse |
enableRepeat |
note when the cursor is in a certain screen
area |
nil, Contain cursor in Areas Plane |
| Mouse |
dragDrop |
enable dragging of objects on screen |
nil, plane number |
Aux Device
| Device Name |
Block |
Action |
Parameters |
| AuxBox |
enable |
enable the auxiliary device |
nil |
The AuxBox most commonly refers to a push-button box that is used by
the experimenter in experimenter-paced experiments.
Tone Read Device
| Device Name |
Block |
Action |
Parameters |
| ToneRead |
enable |
enable the tone read device |
|
| ToneRead |
enableOffset |
marks end of tone |
|
The Tone Read device is used mostly in settings where a DAT tape contains
tones on one channel that indicate when a certain event should begin.
Timer Device
| Device Name |
Block |
Action |
Parameters |
| Timer |
start |
start timer |
nil |
Feedback Device
(In the following section ExpMon stands for ExperimentatorMonitor and
SubMon for SubjectMonitor)
| Device Name |
Block |
Action |
Parameters |
| ExpMon |
reportTrial |
reports trial response and specifications |
nil |
| ExpMon |
reportStatistics |
show computed statistics (N, mean) about reaction
time |
Reaction Device |
| ExpMon |
reportErrors |
show computed statistics (N, mean) about errors |
Reaction Device |
| ExpMon |
reportAllTrials |
final report of all presented trials |
nil |
| ExpMon |
reportDuration |
?? |
Reaction Device |
| ExpMon |
clearStatisticsReportPane |
clears statistics from window |
nil |
| ExpMon |
clearDataReportPane |
clears trial data from window |
nil |
| SubMon |
reportIfError |
present an error message |
Reaction Device, message, plane number, position |
| SubMon |
textDisplay |
show text string |
aText, plane number, position |
| SubMon |
reportSubjectNames |
show the subject names?? |
Reaction Device, plane number, position |
| SubMon |
reportStatistics |
show computed statistics (N, mean) about reaction
time |
Reaction Device, plane number, position |
| SubMon |
reportTotalErrors |
show computed statistics (N, mean) about errors |
Reaction Device, plane number, position |
| SubMon |
ifRtGt |
show a message if reaction time is in specified
value range |
value range, Reaction Device, message, plane
number, position |
NOTE: Statistics of reaction time and errors are computed by
System Device and reported by Feedback device.
System Device
| Device Name |
Block |
Action |
Parameters |
| Cpu |
suspend |
suspend experiment |
nil |
| Cpu |
interact |
enable suspending the experiment or stopping
after current trial |
nil |
| Cpu |
stopTrial |
stop the current trial |
nil |
| Cpu |
clearTrialErrors |
set error count to zero |
Reaction Device |
| Cpu |
clearTotalErrors |
set total error count to zero?? |
Reaction Device |
| Cpu |
doStatistics |
add current trial data to computed reaction
time statistics |
Reaction Device |
| Cpu |
doAllStatistics |
compute reaction time statistics about the whole
experiment |
Reaction Device |
| Cpu |
clearStatistics |
reset statistics to zero |
Reaction Device |
| Cpu |
IfErrorSwitchTrialStack |
switch to other SSF file in case of error |
aFileName |
| Cpu |
doErrorCheckOnNotEqual |
check current trial for errors and add it to
error count |
anErrorCode |
| Cpu |
doAllErrorCheckOnNotEqual |
total error count for the whole experiment |
anErrorCode |
| Cpu |
setGlobalVariable |
|
|
The suspend action, allows stopping the experiment and resuming only
after the experimenter clicks the "Resume". The interact action gives the
option of suspending or stopping the experiment.
By specifying a reaction device, one can calculate statistics of the
subjects reaction time (the doStatistics action). Usually, these statistics
are presented every few trials (using a Feedback device). Use the clearStatistics
action to reset the statistics computation. Use the doAllStatistics action
to compute reaction time statistics for all the trials.
For error counting (doErrorCheckOnNotEqual), anErrorCode variable needs
to be defined, pointing to a field in the SSF file where the correct incoming
response appears. For instance, if the Reaction Device is a Dual box, the
"correct answer" column in the SSF file should have the appropriate "<"
and ">" signs. If the recorded response is not equal to that sign, the
trial is marked as an error. As with reaction time statistics, the error
count is usually presented every few trials (with a Feedback device). Use
the clearTrialErrors action to reset the count.
Result Device
| Device Name |
Block |
Action |
Parameters |
| HardDisk |
reportTrial |
save current trial specifications and response |
nil |
| HardDisk |
reportAllTrials |
save all responses at end of session |
nil |
TTL In Device
| Device Name |
Block |
Action |
Parameters |
| BitIn |
enable |
|
aBit |
| BitIn |
enableOffset |
|
aBit |
The TTL In Device generates digital pulses which are used (usually in
EEG experiments) to synchronise devices.
TTL Out Device
| Device Name |
Block |
Action |
Parameters |
| BitOut |
bitOut |
|
aBit |
Special Device
| Device Name |
Block |
Action |
Parameters |
| EyeTracker |
insertTrial |
|
nil |
| EyeTracker |
insertPlafile |
|
anImage |
| EyeTracker |
defSample |
|
|
| EyeTracker |
defEvent |
|
|
| EyeTracker |
startRecording |
|
|
| EyeTracker |
insertTimeRef |
|
|
| EyeTracker |
insertMessage |
|
|
| Eeg |
markSampleCondition |
|
|
| Eeg |
markSampleOnset |
|
|
| Eeg |
markWordOnset |
|
|
| Eeg |
markSampleOffset |
|
|
Colours in NESU
| 0 |
Black |
0 |
0 |
0 |
| 1 |
Blue |
0 |
0 |
255 |
| 2 |
Green |
0 |
255 |
0 |
| 3 |
Cyan |
0 |
255 |
255 |
| 4 |
Red |
255 |
0 |
0 |
| 5 |
Magenta |
255 |
0 |
255 |
| 6 |
Brown |
128 |
128 |
0 |
| 7 |
LightGray |
192 |
192 |
192 |
| 8 |
DarkGray |
128 |
128 |
128 |
| 9 |
LightBlue |
64 |
64 |
255 |
| 10 |
LightGreen |
64 |
255 |
64 |
| 11 |
LightCyan |
128 |
255 |
255 |
| 12 |
LightRed |
255 |
64 |
64 |
| 13 |
LightMagenta |
255 |
128 |
255 |
| 14 |
Yellow |
255 |
255 |
0 |
| 15 |
White |
255 |
255 |
255 |