![[Note]](images/note.png) | Note |
|---|---|
Remember that if, once you have set up your Arbil page, you realize that the font size is either too small or too big, you can resize it as you like it via the options included in the View menu, i.e.: Larger font; Smaller font; Reset font size. |
The Remote Corpus contains all the remote metadata. Currently it is not possible to add anything to remote corpora or edit it in general using Arbil. It is primarily used to view data and also allows you to import metadata into the Local corpus (discussed in Section 3.2) where they can then be modified.
It has a tree-like structure in which each node contains multiple sub-branches. To open any of them, click on the bullet to the left of the node representing the branch or double click the node itself. This can be repeated for the sub-branches as well. In this way you can view the whole structure of the corpus. If you click the bullet again, the node will fold back.
As far as CMDI documents are concerned, it is possible to switch to a verbatim representation of the latter in the tree. This means that the structure of CMDI documents will be shown exactly as it is, with no kind of visual simplification. In order to have such a representation, select Show verbatim XML structure in tree for CMDI from the Options menu.
If you want to use remote CMDI metadata that are not available under remote corpus, or want to link them at root level, you can add them yourself, provided that you know the URL address of this remote metadata. Right click on the Remote Corpus top node and choose Add Remote Location. In the pop-up window enter the URL and press OK. The corpus should now appear in the main list of the Remote Corpus window.

Since you might not want to use all of the collections of CMDI instances in the Remote Corpus, it is also possible to remove any of the locations of the Remote Corpus at the root level so as to only display the collections that you need. This can be done at the root level only (see figure 3.1) by right clicking on the node (e.g. for MPI corpora) and selecting Remove Remote Location. If you have removed the default location, it is always possible to re-add them to the Remote Corpus by right clicking on it and selecting Add Default Remote Locations.
To add a subnode to the root level, browse to the desired sub collection, right click on it and choose Copy. Then go back to the top node of the Remote Corpus and paste the URL in the dialogue box. The sub collection will now appear in the Remote Corpus tree.
The corpus data on the Remote Corpus may sometimes be updated by the researchers. To be sure that you are working with the newest version of the available corpus, you can update it manually on the nodes that you believe have been altered. To do this, right click on the specific collection you want to update and select Reload.
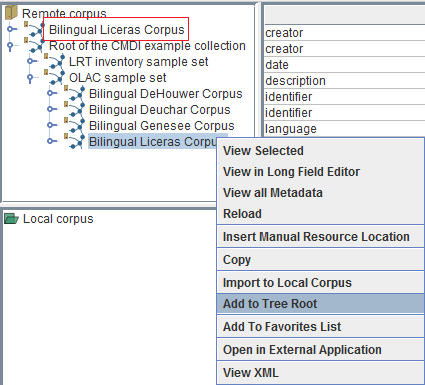
It may happen that the branch you want to work on is located at a very low hierarchical position in your remote corpus. To avoid clicking on every single node in order to get to the one you need, you can select this one, right click on it, and select the option Add to Tree Root. A copy of it will be created and placed at the top of the Remote Corpus tree, so that you will not have to look for it anymore (see Bilingual Liceras Corpus example in the figure below).
In general, the easiest way to view the information of a node is to drag and drop it from the remote corpus into the grey working area on the bottom right. It is also possible to right click on the selected node and choose View Selected. In either case, a window pops up with the desired information listed in tables. This also enables you to view multiple nodes at the same time.
To view multiple nodes, simply hold the Ctrl key on the keyboard while clicking on the desired nodes. Then drag them to the working area (or right click and select View selected). The figure below shows it.
| Note |
|---|---|
If you have an existing open table, it is also possible to add additional tree nodes of any form (i.e. collections and files). Simply drag any unselected node from the tree structure and drop it on the table. It will be automatically added to the table as a row. |

There are also two other quick ways for viewing corpus information:
(1) either you let your cursor rest above a collection or a node without clicking. Information about the collection will be displayed in the tool tip under the cursor;
(2) or you click on a corpus node. Information, if available, will be displayed in the top right frame.
When viewing information on multiple nodes, each row corresponds to one node while each column corresponds to one metadata field. By clicking on any of the column names, you can easily sort rows alphabetically within a given table.
In a table that includes several different types of nodes notice that not all the elements are described in terms of the same field; for example, there are data categories that belong to one collection but not to another. Such data fields are marked in grey and are not available; the same applies to the Local Corpus (see Section 3.2).
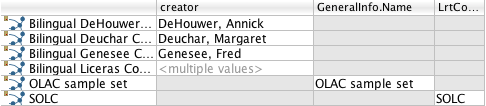
In some cases you will see that, instead of a value, in a cell in the table there is a caption: <multiple values>. This means that there is more than one value for this data category for this particular node. To see these values click on <multiple values> and a new window will pop up with the information shown.