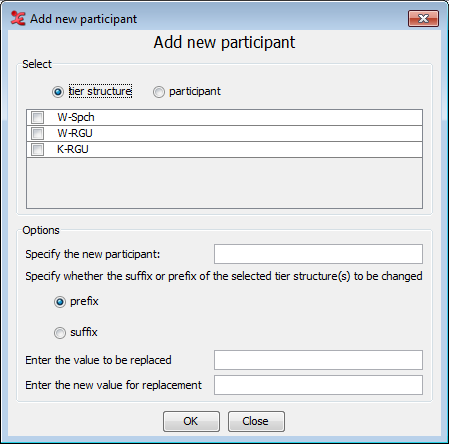
ELAN offers the possibility to create a new set of tiers for a new participant based on an already existing set of tiers. To add a new participant click on . The following Add new participant dialog window appears:
If you have not defined a tier structure, or set a first participant yet, this warning will appear:

This means you need to create a tier structure first, which is a tier with at least one child tier, or create a new tier with a participant set in the tier attributes. See Section 2.4.1 on how to create a tier structure and how to define a tier with the participant attribute set.
The new set of tiers for the extra participant can either be based on an existing tier group with all its depending tiers, or on all tiers with a specific participant attribute.
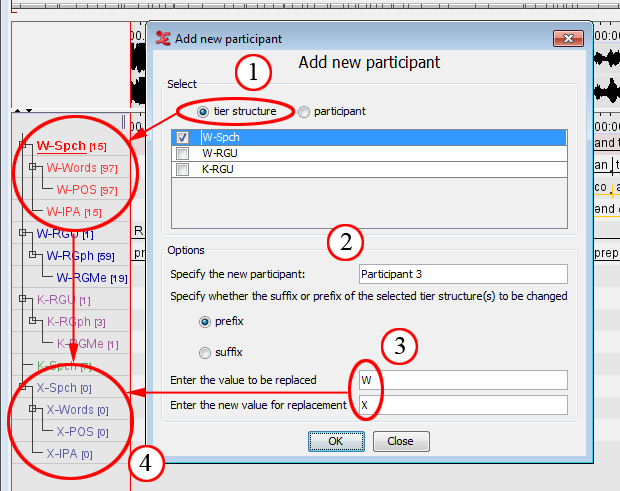
In this example, the option "tier structure" is selected (1). This means only one tier structure will be copied and used with a new participant. "W-Spch" is the selected tier structure. The name of the new participant will be "Participant 3" (2).
In this case, the prefix is changed to distinguish the new tier structure, with the value "W" being changed to "X" (3). The value to be replaced can also be left empty. In that case, the replacement value will be added to the name of the structure. By clicking "OK", the process will be started and the new tier structure for the new participant will be added to the timeline viewer (4). When this is done, you can close the dialog box.
It is also possible to add a new participant based on an existing participant. This method will copy all of the tier attributes to the new participant:
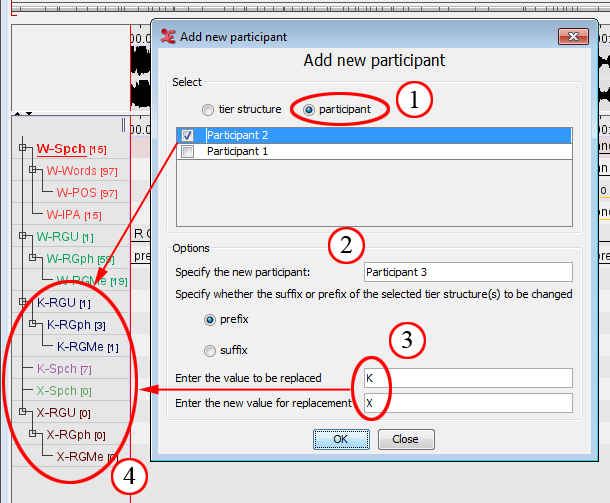
In this example, the participant option is checked (1). This means all tiers and tier structures associated with a certain participant will be copied to the new participant. In this case, the participant of whom the attributes will be copied is "Participant 2". The tiers that will be copied are the “K-RGU” structure and the “K-Spch” tier.
Next, specify a name for the new participant (2). The name will be in the tier attributes after the adding of the participant has been done. Finally, you will need to add or change the prefix or the suffix for the new tiers (3). The value to be replaced can be left empty; the value for replacement cannot. In the example, the prefix “K” is changed to “X”. When everything is set, click “OK”, the new tiers will appear in the timeline (4). After that, you can close the dialog box.
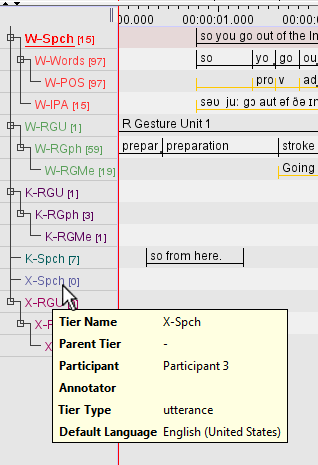
Hovering over the tier in the timeline window will show the tooltip, displaying tier info with the associated participant:
![[Note]](images/note.png) | Note |
|---|---|
|