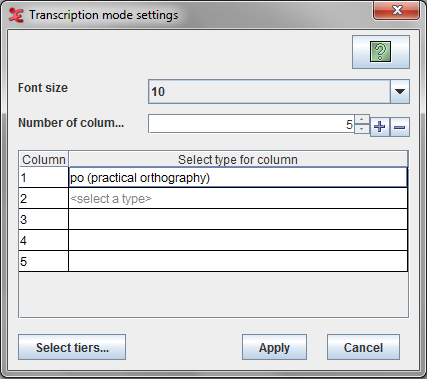
If you go to Transcription mode for the first time, a Settings dialog will come up else click on the button in the settings panel (see Figure 6.6). Here you can select the tier types and the number of columns.
Options in this dialog :
Font size : Specifies the font size for the table in the Transcription window.
Number of columns : Specifies the number of columns table in the Transcription window Use the to add a column and to remove the last column.
Settings Table
Column : Specifies the column index in the transcription table
Select type for column : Specifies the selected tier type for that column. To select a type click on the <select a type> cell in the table to get the list for available types for that column. Click on the type to select it.
button see Section 6.3.2.
![[Note]](images/note.png) | Note |
|---|---|
You select tier types, not individual tiers. This is because Transcription mode displays all annotations on all tiers of a certain type in a vertical column. |
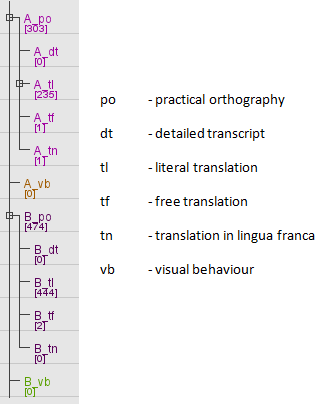
For the purposes of this description we will assume that the user is working with a file that has six main tier types:po (practical orthography), dt (detailed transcript), tl (literal translation), tf (free translation), tn (translation in lingua franca) and vb (visible behaviour). Our example file contains tiers of these types for two participants, and the overall tier structure looks like this :
In our example, we choose the type po (practical orthography) as the first column. We can leave it at that if we just want to work on the transcript. Or we can display any number of columns next to the primary one, the number of columns depends on the available linked tier types — for instance the free translations and/or a literal translations and/or detailed transcript and/or translations in lingua franca.
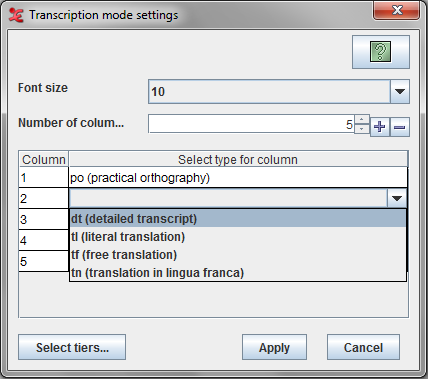
For the other columns we can only select tier types that are time-aligned with the first using the stereotype “Symbolic Association” (see Table 5.2 ). In our example, we can have maximum four columns with tier types dt (detailed transcript), tl (literal translation), tf (free translation) and tn (translation in lingua franca). We cannot choose the tier type vb (visible behaviour)here, because it is not time-aligned with our primary column. Thus the primary column type can be of any type, but the types for other columns should be somehow symbolic associated.
Having selected the tier types , click “Apply”. Now the chosen tier types are displayed in vertical columns (see Figure 6.6), and the two largest differences from the default Annotation mode become visible: (i) all annotations are displayed vertically (top to bottom) rather than horizontally (left to right), and (ii) columns display all annotations of a certain type. For instance, the po (practical orthography) column displays turns from both speakers A and B.
| Note |
|---|---|
Transcription mode presupposes that you use linguistic types to differentiate the types of information in your tiers. Thus the linguistic type of your free translation tier should be different from the linguistic type of your main transcription. |