Creating & editing lexicons
Actions for creating and editing lexicons are available in the drop-down menu. The actions always apply to the lexicon that is selected in the lexicons list and visible in the table. The actions will be discussed below.
Figure 359. The Lexicon Actions
 |
The option opens a separate window for editing lexicons and lexical entries. Especially when multiple modifications are intended, this is more convenient than the one-time use entry edit dialogs described in the section called “Editing lexical entries”. The separate Lexicon Editor is described in section the section called “The Lexicon Editor”.
To create a new lexicon from scratch choose . A new dialog will appear, allowing you to fill out details about your new lexicon.
Figure 360. Create New Lexicon dialog
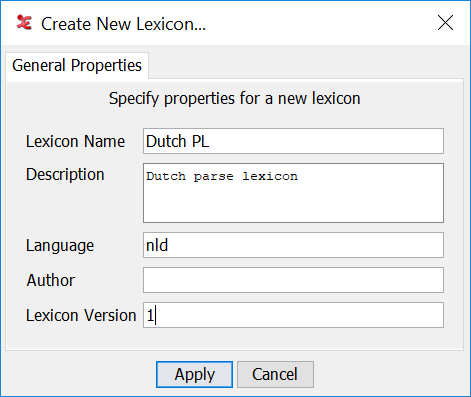
When the details have been filled out (a Name and a Language are required), click to create the lexicon. The lexicon file will be stored in a predefined folder labeled LexanLexicons inside the the section called “Special ELAN data folder”. The file name is based on the name of the lexicon and the file extension is
.xml.The option allows to open a lexicon that is already in the native format but is in a different folder. The lexicon file is then copied to the LexanLexicons folder. So, this action behaves like an import function for lexicons that don't need to be converted (e.g. a file that has been shared by a colleague).
The option closes the current lexicon, the table will be cleared and No Lexicon will be selected.
The action updates the corresponding file in the default location, if there have been any changes in the lexicon.
The option allows to save the lexicon somewhere else in the same file format, e.g. for the purpose of creating a back up file. This action is similar to the export functions but then in the native format.
The option saves the lexicon with the entries sorted as they are visible in the table of lexical entries (the lexicon framework doesn't allow to specify a custom sort order yet).
The option opens a window similar to the Create New Lexicon dialog, the properties that have been entered before can be updated or completed here. But there are two additional tabs, and , described below. Click the button to apply the changes to the lexicon.
Figure 361. The Edit Lexicon Properties window
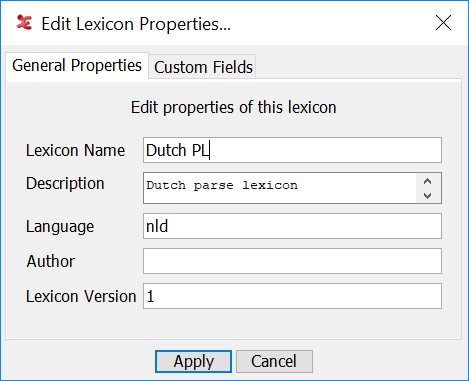
Figure 362. The Custom Fields tab
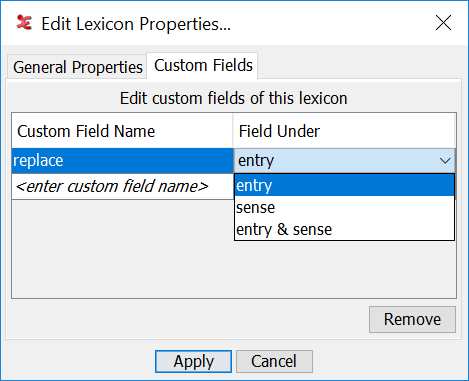
The tab allows to specify the names of custom fields (at the level of entry or sense or both) to be used in lexical entries of this lexicon.
Figure 363. The Sort Order tab
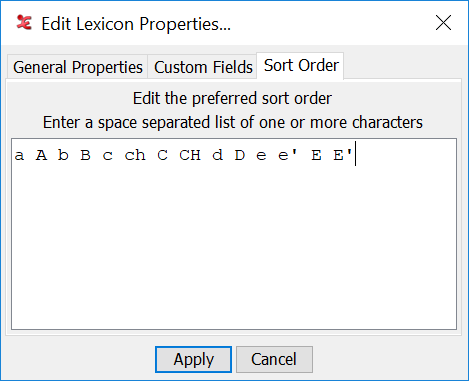
In the tab a preferred sort order can be specified by entering an ordered list of tokens consisting of one or more characters. The sort order will be applied to the lexical-unit field but also for the variant and citation fields. After changing the sort order it might be necessary to click the header of the lexical-unit column once to enforce re-sorting of the table.
![[Note]](images/note_1855015319.png)
Note It is advised to use the option to apply the new sort order to the underlying data structure as well (not only to the view). After that, new lexical entries will be inserted according to the custom sort order.
The option opens a file browser window that allows to select either a Toolbox lexicon (
.dic, .db,
                  .txt
), a lexicon in LIFT format (.lift) or a CorpAfroAs lexicon (.eafl). In case a Toolbox file has been selected, a configuration window will be shown (see below), otherwise a converter will import as much as possible from the original lexicon data into an ELAN lexicon and will add the new lexicon to the list of lexicons.Figure 364. Import Toolbox dictionary
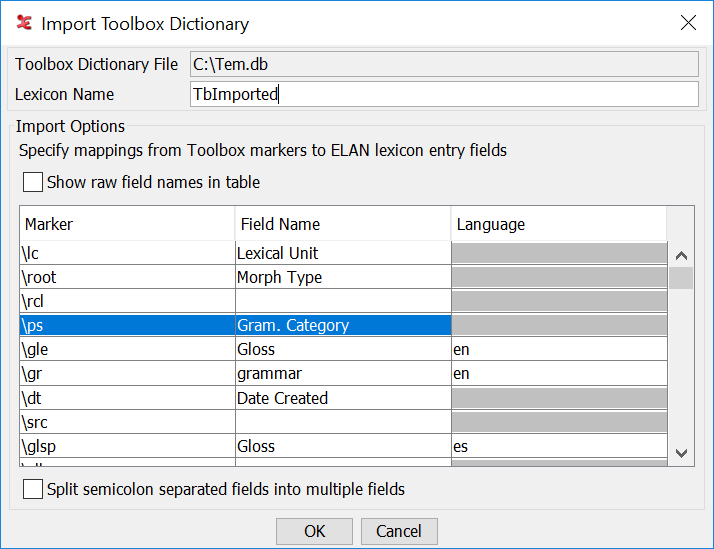
This window allows to specify mappings from Toolbox field markers to ELAN lexicon entry fields. The main element in the window is a tabel with in the first column the list of markers that have been found in the Toolbox dictionary file. In the second column the corresponding field name can be selected from a list or a custom field name can be entered (either custom-field-name or sense/custom-field-name). For some fields it will be possible to enter a language code in the third column, depending on the value in the second column. Markers that don't have a mapping in the second column will be ignored during the import process.
Other elements in this configuration window are:
The text field allows to enter a name for the lexicon. A name is required, it is also used for the file name of the lexicon.
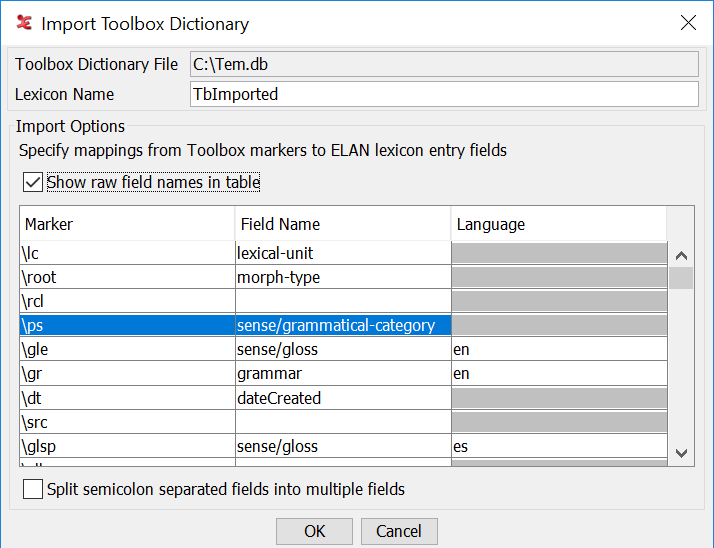
The checkbox only has an effect on how field names appear in the table, as friendly name or as their raw equivalents from the lexicon XML file.
Figure 365. Import Toolbox dictionary showing "raw" field names
The option requests the import function to produce multiple fields from a single input field, if the input contains one or more semicolon characters and if the target field is allowed to appear more than once in an entry (e.g. the input has multiple gloss values separated by semicolons).
After clicking the button several warning messages might be shown, e.g. if required information is missing, if a required field has not been selected in the second column (e.g. lexical-unit) or if a field has been selected more often than allowed.
The action only supports conversion to LIFT format.
| Note |
|---|---|
There is currently no Undo/Redo mechanism for lexicon edit actions! |
| Note |
|---|---|
If multiple transcription windows are open, using the same lexicon, modifying the lexicon should preferably be done in only one window. On Windows there is no guarantee that all windows are updated correctly after a change in a lexicon made in a different window! |
| Note |
|---|---|
More documentation about the structure of lexical entries, about which fields are required, what is hard-coded etc. will follow. The same for native, import and export formats etc. |