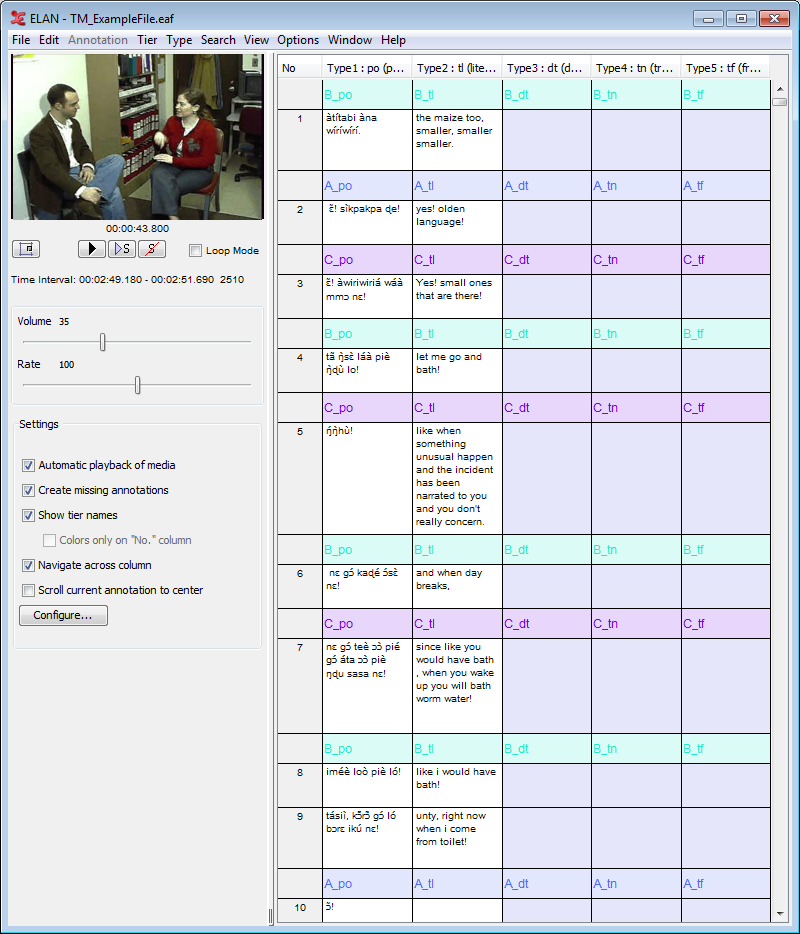
Transcription mode is built for high-speed transcription work. Once you have selected the tier types for the columns , the table is loaded with the tiers of the selected types. Clicking on button in the settings dialog(see Figure 3.2) will bring this window:
Options available in this window :
 : Press this button to toggle the video/settings panel from
left to right and vice versa. The video can also be detached for viewing
independent of the main window. Do to this, right click on the video and click
.
: Press this button to toggle the video/settings panel from
left to right and vice versa. The video can also be detached for viewing
independent of the main window. Do to this, right click on the video and click
. : Play/pause button for the media.
![[Note]](images/note.png)
Note The other media player options like, go to next of previous second/pixel/frame are only available as shortcut actions. To see the shortcuts used for this action, go to menu -> and select transcription mode.
 : Play/pause the selection made.
 : Clears the selection.
Loop mode : If checked, plays the media of the selected annotation constantly in a loop until a new annotation is selected. Default: unchecked.
Options in Settings Panel
Automatic playback of media : If checked, the annotation is automatically played when it enters into edit mode, else you can manually play the media using TAB or SHIFT+TAB (for details see Section 3.3.10). Default: checked.
Create missing annotations : If checked, you will be able to create new annotations by double-clicking an empty column. If unchecked, you can only alter the existing annotations.
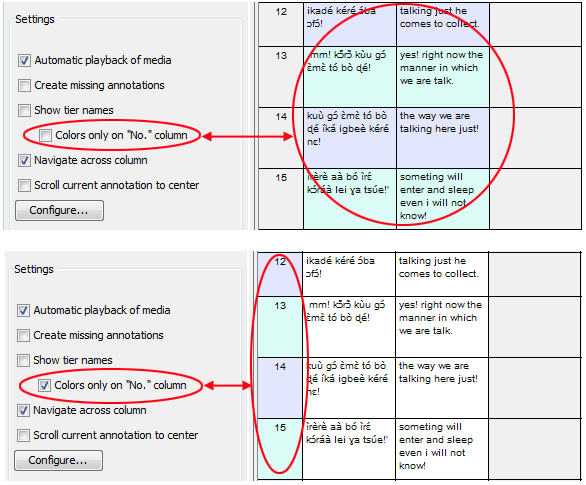
Show tier names :If checked, the tier names are shown in the table and hovering over an annotation will give you the time interval of that (see Figure 3.14). If unchecked, colour coding distinguishes different tiers/participants, and hovering over an annotation will give you the tier/participant name (see Figure 3.15). Default: checked.
Colors only on the "No" column : If the show tier names is unchecked, you can choose whether the color distinction should be displayed all over the table or only in the "No" column. If checked, color difference made only in the "No" column, else the whole table has the color differentiation. Default: unchecked.
Navigate across column : This controls the behaviour of the ENTER i.e. decides whether to move to the next annotation in the same column or to move across the columns. If checked, you move across columns (from left to right). If unchecked, you move only within a column (from top to bottom). Default: unchecked.
Scroll current annotation to center : If checked, this mode keeps your current annotation always in the middle of the screen. Default: unchecked.
: Press this button to get the settings dialog (see Figure 3.2) to select new types or to change the font size or to show/hide tiers.
 : This is used to resize the video/settings panel and the
transcription table. Click and drag to resize.
: This is used to resize the video/settings panel and the
transcription table. Click and drag to resize.
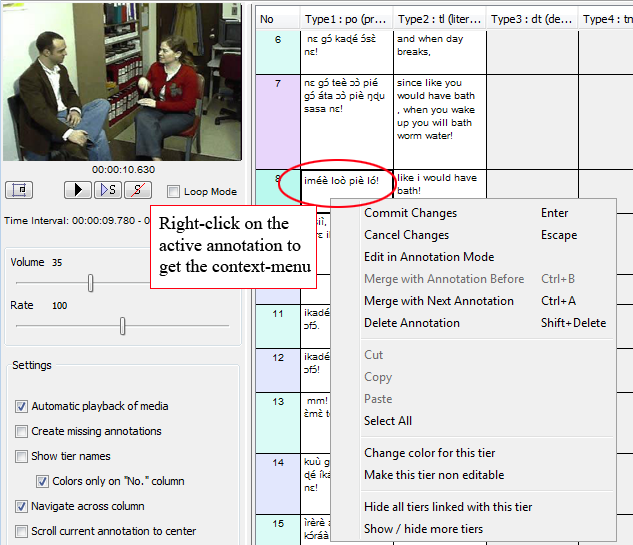
Each cell in the table is the representation of the annotation on a tier. The annotations are sorted/aligned based on the begin time of it. Clicking on any annotation(cell) activates it for editing. You can directly start typing the text for the annotation. After entering the text, press ENTERto save the changes made in the current annotation and to put the next annotation to edit mode. The Navigate across columns setting controls whether you go down within a column or you move across columns (from left to right). There are several ways to put a annotation to edit mode. A single mouse click on an annotation or a right click made on a annotation will put the annotation in edit mode and pops up the context menu below and for other keys see Section 3.3.10.
Other options available in this mode :
right clicking on annotation will popup this menu.
: Saves the changes made to the annotation
: Cancels the changes made to the annotation
: see Section 3.3.9
: see Section 3.3.8
: see Section 3.3.8
: Deletes the current annotation from the tier
: Freezes the tier in the table thus making it non editable
: Hides the group of tiers that are linked with the current editing tier
: see Section 3.3.3
All the columns are resizeable: just mouse click and drag the boundaries to fit your desired widths.
You can re-order columns on the screen simply by dragging them to the desired location.
The video can also be detached for viewing independent of the main window. Do to this, right click on the video and click .
The wav form can also be hidden if needed. You can do this by unchecking the from > > . To show the wav form check the option from the same menu.