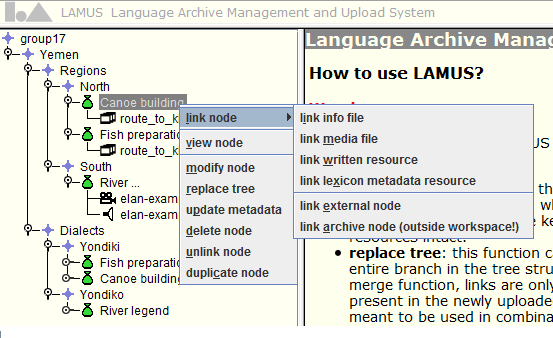
The option in the tree menu is used to link various contents to corpus nodes and/or session nodes after these have been uploaded to the unlinked files container. This transfer from the local machine or network to the LAMUS workspace is described in Section 3.2.1. If a corpus node is selected from the tree-view the following linking options become available:
: an info file can be a txt-, html- or PDF-file containing information about the corpus node.
: it allows you to link an unlinked corpus node (along with its possible content) as a child of the selected corpus node. This option is used to build the basic tree structure of a corpus.
: through this option you can link an unlinked session node (as well as its possible content) as a child of the selected corpus node. This option is used to enrich the corpus with various content (i.e. metadata, resources).
: this option allows you to link a free catalogue node, and it is used to provide a summary of the corpus.
: enter the url to the external node/resource in the designated field and specify the file type (info file, media file, written resource or annotation) from the pull down menu.
: select a node from the corpus tree presented in the main interaction window. Linking to a node that is in the workspace or to a node that is a parent, or other ancester, of the workspace top node is not allowed.
In case the user has selected a session node from the tree-view, the options for linking are:
: an info file is a txt-, html- or PDF-file containing information about the session node.
: a media file is a video- or audio-file or picture belonging to the session node.
: it allows you to link a resource other than video-, audio-files or pictures to the session node.
: enter the url to the external resource in the designated field and specify the file type (info file, media file, written resource or annotation) from the pull down menu.
: select a node from the corpus tree presented in the main interaction window. Linking to a node that is in the workspace or to a node that is a parent or other ancester of the workspace top node is not allowed.
All files, except for external nodes and any archive nodes, need to be present in the unlinked files section of the workspace before they can be linked. After the user has made his/her choice from the tree menu the main interaction window will display a list showing all unlinked files of the appropriate type. For example, if the user wants to link a session node, only the free IMDI sessions nodes are displayed; only video-, audio-files and pictures are listed if the user selects from the tree menu. Use the button to quickly select all the files in the list.
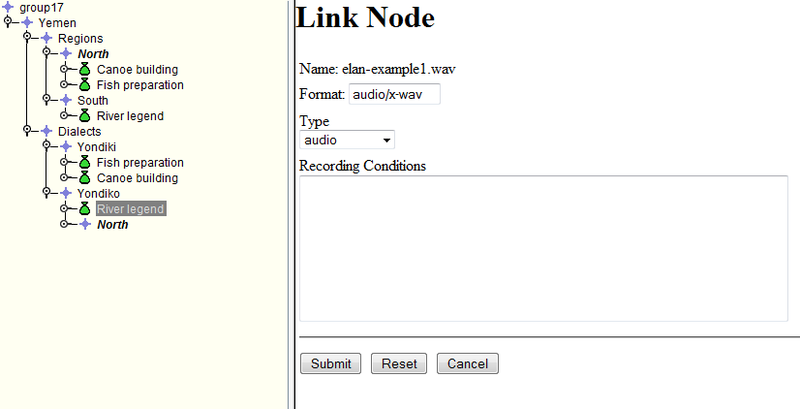
After clicking the button, the next page will display more information about the file(s). From the format pull down menu it is possible to assign various, different formats to the media file. Accepted file formats and types are listed in Appendix A. The system should recognize the used format of the files correctly; if not, the user has to choose the correct file type from the pulldown list. As the filetype is used in conjunction with other applications, it is important to choose the correct format. For example, the Access Management System can only grant read access when the proper type for the resources is used. Therefore, if the wrong format is chosen, access to these resources will be denied.
Pressing the button moves the resources from the unlinked files section to their appropriate place in the tree structure of the workspace.
Locally created corpus structures (using Arbil, http://tla.mpi.nl/tools/tla-tools/arbil/) can be linked as a whole into the tree structure, once all elements (i.e. IMDI files and resources) have been uploaded into the workspace.
Links can be created between multiple nodes. In the next example, the corpus node and its content, which are already linked to “North”, are going to be linked to “Dialects” as well. To do so, first select the target node, the one to which you want to make the second link (i.e. "Dialects" node). Hold the CTRL key and now select the source node, the one already carrying linked material (i.e. "North" node). Choose from the tree menu and click on the new page. The multiple linked node will appear in bold italic in the tree view as seen in the example below.
![[Note]](images/note.png) | Note |
|---|---|
Remember to select first the target node and then the source node. If you do it the other way round, i.e. first source node and then target node, you will get an error message. |
The same procedure applies when only certain resources need to be linked to more than one session node. Be sure to work within the boundaries of the IMDI metadata framework: corpus nodes can point to corpus nodes, session nodes and info files; session nodes can point to info, media and annotation files.
![[Note]](images/note.png) | Note |
|---|---|
If the user decides to delete a multiple linked node, the node will be deleted from every location. To prevent this, first unlink the nodes that can be removed. |


