Your structure file, also referred to as the .typ file here, consists of a list of markers and their definitions. These definitions include the information about the relation between the markers. In fact, this is the most important part of this file for the purpose of importing your lexicon into LEXUS. In Figure 1.1, you can see an example of a typical structure file viewed in a text editor.
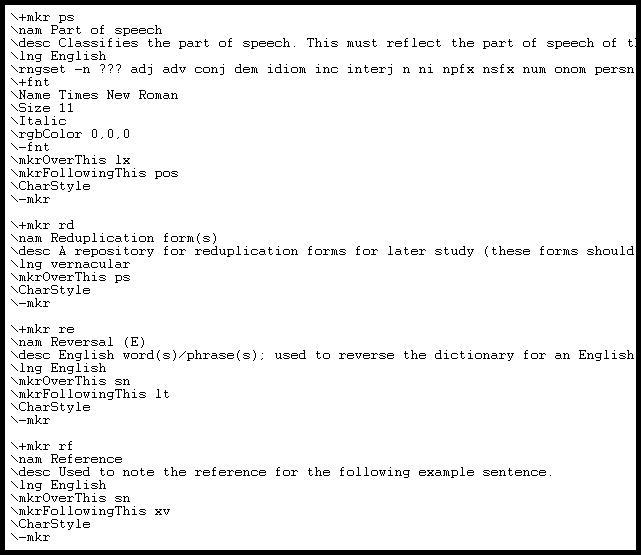
As you can see, the structure file is divided into small sections, each defining a separate marker. The markers are listed alphabetically. The first line of each of these sections identifies the marker, for instance the phrase: identifies the marker, that is . The next line gives the full name of the marker: and yet the next one gives its description: and the language in which the values appear:. Most of this information will be copied to LEXUS and therefore should be complete and correct. The line defines the possible values that this marker can have (this applies only to markers that have such closed sets of values): ... The few lines that are eclosed by: and contain the information about the font: type, size, color etc.
The most important part of the marker definition for the purpose of importing data into LEXUS is the line which specifies which marker is above the currently discussed one in the hierarchical structure. In this case, the marker that is directly above is , that is . That is how we know that the hierarchical order of these two is the following: is directly above . Similarly, all other markers are defined in the structure file, so that they all form one hierarchy. This hierarchy can be found not only in the structure file, but also in the Toolbox project itself. If you open your Toolbox project, which runs on your structure file, and go to and from this menu choose and then in the left part of your workspace all the markers for the particular entry you are looking at, will be listed and their hierarchy will be visualized by the ‘stair-like’structure (See Figure 1.2):
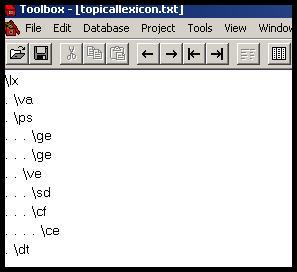
Here again you can see that , is found under , . We can also notice that it is not only the marker , but also that has been defined under This visualization of the hierarchy however is not completely clear as what we see is not the entire hierarchy that is in the structure file, but only the markers used in the particular entry. Thus, we can see that the marker is lower in the hierarchy than or ; this is apparent from the number of dots before it, as one dot separates nodes that are on different levels in the structure. But we do not know what is the precise hierarchy. In fact it could be the case that is linked under or but not directly (the number of dots shows that there is another level between them) or it could be linked indirectly under something else than or. Similarly, it is not immediately clear which marker is above : , or a different marker that did not appear in this particular entry. Toolbox shows here only the markers that have been inserted by you in this particular entry and not the underlying hierarchical structure of the whole lexicon.
Only by looking at Figure 1.2 we cannot decide what the hierarchy really is. One way to check it is to look again into the structure file, find the part that defines the relevant markers and see what is written there in the line: .
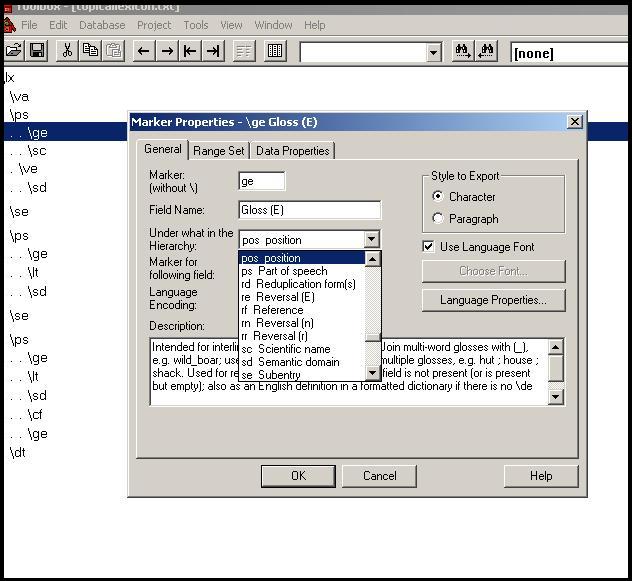
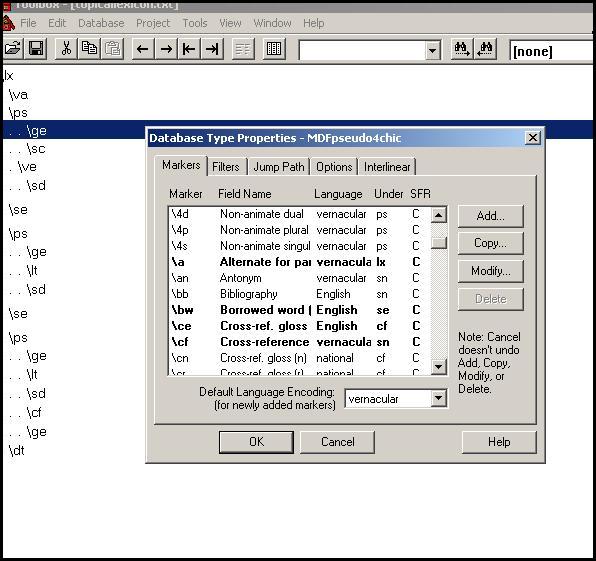
Another way to find this information in Toolbox is to right-click on the maker itself in the hierarchy. A window will pop up with all the information about the marker:

Here we can see that is actually specified under , in the hierarchy. This pop-up window is very important as it contains information about the marker: its field name, its place in the hierarchy, language encoding and definition. All these elements can be modified here. As for changing the place of a marker in the hierarchy, you simply have to click on the roll-out menu next to and choose the marker you want from the list:
This change will be automatically saved in your structure file.
It is also possible to rearrange the marker hierarchy in the structure file itself. You simply have to substitute the marker with another one. Compare the two screenshots in Figure 1.5:
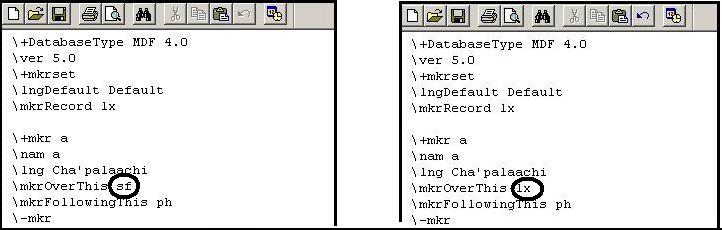
Figure 1.5. Example: Redefining the position of the marker in the .typ structure file. Before: defined under 'sf'. After: defined under 'lx'
It is important to remember to save your changes in the .typ structure file every time you do them.
The last important option in Toolbox is the possibility to view a list of all the markers that you are using. To do that, click on in the main Toolbox menu and choose from the roll-out menu. A window will pop-up with all the markers, See Figure 1.6:
Here you can see all the markers with the information about their place in the hierarchy. This window also shows which markers are actually in use (that is, which markers have at least one value specified somewhere in the lexicon). It is easy to see which markers do not fulfill this criterion - they are not written in bold font like the rest. These markers can be deleted by clicking on them and choosing the option Delete from the right panel.