ELAN offers various export options. To export, click on and one of the options.
Toolbox file (Section 4.3.2.2)
FLEx file (Section 4.3.2.3)
CHAT file (Section 4.3.2.4)
Tab-delimited text file (Section 4.3.2.5)
Tiger XML (Section 4.3.2.6)
Interlinear text file (Section 4.3.2.7)
HTML file (Section 4.3.2.8)
Traditional transcript file (Section 4.3.2.9)
Praat TextGrid file (Section 4.3.2.10)
Alphabetical list of words (Section 4.3.2.11)
SMIL clip (Section 4.3.2.12)
Clip of video file (Section 4.3.2.16)
QuickTime text (Section 4.3.2.13)
Subtitle text (Section 4.3.2.14)
Tiers for recognizers (Section 4.3.2.15)
Media clip using script (Section 4.3.2.17)
Image from ELAN Window (Section 4.3.2.18)
Filmstrip Image (Section 4.3.2.19)
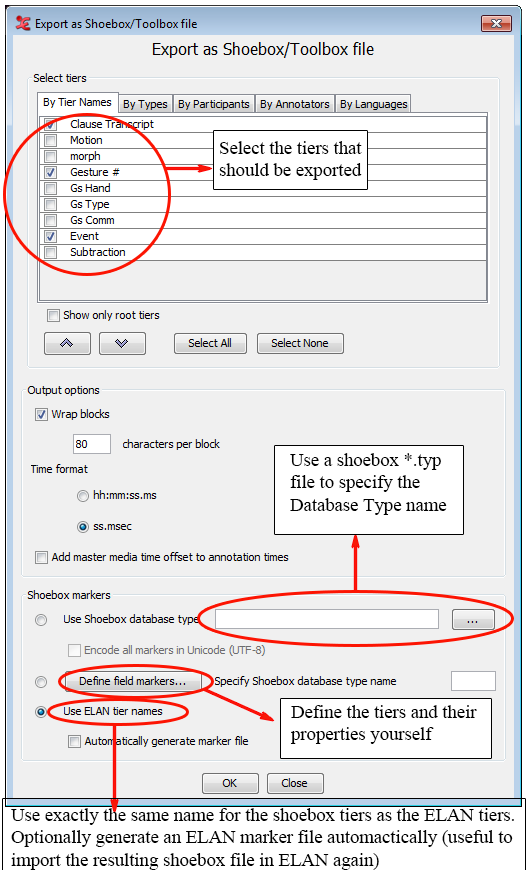
Shoebox file (Section 4.3.2.20)
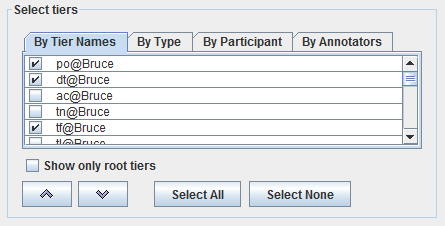
Different ways to select tiers :
By Tier Names
Select the tiers by checking the boxes before each tier name.
By Type
This tab shows a list of the linguistic types available in the current transcription. Select the types by checking the boxes before each type name. Selecting the types will select all the tiers of the each selected types. To modify the selected tiers switch back to By Tier Names.
By Participant
This tab has a list of all the participants in the transcription. Select the participants by checking the boxes before each type name. Selecting the participants will select all the tiers of the each selected participants. To modify the selected participant switch back to By Tier Names.
By Annotators
This tab has a list of all the annotators in the transcription. Select the participants by checking the boxes before each annotator name. Selecting the annotators will select all the tiers of the each selected annotators. To modify the selected tiers switch back to By Tier Names.
![[Note]](images/note.png) | Note |
|---|---|
To select multiple tiers, press Shift and click on the successive tiers or click and drag the mouse along the tiers to select them |
Other options :
To sort the selected order of tiers use the
 and
and  buttons to move the tiers up and down in the table.
 Show only root tiers : Check this option to show only the root tiers in the transcription.
: click this button to select all the boxes in the current tab.
: click this button to de-select all the boxes in the current tab.
: click on Ok to select the tiers
: click to close the dialog or cancel the changes
Similar to exporting a document to Shoebox (see Section 4.3.2.20) ELAN data can be exported to a Toolbox document with an UTF-8 encoding. This export provides more options for output customization.
To export a file into Toolbox, do the following:
Click on menu.
Click on
The dialog box appears:
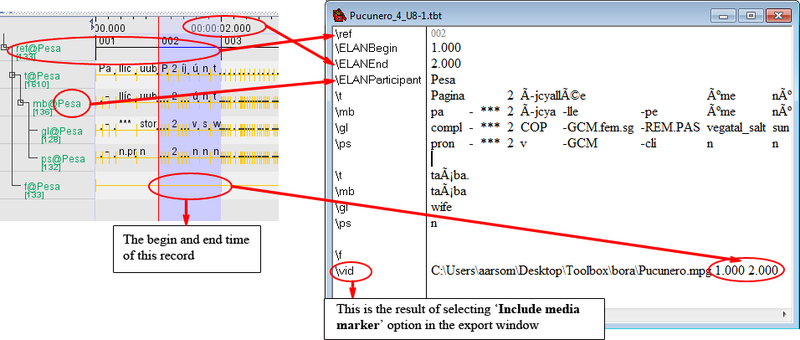
Only the left part of ELAN tier names containing an @ are identified as tier markers for Toolbox. These markers form a block in the exported file. The right part of the ELAN tier names are identified as participant names. These are exported with the marker ELANParticipant see the figure below:If you use a Shoebox *.typ file to specify the Toolbox database type ELAN extracts the database type name from the first line of the type file (e.g. the database type name Text in
\+DatabaseType Text) and puts is in the first line of the exported file (e.g.\_sh v3.0 400 Text).When there is only one root tier (tier without a parent tier) in the transcription (e.g. ref) this will be used as the record marker by default. When there are multiple root tiers "\block" will be added as record marker. In both cases it is possible to specify a custom record marker instead.
Some options not touched up in Figure 4.42:
By first selecting a tier(Section 4.3.2.1) and then selecting you insert a blank line after the selected marker every time the marker is printed in the exported file. The tier name is colored blue in the dialog box.
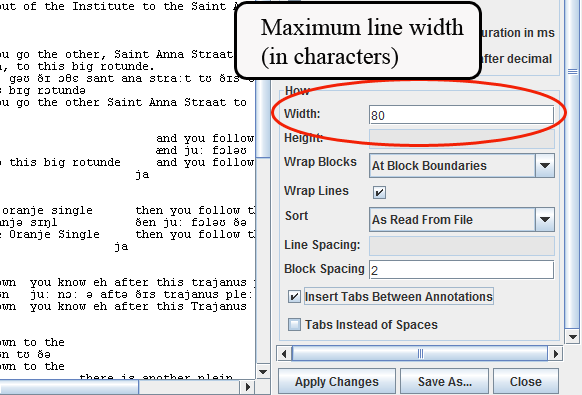
By selecting you can let ELAN wrap a whole block if one of the lines in a block is longer than a specified number of characters (default is 80 characters). A block in this context refers to the markers that are part of the interlinearization.
When is selected it is also possible to select . This applies to long marker lines that are not part of the interlinearization. There are 2 variants: when Wrap to next line is selected the line is split into 2 or more lines that immediately follow each other, regardless of their position in the record. When Wrap to end of block is selected everything beyond the first wrap is placed at the end of the record. Note that wrapped interlinearization blocks are grouped as much as possible.
When is selected all markers will be printed in each record, whether there is content or not. When this option is not selected a marker will not be printed in a record when it has no content.
By selecting you can add to the annotation times the time offset from the master media that originated from the synchronization of media files (see Section 4.2.3).
Make a choice and click on to continue.
Specify the name and directory of the exported file.
Click to export the file; otherwise click to exit the dialog box without exporting the file.
The file is exported as a
*.txt|*.sht|*.tbtfile.If there already exists a file of the same name, ELAN will ask you whether or not it should overwrite the existing file.
Open the exported file in Toolbox.
It contains the following information:
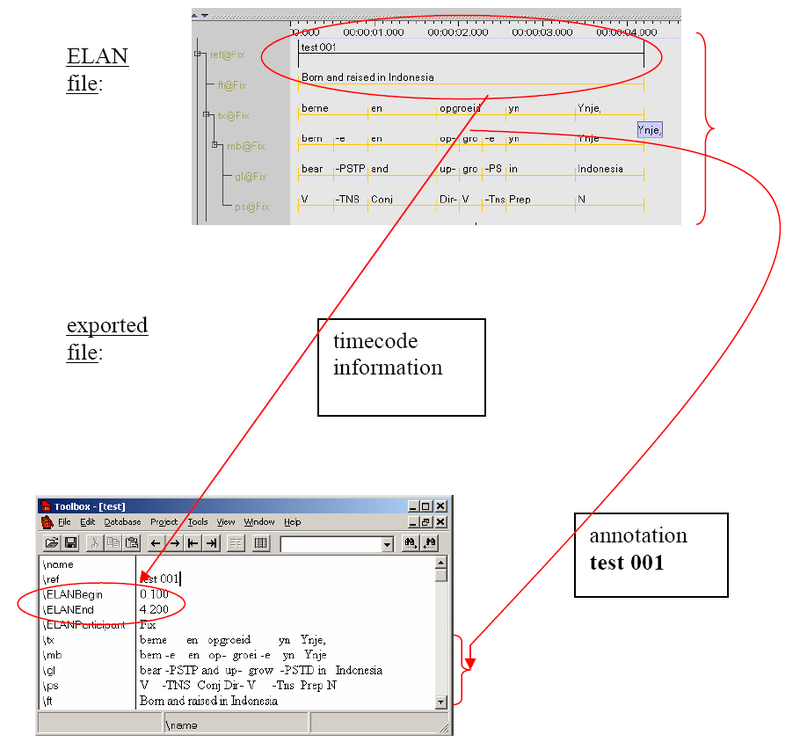
All tiers and annotations.
Each ELAN parent annotation (including all its referring annotations) corresponds to one Toolbox record. E.g., in the illustration below, the ELAN parent annotation “CLLDCh3R02S01.001” corresponds to the Toolbox record “CLLDCh3R02S01.001”.
The time code information for each parent annotation.
Each ELAN parent annotation (i.e., each Toolbox record) contains the additional field markers \ELANBegin and \ELANEnd (i.e., the begin and end time of the parent annotation).
This time code information allows you to import the Toolbox file back into ELAN, without having to manually re-align the file (see Section 4.3.1.8).

ELAN allows you to export your project to the SiL Fieldwork Language Explorer software, also referred to as FLEx.
| Note |
|---|---|
If your .eaf file contains multiple participants, make sure you have given each participant a name value. You can set a participant value under . |
Choosing will give you the following screen:
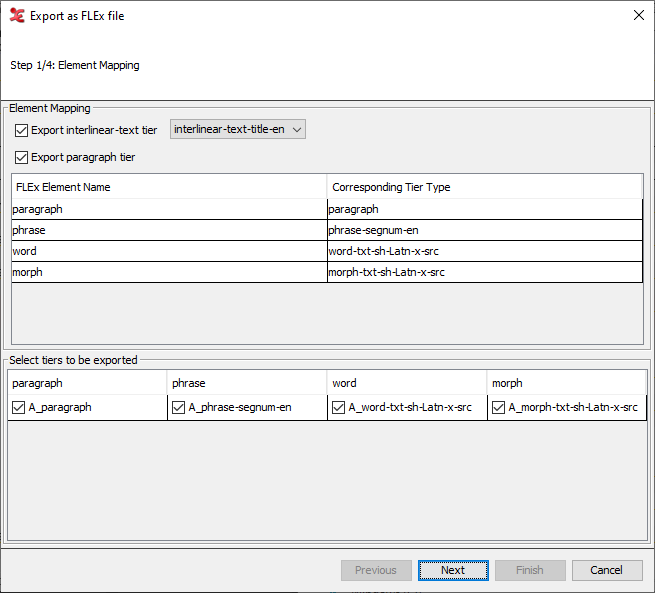
In this screen, you can map which linguistic type corresponds to which FLEx element, and you can select which tiers should be exported.
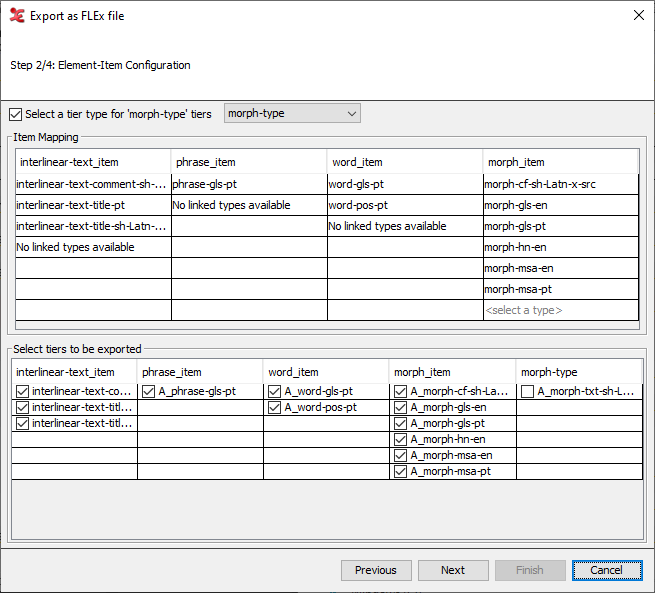
The second screen allows you to map the items to the correct element, and what tiers should be exported as that item.
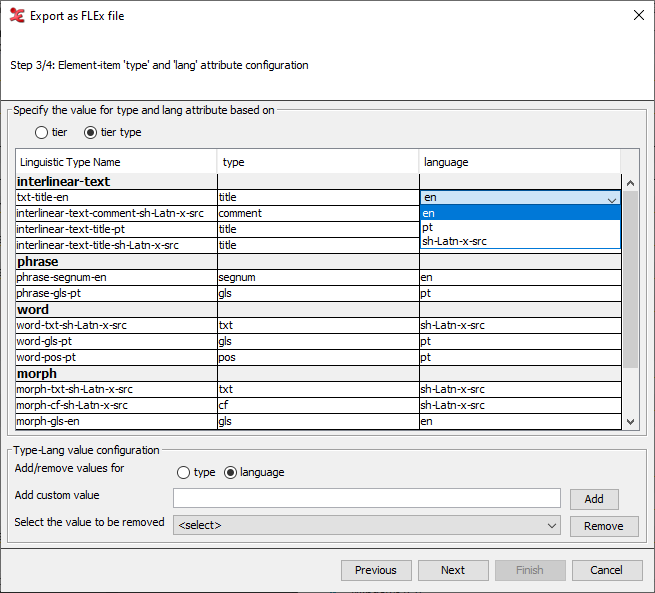
In the third screen, you can set the language and type attributes for either the tiers or the linguistic types. You can also add or remove values if needed. For more information on the structure of FLEx, see Figure 4.27.
The final screen allows you to save the file as a flextext file, so it can be used in FLEx.
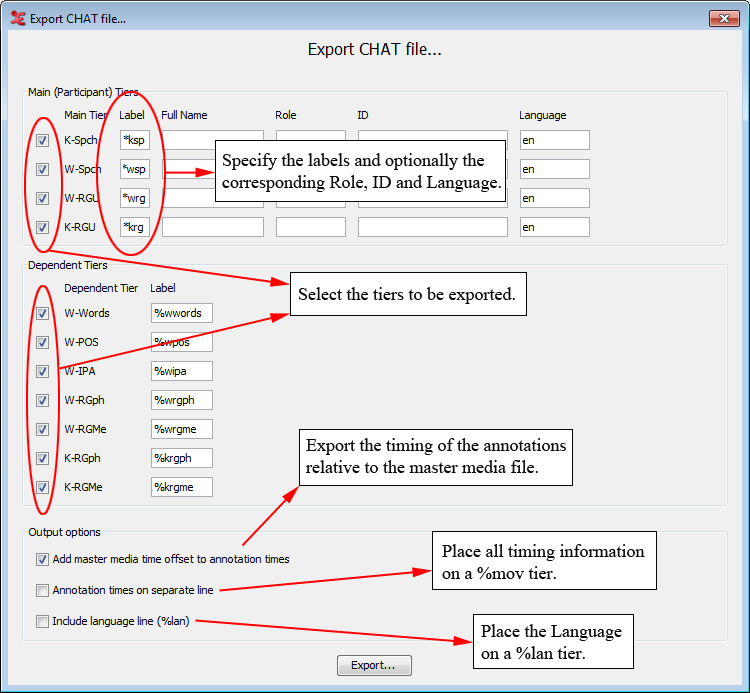
Choosing will give you the following screen:
Fill in the necessary fields.
Note Chat labels must be preceded by * (for root tiers) or % (for dependent tiers). While root tiers have to contain exactly 3 characters, dependent tier names can have up to 7 characters.
Click on
Fill in a chat file name and choose .
All documents can be exported into a tabular format for purposes of further analysis and/or printing. This includes documents that were created by ELAN itself (see Section 4.2.1 and Section 4.2.4) as well as documents that were imported into ELAN from Shoebox (see Section 4.3.1.8) Do the following:
Click on menu.
Click on .
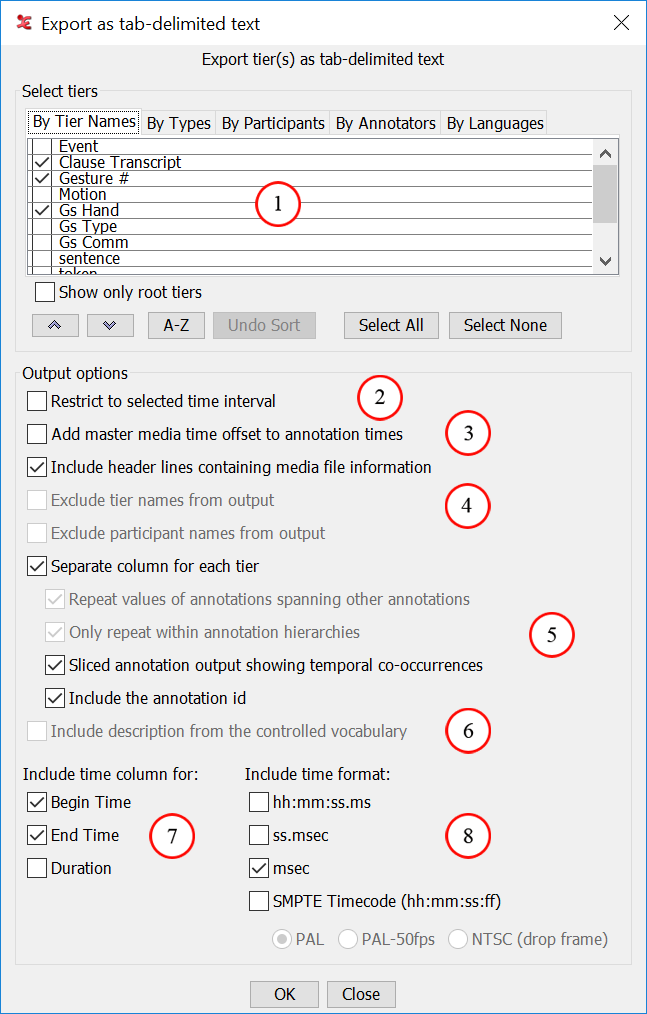
The dialog window is displayed, e.g.:
Select the tiers to be exported. ( Section 4.3.2.1)
Select to export a selected time interval only.
Add time offset from the master media to the annotation times.
Select to exclude the tier and/or participant names from the output file
Annotations sharing the same begin and end time are exported in the same row.
Select to include the description of the controlled vocabulary.
Select time information and format.
Add extra time format expressed in hours, minutes, seconds and frame.
By default, ELAN exports all annotations, but it is possible to restrict the export process to selected annotations. The following three options are available:
Export only those annotations that correspond to a selected time interval. Do the following:
In the ELAN window, select the desired time interval (see Section 5.7.1).
In the dialog window, click in the box to the left of . A checkmark appears indicating that this option has been selected.
Export only those annotations that are contained on particular tiers. Do the following:
In the dialog window, select those tiers that you want to export. A checkmark appears next to any selected tier.
Export only those annotations that (a) correspond to a particular time interval and (b) are contained on particular tiers. To do this, combine the two steps under (a) and (b) above.
By selecting you can add to the annotation times the time offset from the master media that originated from the synchronization of media files (see Section 4.2.3).
The option gives each tier its own column in the export file. Annotations that have the same begin time and the same end time are exported to the same row i.e. the same tab-delimited line.
If you check
Repeat values of annotations spanning other
                            annotations
the spanning annotation is put in each row containing an annotation it spans. The spanning annotation is not in a row by itself.The option
Only repeat within annotation hierarchieslimits the previous option. An annotation is only repeated if it is on one of the ancestor tiers in the annotation hierarchy.
Select the time markers you want to export (begin time, end time and/or duration of every annotation unit).
Choose the time format (hh:mm:ss.ms, ss.msec, milliseconds and/or SMPTE time code)
Note If you choose the SMPTE (hh:mm:ss.ff) format, the selected video standard (PAL or NTSC) just indicates the way seconds and milliseconds are converted to frame numbers. This is independent of the actual video standard of the associated video(s).
Click to start the export process; otherwise click to exit the dialog box without exporting the annotations.
Finally you will see a save dialog window. In the Encoding drop down box a text encoding can be selected (either iso-latin, UTF-8 or UTF-16). Make an appropriate choice and click on .
Note Some Mac applications, like TextEdit, have difficulties to load UTF-8 encoded files. This is most noticeable for “special” characters, e.g. IPA. Using UTF-16 is recommended in that case.
A message appears to inform you that the file has been exported. The exported file has the extension
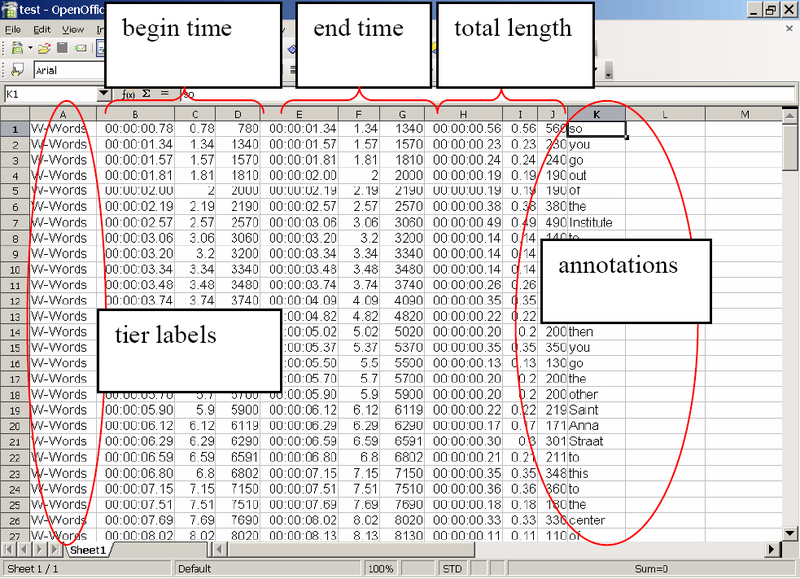
*.txt.The exported file contains the following information: participant, begin time of each annotation, end time, total length, content, and tier. It can be opened with any program that can handle tab-delimited texts, e.g., Microsoft Excel.
Note Some versions of Excel seem to have problems importing tab-separated files (white rectangles are shown instead of the column borders). As a workaround you can open the text file first in a text editor (e.g. Notepad) and copy and paste the content into Excel.
If your ELAN annotations contain syntactic elements, it is possible to export these to Synpathy[4] (see http://tla.mpi.nl/tools/tla-tools/older-tools/synpathy/). This function is available via
First select out of the candidate tiers the one you want to be exported.
Afterwards, map the tiers onto the correct description ("word" or "pos"). Finally
enter the name of the file (*.tig).
This function () is very similar to ELAN’s printing system. Therefore more information can be found in Section 4.2.15. The main difference is that the width of the exported text depends in this case on the number of characters that fits on one line.
After selecting an appropriate layout click on Save as and choose a location
and file name. These files can afterwards easily be edited with any text editor
(preferably using a fixed-with font). Optionally tick the box if you prefer to have the whitespace between
annotations to be filled with tabs instead of spaces (especially useful when importing
a text file into Word). If
is selected, you could also have single tab instead of multiple whitespaces. To do
that tick box if you prefer to have
tabs instead of multiple white spaces.
Similarly to the export to interlinear text (see Section 4.3.2.7) you can also export annotations to a HTML file, through the menu.
The only extra option for the HTML export is
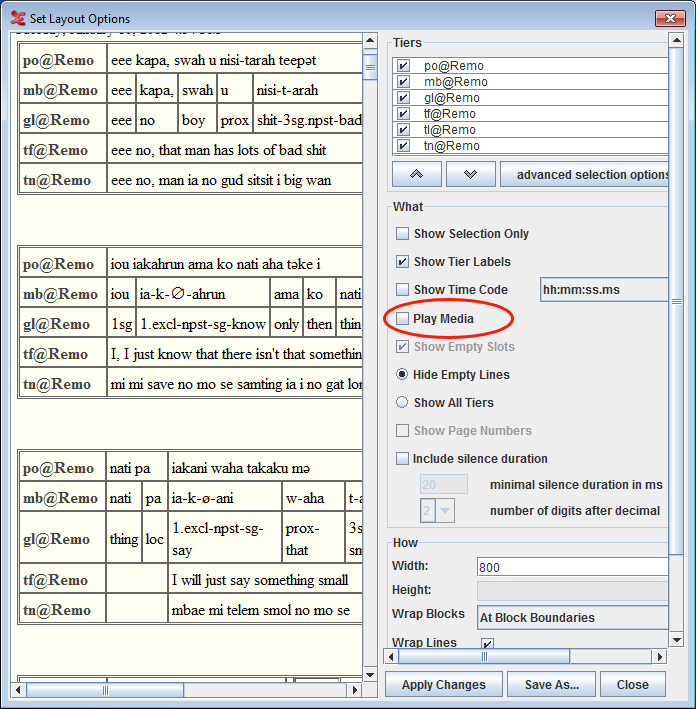
Play media : Check this option to play the media file in the exported html file.
Note To play the media HTML 5 is required. It is necessary to place the exported html in the same location as the media file in order to play the file from the html export.
In some situations a straight-forward list of the annotation units, one after another, can be handy. For that cause an export option to a “traditional transcript text” has been added to ELAN. In its simplest form it just will create a text file containing the successive annotations of several tiers, in chronological order. This feature can be found under .
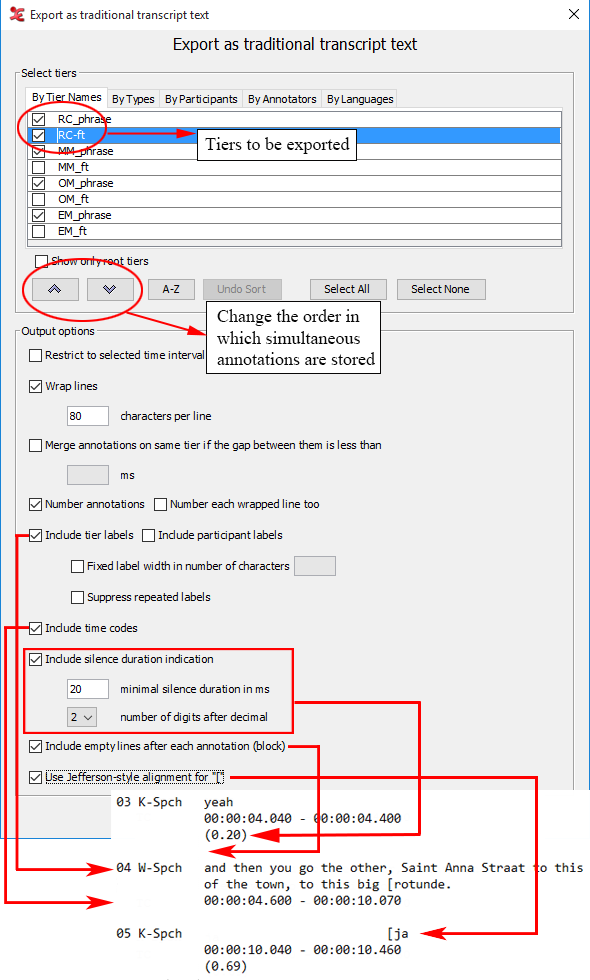
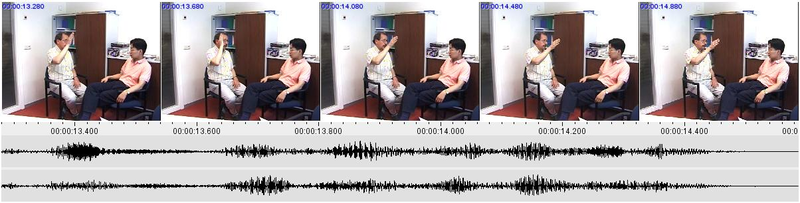
As can be seen in one of the options enables you to include silences with a minimal duration. In the figure there is a silence of 0.2 seconds between 'yeah' on the tier K-Spch and 'and the you go the other ...' on the tier W-Spch. The first annotation end at 00:00:04.400 seconds and the second begin at 00:00:04.600 seconds, resulting in a silence of 0.2 seconds. If this silence was shorter than the minimal silence duration entered in the export dialog window (20 ms in the figure), the silence will not be included in the exported file. The silence duration indication can have 1, 2 or 3 numbers of digits after the decimal.
Another option makes it possible to merge annotations on the same tier if the gap in between these annotations is less than a certain amount of milliseconds.
Empty lines after each annotation (block) can also be included or excluded in the generated output file. Lastly, you can set a fixed width (in number of characters) for the tier labels.
When you wish to work with your annotations in Praat, ELAN enables you to export your annotation to a Praat TextGrid. To do this, click . In the dialog window that appears you can select the tiers you wish to export(Section 4.3.2.1) and specify whether you want to restrict the output to the selected interval.
After clicking , you can enter a filename and select an encoding. In addition to TextGrid files in the default encoding for the operating system, ELAN supports Praat TextGrid files with UTF-8 and UTF-16 encoding. Finally click on .
Sometimes it can be very useful to have a alphabetical list of (unique) words from one or more tiers. ELAN offers a way to generate such lists. Go to and select the tiers(see Section 4.3.2.1) from which you want to extract the words. The annotations of the selected tiers will be tokenized (split into words) using either a default set of delimiters or a user definable set. Check Count occurrences if you want the list to include the number of occurrences for each token. After selecting tiers (or better, deselecting unwanted tiers) you can click OK and choose a filename. Clicking will save the word list.
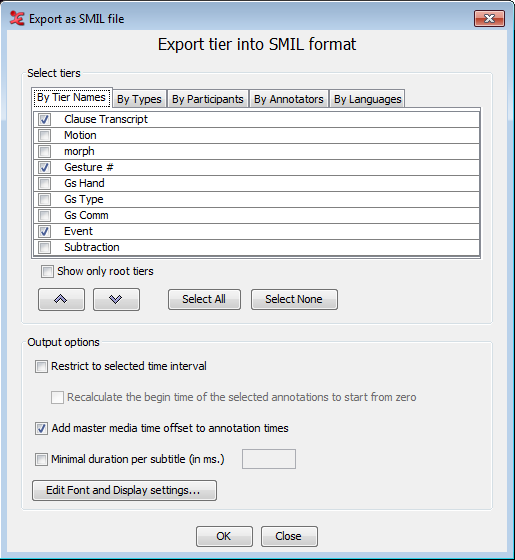
ELAN supports export to SMIL[5]-compliant clips. With a suitable player this enables you to view media files and the associated annotations as a subtitled movie.
Select the menu. This will bring up this dialog box:
Select the tiers you want to export (see Section 4.3.2.1).
Check if you only want to export the current selection. Otherwise the whole media file and associated annotations will be exported.
Check if you only want the current selection start time to start from zero.
Check to add the annotation times the time offset from the master media that originated from the synchronization of media files (see Section 4.2.3).
Check to specify the minimal display duration of a subtitle. For instance, if a annotation is only 0.3 seconds long, but you want to display a subtitle at least 0.5 seconds, enter 500 (ms).
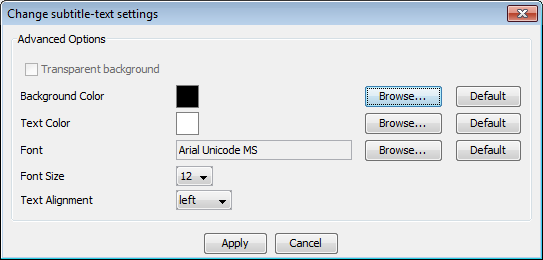
Click on button. This will bring up this dialog box:
Click on the respective button and select the color from the dialog displayed to set the background color and text color of the subtitle text.
To set the font of the Text, click on the respective button and select a font from the font list
.Font size and the alignment of the subtitle text can be selected from their respective list.
Click button to set the default setting.
Click on the button to apply the new setting
Choose to export the clip.
Click on the suggested filename to change the location where the SMIL clip will be saved.
Exporting SMIL for Quick time is very much the same as exporting SMIL for real player (see Section 4.3.2.12.1). To export SMIL for Quick time, go to . This will bring up a dialog box very similar to export SMIL for Real player . The only extra option which is not available for real player is .If selected, all tiers are merged into one file and if not selected a separate text file will be generated for each tier. It is also possible to set a transparent background for the subtitles. This is done by selecting Transparent background in the dialog (see Figure 4.54) which pops up by clicking the button. Finally click on to export.
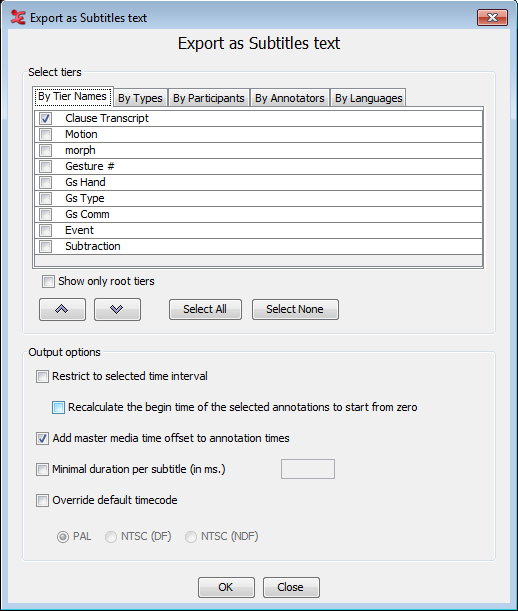
Another format you can export to from ELAN is QuickTime subtitle Text. To do this, go to . Select the tiers(see Section 4.3.2.1 ) you want to be included in the subtitles. Optionally specify the following options:
: restrict the subtitles to the current selection.
: recalculates the time of current selection to start from zero
: add to the annotation times the time offset from the master media that originated from the synchronization of media files (see Section 4.2.3).
: specify the minimal display duration of a subtitle. For instance, if a annotation is only 0.3 seconds long, but you want to display a subtitle at least 0.5 seconds, enter 500 (ms).
: If not selected a separate text file will be generated for each tier.
: (see Figure 4.54)
Finally click on .
Besides the QuickTime subtitle Text (see Section 4.3.2.13) ELAN can export annotations to there
are few other subtitle formats: SubRip (.srt), Spruce
(.stl), Timed Text Marlup Language(ttml)
(.xml) and LRC (.lrc) . Click on
and select the
tiers(see Section 4.3.2.1 ) you want to include in the
subtitle file. Specify whether the subtitles should be restricted to annotations in
the selected time interval, whether the time of the selected interval should be
recalculated form zero and if the master media time offset should be added to the
annotations times. The third option lets you specify the minimal display duration of a
subtitle. For instance, if a annotation is only 0.3 seconds long, but you want to
display a subtitle at least 0.5 seconds, enter 500 (ms).
After you have selected tiers and specified the options, click on . Enter a filename in the next window and click on .
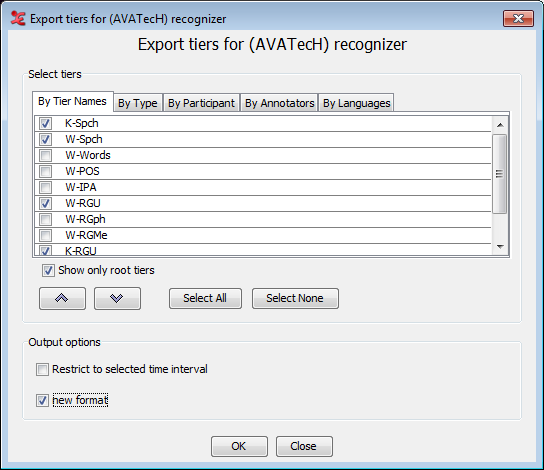
Tiers for the recognizers are exported in the AVATech tier format. For more information on the AVATech tier format see http://tla.mpi.nl/projects_info/avatech/. Files can be exported as .txt, .csv and xml.
Select menu. This will bring up this dialog box:
Check to show only the top level tiers.
Select the tiers you want to export. Keep CTRL pressed and click to select multiple tiers, press Shift and click to select multiple successive tiers.
Check if you want to export the current selection. Otherwise the whole media file and associated annotations will be exported.
Check to output the tiers to a new, more extensive xml format that supports a seperate output scheme of overlapping tiers.
Click to export the tiers and give a filename, where the tiers can be exported. Also choose the format you want, e.g. txt, csv or xml.
When a command line tool for extracting clips from video files is installed Elan is able to use that tool. At this moment only M2-edit-cl[6] from Mediaware Solutions is supported. If the edit tool is in the user path and a selection is made, there is a menu item to export a video clip of the current selection for each linked video. In that case, follow these steps:
Select the part of the video(s) you want to export as (a) clip(s)
Choose
Enter a filename and press
Elan now supports any command line tool to extract clips from the video file. Elan
uses a script file named "clip-media.txt" which can be found in
the Elan folder where Elan is installed. To clip a video file, first the script have
to be modified according to specifications of the command line tool used.
For example, the syntax for M2-edit-cl : M2-edit-cl/ in:$begin(fr) / out:$end(fr) $in_file $out_file
M2-edit-cl : the path of the application
in:$begin(fr) : specifies the begin time frame of the clip in frames.
out:$end(fr) : specifies the end time frame of the clip
$in_file : input file
$out_file : output file
Few examples for command line tools are
M2-edit-cl -: windows : M2-edit-cl/ in:$begin(fr) / out:$end(fr) $in_file $out_file
ffmpeX - mac n windows : /Applications/ffmpegX/ffmpeg -sameg -ss $begin(sec.ms) -t -$duration(sec.ms) -i $in_file $out_file
These syntax depends on the command line tool you are using. Look in the script file for more explanation and examples. To clip the video file first make a selection of the video file and select .. A dialog will appear in which you can set the file name and the location to save the clipped file to. You can specify more options for clipping in the Preferences dialog, see Section 4.4.28.
| Note |
|---|---|
If you have more media files to be clipped, typing a file name with a extension in the 'Save as' dialog will use the same extension for all the files that will be clipped. If you want to use the same extension from the original media file for the clipped files, then donot type an extension with the file name in the 'Save as' dialog which prompts you to set the file name and location for the clipped media files. |
To export an image from the ELAN window (i.e. to make a screenshot):
choose
Enter a filename and an extension (
*.jpg,*.jpeg,*.pngor*.bmp)click on .
Note If you are using Windows, it sometimes happens that ELAN’s video window is black on the picture created using this function. This can be solved by temporary disabling the hardware video acceleration:
Right-click on the desktop
choose properties
select the Settings tab
Click on the advanced… button
Select the Troubleshooting tab
move the Hardware Acceleration slider tot None
Don’t forget to re-enable the hardware acceleration afterwards, because this has a strong effect on the system’s graphical performance.
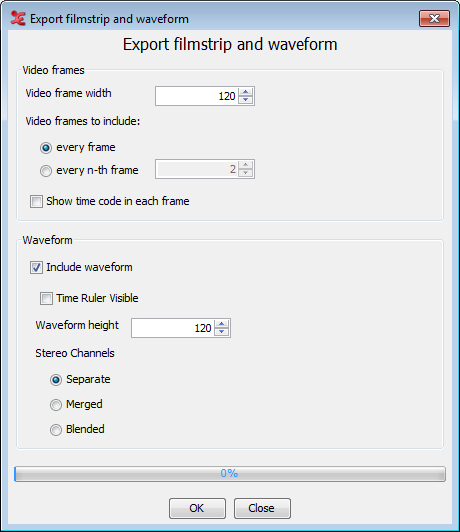
To export a Filmstrip Image first select the time segment you want the
filmstrip of. Then click . In the dialog window (see Figure 4.58) you can define the width of each
video frame, which frames to include and whether ELAN must add a time code in each
frame. Moreover, ELAN can add the waveform, with or without a ruler, and specify the
height. You can also specify whether the stereo channel should be displayed separately
or merged or blended. Click on to generate the image.
Finally select a destination folder, enter a filename and click on
.
An example or an exported filmstrip image can be seen in Figure 4.57.
All Shoebox files that were imported into ELAN (see Section 4.3.1.8) can be exported back into Shoebox. In this case, the time code information is kept.
To export a file into Shoebox, do the following:
Click on menu.
Click on .
The dialog box appears. Make a choice and click on to continue.
By selecting you can let ELAN wrap a whole block if one of the line in a block is longer than a specified number of character (default is 80 characters).
By selecting you can add to the annotation times the time offset from the master media that originated from the synchronization of media files (see Section 4.2.3).
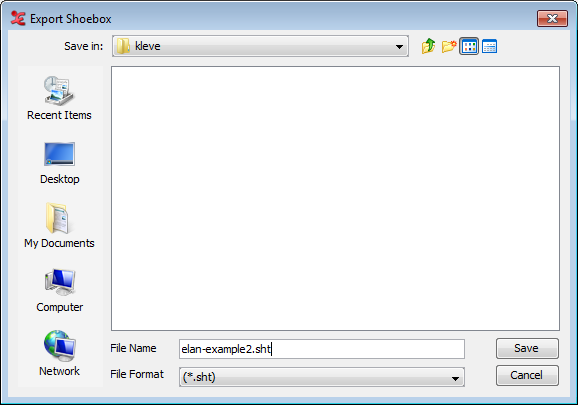
Specify the name and directory of the exported file, e.g.:
Click to export the file; otherwise click to exit the dialog box without exporting the file.
The file is exported as a
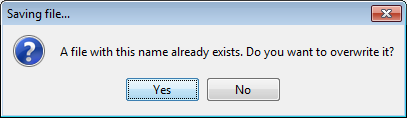
*.txt|*.sht|*.tbtfile.If there already exists a file of the same name, ELAN will ask you whether or not it should overwrite the existing file, e.g.:
Open the exported file in Shoebox.
It contains the following information:
All tiers and annotations.
Each ELAN parent annotation (including all its referring annotations) corresponds to one Shoebox record. E.g., in the illustration below, the ELAN parent annotation “Ligya-001” corresponds to the Shoebox record “Ligya-001”.
The time code information for each parent annotation.
Each ELAN parent annotation (i.e., each Shoebox record) contains the additional field markers \ELANBegin and \ELANEnd (i.e., the begin and end time of the parent annotation).
This time code information allows you to import the Shoebox file back into ELAN, without having to manually re-align the file (see Section 4.3.1.8).
[4] Synpathy is a tool for annotating, analyzing, and graphically editing the syntactical structure of sentences (e.g. Linguistically annotated text corpora), developed at the Max Planck Institute for Psycholinguistics. The application is based on the SyntaxViewer from the TIGER search project developed by the IMS (Institute für Maschinelle Sprachverarbeitung, University of Stuttgart).
[5] For a description of this standard and players see http://www.w3.org/AudioVideo/