After the user has created a new workspace, or has selected an existing one, the following page will be displayed:

This window is the central page for all actions with regard to managing the contents and
adjusting the structure of the chosen workspace. The image below shows that each corpus is
organized in the shape of a tree-like structure (see Figure 3.1 and Figure 3.2). These trees are constructed with the use of corpus- and session nodes. A corpus
node, represented by a blue symbol in the tree view ( ), is a specific point inside the structure of the corpus, and it is used
to build its general structure. Usually corpus nodes are grouped together on the basis of,
e.g., the geographical location, the discourse genre, the sex or age of the speakers, the
dialect of the speakers, the target/source language etc.
), is a specific point inside the structure of the corpus, and it is used
to build its general structure. Usually corpus nodes are grouped together on the basis of,
e.g., the geographical location, the discourse genre, the sex or age of the speakers, the
dialect of the speakers, the target/source language etc.
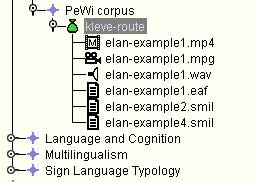
Each corpus node may contain: a) other sub-corpus nodes; b) one or more session nodes.
Session nodes are important because they incorporate links to all actual data (i.e. video- and
audio files, information- and annotation files). They are represented by a green symbol ( ). The resources have also symbols indicating the type of content, i.e. a
speaker symbol (
). The resources have also symbols indicating the type of content, i.e. a
speaker symbol ( ) represents an audio file.
![[Note]](images/note.png) | Note |
|---|---|
If a node has the
|

LAMUS facilitates the construction of corpora, as shown in the picture above, using corpus nodes, session nodes and resources as building blocks. These elements are linked to one another and do make up the tree structure itself. The layout of the corpus structure is to be determined by the researcher. As every node or resource is linked to other elements in the tree, changes in the arrangement can easily be made by just adjusting these connections. Single resources or whole parts of the corpus can be unlinked from the tree structure to be used again in a different location. New elements can be uploaded to the workspace to be incorporated in the corpus.
The main interaction window provides information and feedback from the system about the actions performed by choosing the specific LAMUS function buttons (on the bottom of the screen, Section 3.2).
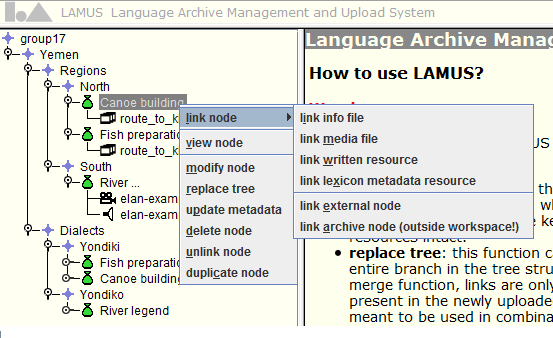
Right click on a corpus node in the structure of your open workspace to get access to various management functions. These options from the tree menu are discussed in Section 3.1.1 to Section 3.1.12. The tree menu is context sensitive, meaning that different options are available for corpus nodes, session-nodes and/or resources.
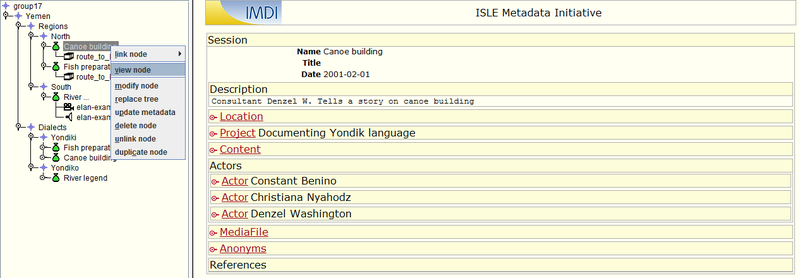
In the archive every node contains information about its creation, its resources and
its relations to other nodes. This information is called metadata (i.e. data describing
other data) and it is stored in IMDI (ISLE Metadata Initiative) files. Click
from the right click tree menu to view the metadata
of the selected node. The contents of its IMDI file will be displayed in the main
interaction window. Click the  icons in the main interaction window to extend/collapse the metadata
information for the corresponding elements.
icons in the main interaction window to extend/collapse the metadata
information for the corresponding elements.
To add a new corpus node to the corpus structure/corpus node, select from the tree menu. Enter a name and a title in the appropriate fields. The information given in the Title field will be displayed when hovering the mouse over the corpus node in the tree view. After clicking the new corpus node will be added to the tree structure, linked to the previously selected node.
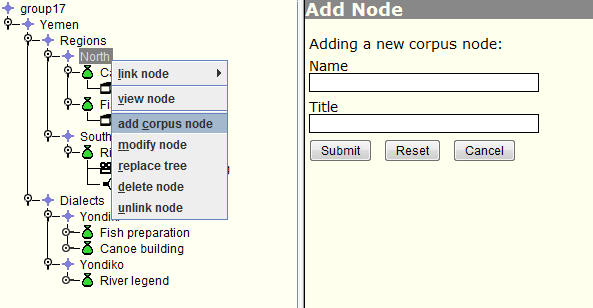
The difference between this option and (Section 3.1.8) is that with 'add corpus node' the new corpus node and its metadata description are generated from scratch (the metadata description will be very elemental, consisting of only a name and a title). With 'link corpus node', by contrast, you choose already made and uploaded metadata files for the new corpus node.
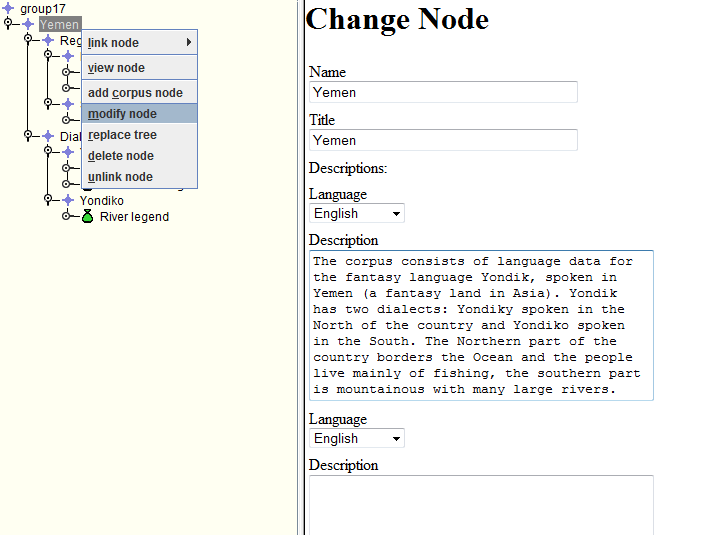
Use this option to change the name, the title or the description of an existing corpus node. Click from the tree menu. After entering the new name of the node, its title, the language and some description, click the button at the bottom of the main interaction window (you may have to scroll down). In case you want to add detailed metadata (i.e. information about actors or location), use Arbil (http://tla.mpi.nl/tools/tla-tools/arbil/) to create more extensive corpus or session nodes.
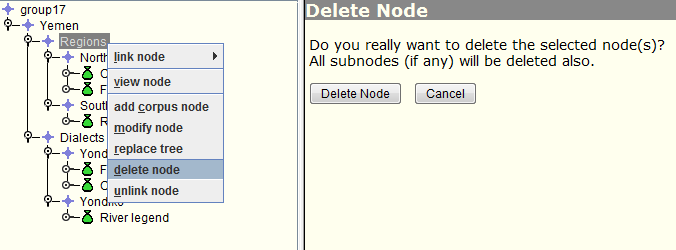
To remove a selected node or a resource from the tree structure select from the tree menu and click the button. In case the node has children (i.e. incorporated session nodes or resources), they will be removed from the workspace together with the selected node. If the user wants to keep these files for future use, he/she should unlink them first (Section 3.1.7); this process will transfer the data to the unlinked files section of the workspace.
To replace a branch in the tree structure, users can select the option replace tree. This function is meant to be used together with Arbil. Indeed, the first thing to do is start Arbil, then import your files into the local corpus, edit them and finally export them. You can have a look at Arbil manual to learn how to do that (http://www.mpi.nl/corpus/html/arbil-imdi/index.html). In particular, consult the following parts: section 3.3.1. for importing (http://www.mpi.nl/corpus/html/arbil-imdi/ch03s03s01.html); chapter 5 for editing metadata (http://www.mpi.nl/corpus/html/arbil-imdi/ch05.html); section 7.1 for exporting (http://www.mpi.nl/corpus/html/arbil-imdi/ch07s01.html).
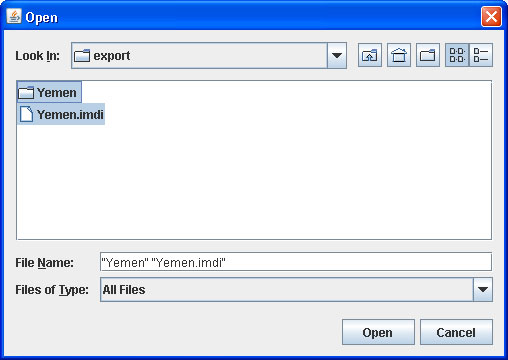
The exported branch should be then uploaded into LAMUS (see Section 3.2.2 for help); both the .imdi and the directory files have to be selected.
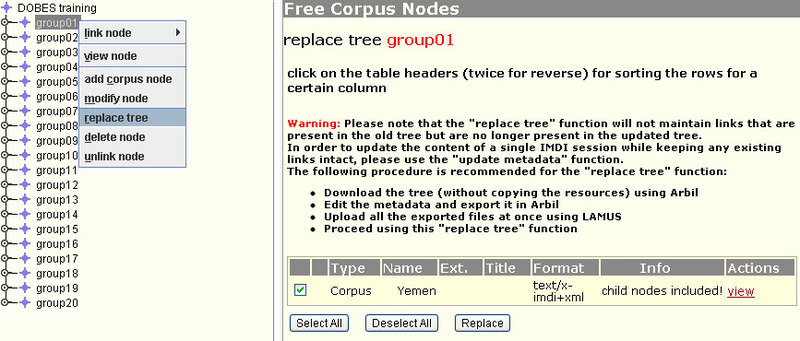
After having uploaded the required files, for the actual replacing of the tree select the branch that you want to replace, right click and select . In the Free Corpus Node window you have to check the checkbox next to the branch you exported out of Arbil (here: Yemen). And then select . The branch should now be replaced with the new branch.
| Note |
|---|---|
It is possible to replace a corpus with another corpus and a session with another session.These cannot be mixed, however. |
| Note |
|---|---|
Tree replace option is NOT a merge function! So if you have files in the old branch that aren't linked in the new branch, then they will be removed. |
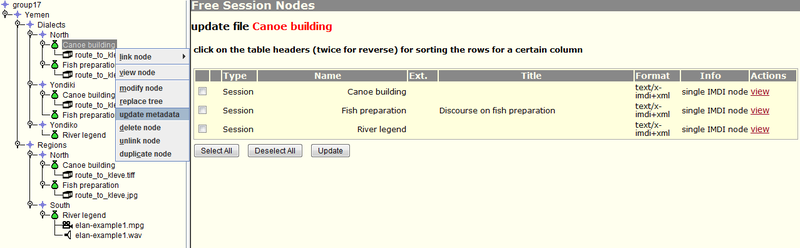
To update the metadata of a single IMDI session with a newly uploaded IMDI session, use the Update metadata function. This function will replace the content of the metadata while keeping any existing link to resources intact.
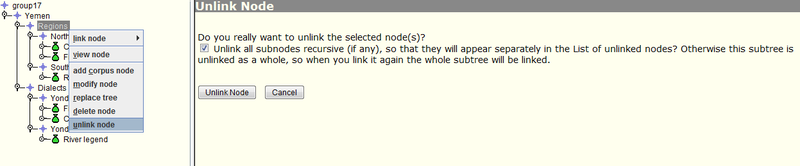
To move a node or a resource from the tree structure to the unlinked files section of the workspace select from the tree menu. As default, the selected node together with its contents (sub-nodes and resources) are moved as a unit to the unlinked files container. The structure of the node does not get affected by this action. If the user decides to link it again, the contents will stay linked within that node. Only their location in the corpus tree will change.
Click the checkbox as seen in the picture below to split the node from its contents. In this way they will appear as separate files in the unlinked files section. The underlying structure of the selected node is lost and the sub-nodes and resources can now be linked to a different node in the tree view. As already mentioned, after clicking the button, the selected nodes and resources are moved to the unlinked files section of the workspace.
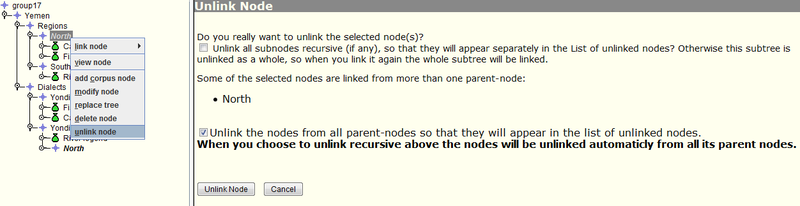
When a node or resource is linked more than once in the corpus (i.e. when a certain media file is used in more than one session of experiment, Section 3.1.8), LAMUS will inform the user about it and will give him/her the option to either unlink the nodes/resources only from the selected node (i.e. it will remain linked to its other parent(s)) or to unlink it from all possible parent nodes by ticking the second checkbox. Only in the latter case the unlinked nodes will appear in the list of unlinked files because in the former case the nodes/resources will still be linked to a node in the tree.
The option in the tree menu is used to link various contents to corpus nodes and/or session nodes after these have been uploaded to the unlinked files container. This transfer from the local machine or network to the LAMUS workspace is described in Section 3.2.2. If a corpus node is selected from the tree-view the following linking options become available:
: an info file can be a txt-, html- or PDF-file containing information about the corpus node.
: it allows you to link an unlinked corpus node (along with its possible content) as a child of the selected corpus node. This option is used to build the basic tree structure of a corpus.
: through this option you can link an unlinked session node (as well as its possible content) as a child of the selected corpus node. This option is used to enrich the corpus with various content (i.e. metadata, resources).
: this option allows you to link a free catalogue node, and it is used to provide a summary of the corpus.
: enter the url to the external node/resource in the designated field and specify the file type (info file, media file, written resource or annotation) from the pull down menu.
: select a node from the corpus tree presented in the main interaction window. Linking to a node that is in the workspace or to a node that is a parent, or other ancester, of the workspace top node is not allowed.
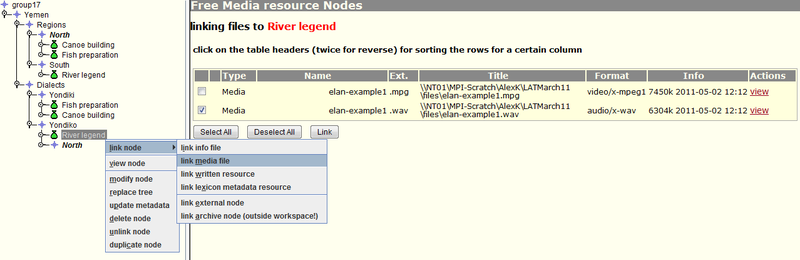
In case the user has selected a session node from the tree-view, the options for linking are:
: an info file is a txt-, html- or PDF-file containing information about the session node.
: a media file is a video- or audio-file or picture belonging to the session node.
: it allows you to link a resource other than video-, audio-files or pictures to the session node.
: enter the url to the external resource in the designated field and specify the file type (info file, media file, written resource or annotation) from the pull down menu.
: select a node from the corpus tree presented in the main interaction window. Linking to a node that is in the workspace or to a node that is a parent or other ancester of the workspace top node is not allowed.
All files, except for external nodes and any archive nodes, need to be present in the unlinked files section of the workspace before they can be linked. After the user has made his/her choice from the tree menu the main interaction window will display a list showing all unlinked files of the appropriate type. For example, if the user wants to link a session node, only the free IMDI sessions nodes are displayed; only video-, audio-files and pictures are listed if the user selects from the tree menu. Use the button to quickly select all the files in the list.
After clicking the button, the next page will display more information about the file(s). From the format pull down menu it is possible to assign various, different formats to the media file. Accepted file formats and types are listed in Appendix A. The system should recognize the used format of the files correctly; if not, the user has to choose the correct file type from the pulldown list. As the filetype is used in conjunction with other applications, it is important to choose the correct format. For example, the Access Management System can only grant read access when the proper type for the resources is used. Therefore, if the wrong format is chosen, access to these resources will be denied.

Pressing the button moves the resources from the unlinked files section to their appropriate place in the tree structure of the workspace.
Locally created corpus structures (using Arbil, http://tla.mpi.nl/tools/tla-tools/arbil/) can be linked as a whole into the tree structure, once all elements (i.e. IMDI files and resources) have been uploaded into the workspace.
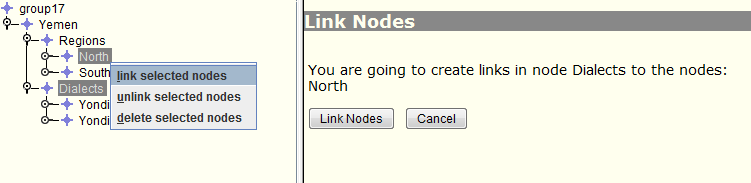
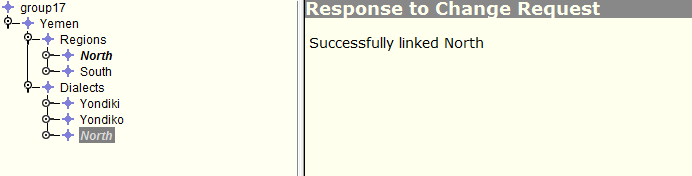
Links can be created between multiple nodes. In the next example, the corpus node and its content, which are already linked to “North”, are going to be linked to “Dialects” as well. To do so, first select the target node, the one to which you want to make the second link (i.e. "Dialects" node). Hold the CTRL key and now select the source node, the one already carrying linked material (i.e. "North" node). Choose from the tree menu and click on the new page. The multiple linked node will appear in bold italic in the tree view as seen in the example below.
| Note |
|---|---|
Remember to select first the target node and then the source node. If you do it the other way round, i.e. first source node and then target node, you will get an error message. |
The same procedure applies when only certain resources need to be linked to more than one session node. Be sure to work within the boundaries of the IMDI metadata framework: corpus nodes can point to corpus nodes, session nodes and info files; session nodes can point to info, media and annotation files.
| Note |
|---|---|
If the user decides to delete a multiple linked node, the node will be deleted from every location. To prevent this, first unlink the nodes that can be removed. |
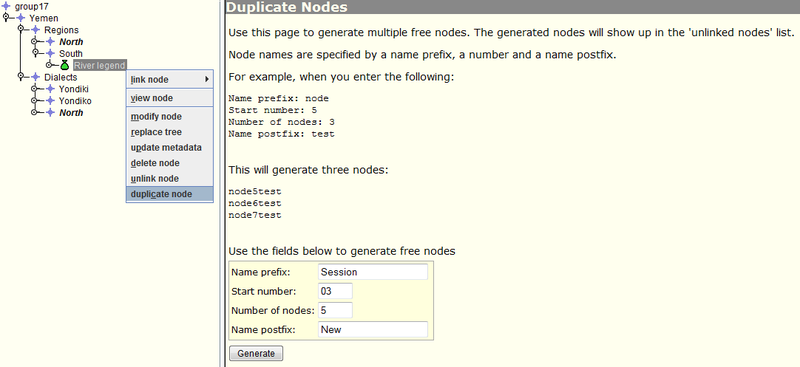
The option can be used to quickly create session nodes. A page will open in the main interaction window, asking you to fill in some fields (see picture below). Then press Generate. The new session nodes can now be found in the unlinked files section of the workspace. The labeling used in the example shown below will result in the five new free session nodes called “SessionNode03New” to “SessionNode07New”. These generated nodes contain no metadata, except for the name and title, and have no linked content.
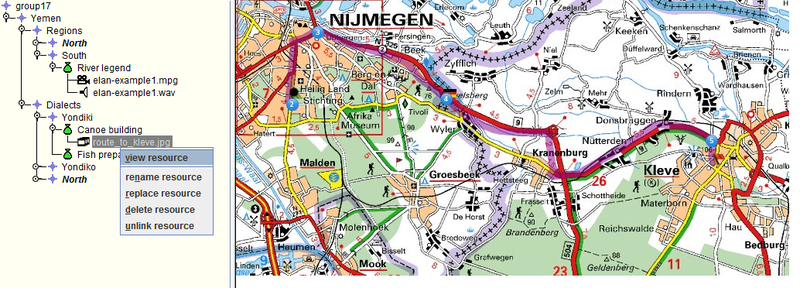
To view the contents of a resource, choose from the tree menu. The main interaction window will show the contents of the selected file. In case of video- and audio-files, QuickTime is the default application used to play the file.
The option from the tree menu is used to change the name of a resource. Enter the new name and its extension in the appropriate field and press .
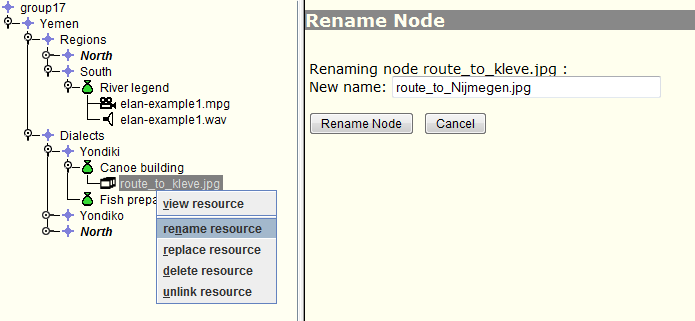
| Note |
|---|---|
Names of corpus and session nodes can be changed using the Modify node option from the tree menu (Section 3.1.3). |
To replace an already linked resource with another one (e.g., when a new version of a certain file is available), choose from the tree menu. The new files has to be present in the unlinked files container.
When replacing a node, the new resource will receive new references (handle URI and NodeId number). These identifiers are shown in the main interaction window when the resource in the IMDI web browser is selected. The replaced file will keep its original reference and will be stored in a versioning system, allowing the user to choose between the different versions of the original file.
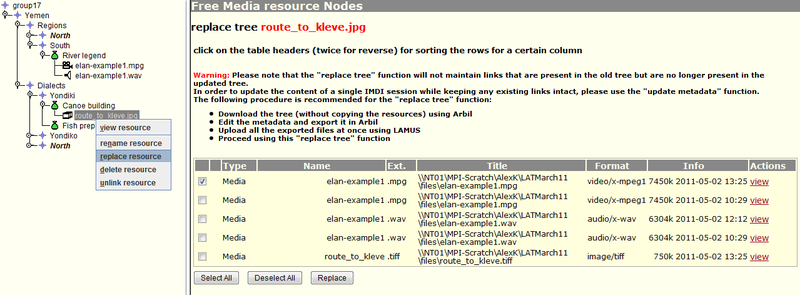
| Note |
|---|---|
The original file will be deleted from the workspace when it is replaced. It is advisable to always have a backup of the original files. |