Tab-delimited text file
All documents can be exported into a tabular format for purposes of further analysis and/or printing. This includes documents that were created by ELAN itself (see the section called “Creating a new document” and the section called “Opening an existing document”) as well as documents that were imported into ELAN from any of the supported formats. Do the following:
Click on menu.
Click on .
The dialog window is displayed, e.g.:
Figure 41. Export as tab-delimited text dialog window
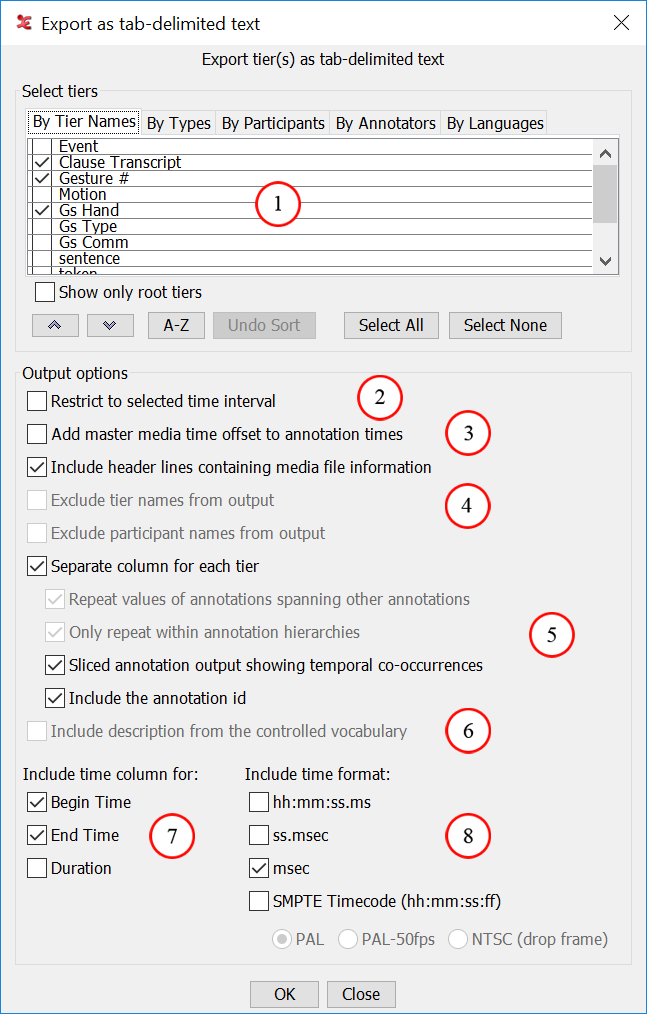
Select the tiers to be exported. ( the section called “How to select tiers”)
Select to export a selected time interval only.
Add time offset from the master media to the annotation times.
Include header lines with media file location info, include the tier and/or participant names from the output file
Annotations sharing the same begin and end time are exported in the same row.
Select to include the description of the controlled vocabulary.
Select time information and format.
Add extra time format expressed in hours, minutes, seconds and frame.
By default, ELAN exports all annotations, but it is possible to restrict the export process to selected annotations. The following three options are available:
Export only those annotations that correspond to a selected time interval. Do the following:
In the ELAN window, select the desired time interval (see the section called “Making a selection on an independent tier”).
In the dialog window, click in the box to the left of . A check mark appears indicating that this option has been selected.
Export only those annotations that are contained on particular tiers. Do the following:
In the dialog window, select those tiers that you want to export. A check mark appears next to any selected tier.
Export only those annotations that (a) correspond to a particular time interval and (b) are contained on particular tiers. To do this, combine the two steps under (a) and (b) above.
By default, the output contains one annotation per row, with the tier name in one of the columns, time information in several following columns and then the annotation value.
By selecting you can add to the annotation times the time offset from the master media that originated from the synchronization of media files (see the section called “Synchronizing video files”).
The option allows you to add the media-file path information for each media file to the header of the exported file.
The option gives each tier its own column in the export file. Annotations that have the same begin time and the same end time are exported in the same row i.e. the same tab-delimited line. The following options allow to also have annotations in the same row if they are not fully aligned but do overlap. As a consequence each annotation can be in the output more than once, making annotation counts unreliable.
If you check
Repeat values of annotations spanning other
                          annotations
the spanning annotation is put in each row containing an annotation it spans. The spanning annotation is not in a row by itself.The option
Only repeat within annotation hierarchieslimits the previous option. An annotation is only repeated if it is on one of the ancestor tiers in the annotation hierarchy.The option
Sliced annotation output showing temporal
                          co-occurrences
is an alternative way to repeat annotation values based on overlaps. In this export all unique begin and end times of all annotations in the export are placed in one list, creating new intervals (between each two successive time values). Each interval is exported if there is at least one annotation overlapping that interval and in the column of each tier the value of the overlapping annotation, if any, is exported.The option
Include the annotation idappends the annotation identifier between brackets to the annotation value (e.g. [a13]). This makes it possible to distinguish annotations in the output, which is hard to do in the case of repeated values.
Select the time markers you want to export (begin time, end time and/or duration of every annotation unit).
Choose the time format (hh:mm:ss.ms, ss.msec, milliseconds and/or SMPTE time code)
![[Note]](images/note_1855015319.png)
Note If you choose the SMPTE (hh:mm:ss.ff) format, the selected video standard (PAL or NTSC) just indicates the way seconds and milliseconds are converted to frame numbers. This is independent of the actual video standard of the associated video(s).
Click to start the export process; otherwise click to exit the dialog box without exporting the annotations.
Finally you will see a save dialog window. In the Encoding drop down box a text encoding can be selected (either ISO-latin, UTF-8 or UTF-16). In the file format box there are two options,
*.txtsaves a tab-delimited text file,*.csvsaves the annotations in a comma separated values file, placing all text values between double quotes. Make an appropriate choice and click on .Note Some Mac applications, like TextEdit, have difficulties to load UTF-8 encoded files. This is most noticeable for “special” characters, e.g. IPA. Using UTF-16 is recommended in that case.
A message appears to inform you that the file has been exported.
The contents and the layout of the exported file depends on the selected options. It can be opened with any program that can handle tab-delimited or comma separated texts, e.g., Microsoft Excel.
Figure 42. Tab-delimited text
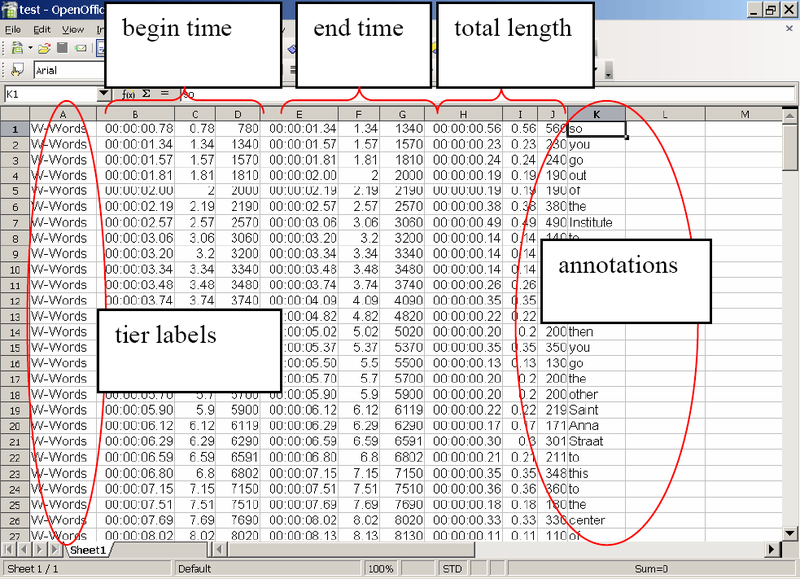
Note Some versions of Excel seem to have problems importing tab-separated files (white rectangles are shown instead of the column borders). As a workaround you can open the text file first in a text editor (e.g. Notepad) and copy and paste the content into Excel.