The menu allows you to set a number of preferences. It contains the following options:
Every IMDI file is assigned to a type and to a profile. These types and profiles are managed through the menu item .
By default, there are three different types of IMDI files:
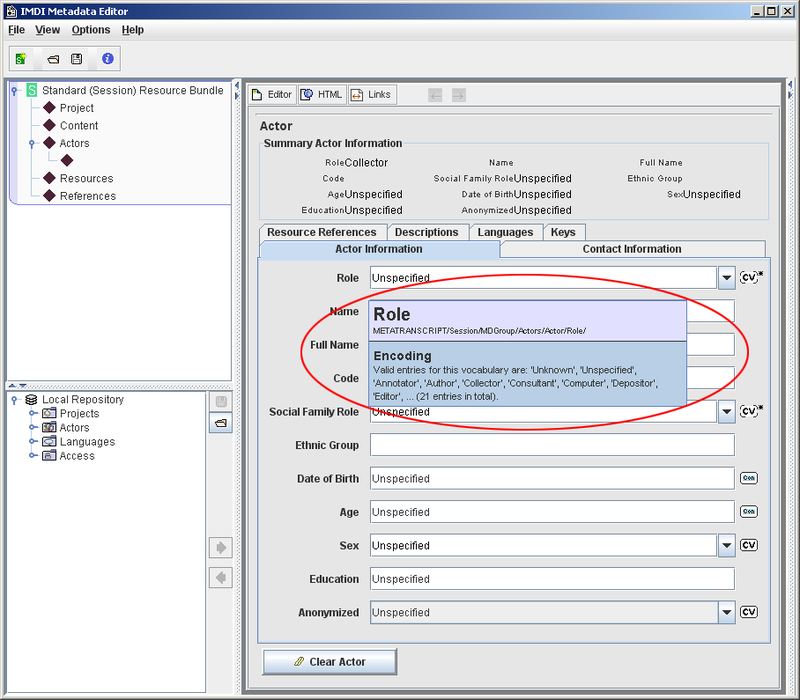
Types are associated with one or more profiles. These profiles specify the available metadata categories together with their constraints. For example, members of the sign language research community have developed a Sign-Language Profile. IMDI files that are based on this profile contain some sign-language-specific metadata categories and constraints, e.g.:
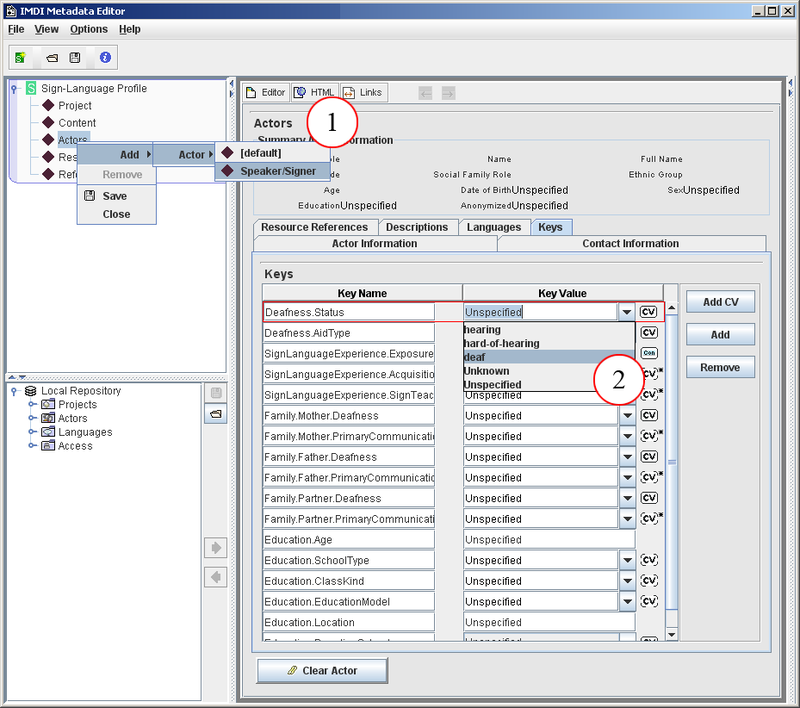
Figure 1.12. Sign-language-specific metadata categories
IMDI files based on the Sign-Language Profile contain the metadata category Speaker/Signer.
This Speaker/Signer category contains keywords that are of relevance to sign-language research (e.g., Deafness.Status etc.). For each keyword, there are constraints on its values. These constraints are visualized in the form of pull-down menus of controlled vocabulary items (e.g., , etc.).
To manage types and profiles, click on Profile Manager. The following options are available:
Add a new profile:
Click on the type where you want to add the profile. Then click on (to add a locally-stored file) or on (to add a file stored on the Web). A dialog window appears, allowing you to browse to the file or to enter its URL.
Delete a profile:
Click on the profile that you want to delete. Then click on .
Select the default profile for a type:
Click on the profile that you want to make the default profile for a type. Then click on . From now on, this profile will automatically be used whenever you create a new IMDI file based on this type, i.e., for new Session files (see Section 1.2.1.2), new Lexicon files (see Section 1.2.1.3) or new Corpus files (see Section 1.2.1.4). The non-defaults can still be accessed through the menu item (see Section 1.2.1.1).
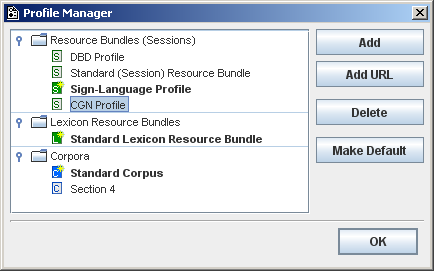
Click on to exit the Profile Manager window again.
![[Note]](images/note.png) | Note |
|---|---|
Profiles are stored in the folder
|
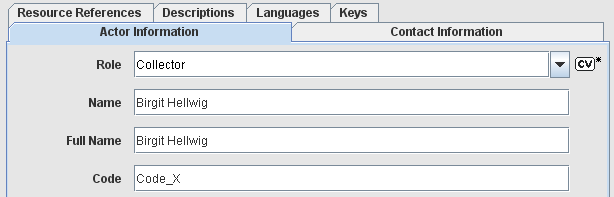
is used whenever you have chosen to make the name of an actor anonymous, i.e., whenever you have chosen that the actor’s real name should only be visible to you. If someone else opens the IMDI file, a code will be displayed in the name fields. This is the case for both the Name and Full Name field.
The option allows you map a full name to such a code. This mapping will be stored in a file on your computer. You (and everybody whom you grant access to this file) will be able to see the full name, while everybody else will only see the code.
To create such a file, do the following:
Click on .
Click on .
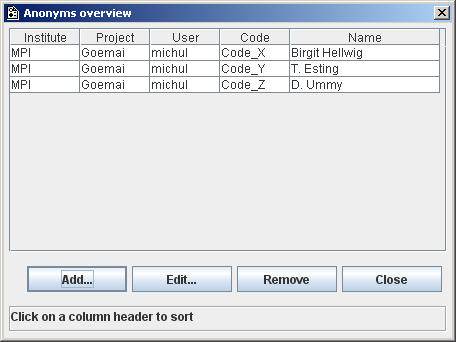
The Anonyms overview dialog window appears. It allows you to create, modify and remove mappings, and it displays all available mappings, e.g.:
The following options are available:
You can sort the available mappings. Click on any of the column headers to sort the corresponding column alphabetically.
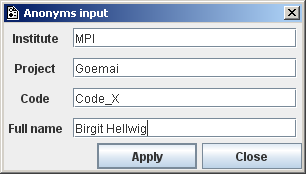
To add a mapping, click on . The Anonyms input dialog window appears. Please fill in the institute (e.g., MPI), the project (e.g., Goemai), the code of the actor and his/her full name.
To save the mapping, click first on and then on .
The new mapping will be displayed in the Anonyms overview dialog window.
Note The column User (in the Anonyms overview dialog window) does not appear in the Anonyms input dialog window. This column is automatically filled in by the program.
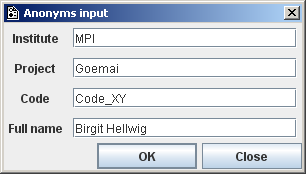
To edit a mapping, click on it to highlight it. Then click on . The Anonyms input dialog window appears and displays the highlighted mapping. Type in your changes.
Click on to save the changes.
To remove a mapping, click on it to highlight it. Then click on . The mapping is removed without further warning.
Click on to exit the Anonyms overview dialog window.
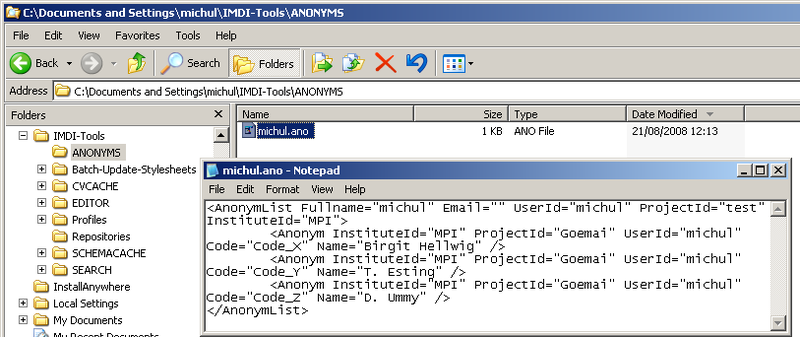
All mappings are saved in the file
user-name.anoin the folder<user-directory> \ IMDI-TOOLS \ Anonyms, e.g.:If you want other people to have access to these mappings, send them a copy of the file
user-name.ano. They should then save this file in their folder<user-directory> \ IMDI-TOOLS \ Anonyms.
In order to use this anonymization feature, be sure to enter the full name into the Name and/or the Full Name field. The IMDI editor automatically will ensure that only you will have access to it. Others will see the code you provided.
| Note | |||
|---|---|---|---|---|
Don’t enter the code name into the Name or Full Name fields in the actor screen. If you do so, the real name will not be connected to this code. However, for your own convenience you might want to enter the code name into the actor’s Code field. This way you can see directly the link between the Code and the Full Name without opening the anonymization window.
|

The IMDI tools make use of so-called "controlled vocabularies"
to ensure consistency across users (i.e., they provide lists of
values for specific metadata categories or keys). These vocabularies
are stored on the Web, and a copy of them is stored in the cache of
your desktop computer (in the folder
<user-directory> \ IMDI-TOOLS \ CVCACHE)
(see the IMDI CV-Editor manual for details).
You can view these vocabularies through the menu item . Click on it to access the Vocabs overview window, e.g.:
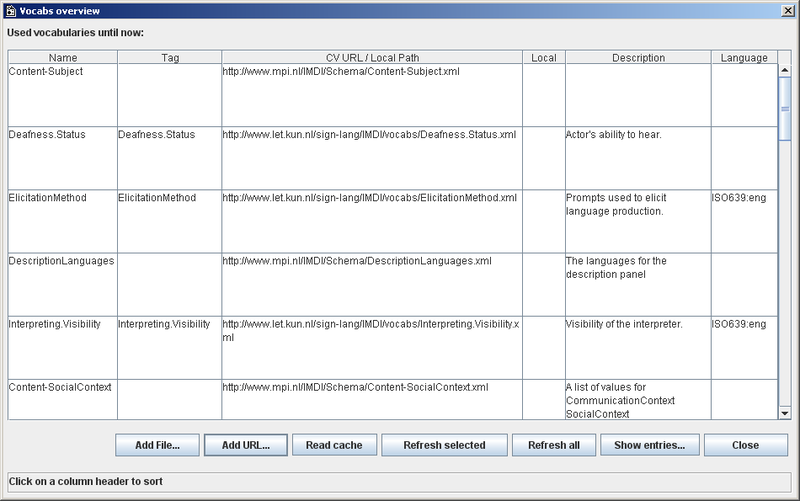
Figure 1.18. Vocabs overview
Columns:
Name: the name of the metadata category;
Tag: the tag of the metadata category (if it is in a language other than English);
CV URL/Local Path: the name and URL / local path of the controlled vocabulary file;
Local: an indication of whether or not the file is stored locally;
Description: descriptive information about the controlled vocabulary;
Language: the language of the metadata category and its vocabulary.
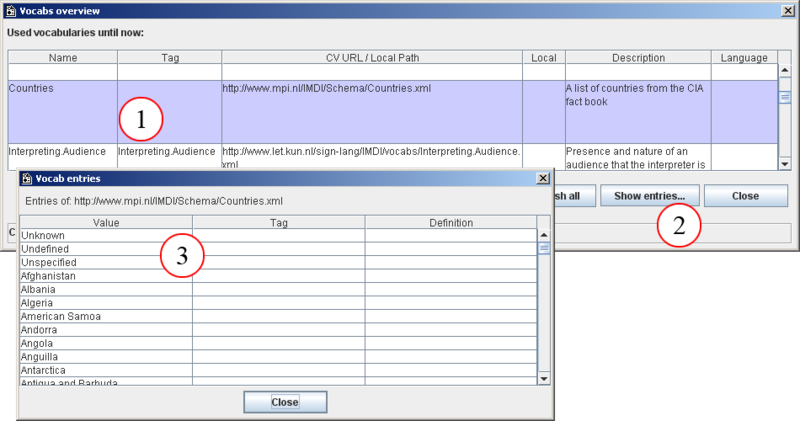
The Vocabs overview window offers you the following options:
You can sort the available controlled vocabularies. Click on any of the column headers to sort the corresponding column alphabetically.
Click on to add a controlled vocabulary file that is stored locally. The Browse window appears, allowing you to browse to the folder and to select the file. The vocabulary will then be added to the Vocabs overview window.
Click on to add a controlled vocabulary file that is stored on the Web. The Vocab add window appears. Enter the URL of the vocabulary, click on and then click on . The vocabulary will be added to the Vocabs overview window.
Click on to view all available controlled vocabularies (i.e., all vocabularies that are stored in the folder
<user-directory> \ IMDI-TOOLS \ CVCACHE).Click on a vocabulary to select it, then click on to have the IMDI tools check for a newer version of that vocabulary on the Web, and to update the cache accordingly.
Click on to have the IMDI tools check for newer versions of all vocabularies on the Web, and to update the cache accordingly.
Click on a controlled vocabulary to select it, then click on to view its content., e.g.:
Click on to close the window.

A stylesheet offers the possibility to make changes to multiple imdi-files at once. It resembles a kind of powerful find-and-replace option. Using an update stylesheet requires 2 steps:
creating the stylesheet, which can be done with the IMDI editor
applying the prepared stylesheet on a set of imdi-files with the IMDI browser
For information about the latter process, see the IMDI browser manual, Chapter 4.
Please be aware that this is a powerful technique that should be used with care as it has the potential (if used in an inappropriate way) to damage a large set of IMDI files! Although a backup will be made of all files before they are alterered, it is a good practice to think twice before you apply a stylesheet.
To create an update stylesheet choose . At the right side of the window an extra frame will appear:
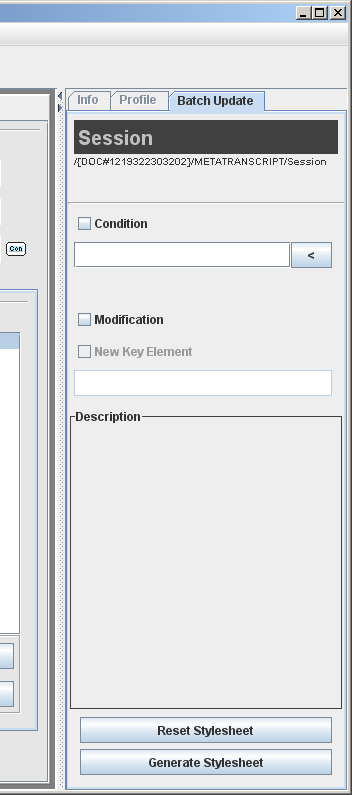
For every field in a session file, you can specify a conditon and/or a modification:
If you enter both, then the stylesheet will act as a find-and-replace function.
If only a modification is entered this value will replace the data of the chosen text field, without considering its previous content. The New Key Element option creates a new key-value pair (see Section 2.4.1.6)
If the modification is omitted, the condition will act as a restriction on the set of files upon which the other modifications will be performed.
If you specify multiple conditions, they all need to be fulfilled before the modifications are applied.
If you specify multiple conditions, they all need to be fulfilled before the modifications are applied.
| Note |
|---|---|
In version 3.2 you can modify 1 key at most for every style sheet. |
An example
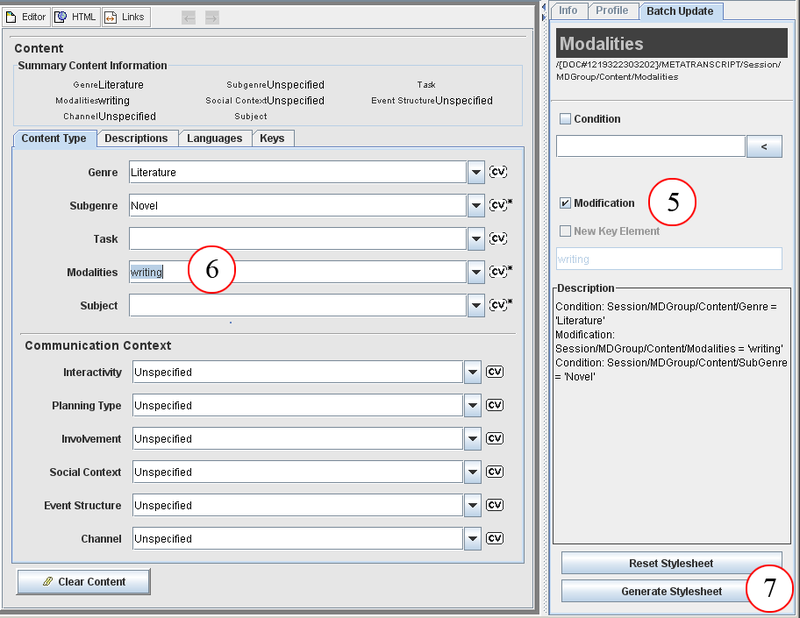
Let’s say we want to change the content part of a set of metadata files. Every time we encounter both the genre 'Literature' and the subgenre 'Novel', we can assume the associated modality will be 'writing'. So in this case we will use 'Literature' and 'Novel' as conditions, while 'writing' acts as the modification.
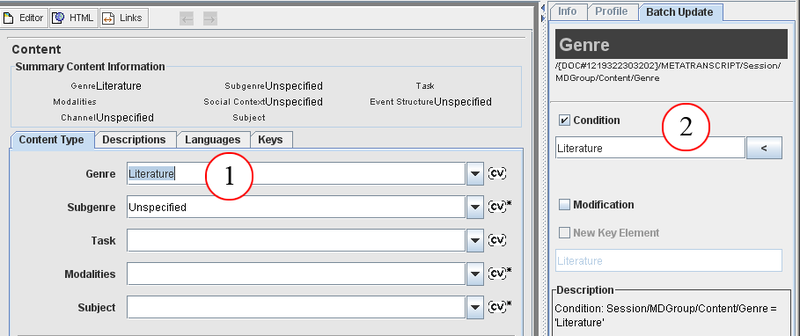
Figure 1.22. Example Update Stylesheet: 1
Click in the text field for which you want to specify acondition
Tick the condition check box and enter "Literature"
or use the button to copy the text from the selected text field
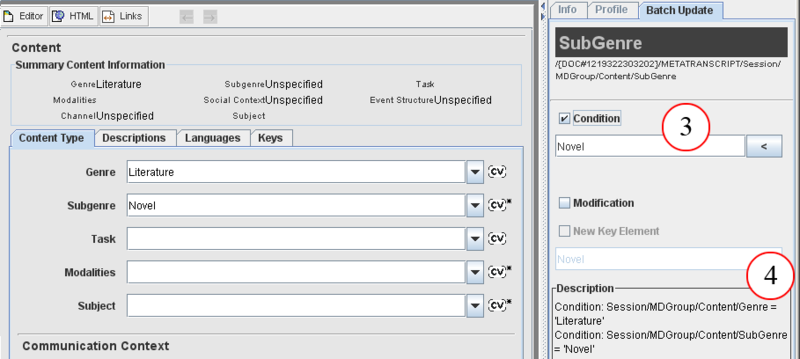
Figure 1.23. Example Update Stylesheet: 2
Now do the same for Subgenre and "Novel"
The description box shows the specified conditions
| Note |
|---|---|
to specify a condition for a field that is constrained by a closed controlled vocabulary, select a value from the dropdown box in the editor itself. This selection will appear as grey text in the stylesheet editor. |
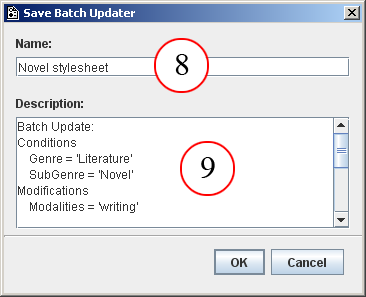
After you saved the newly created stylesheet, take a look at Chapter 4 of the IMDI browser manual for instructions about how to apply it to your files.
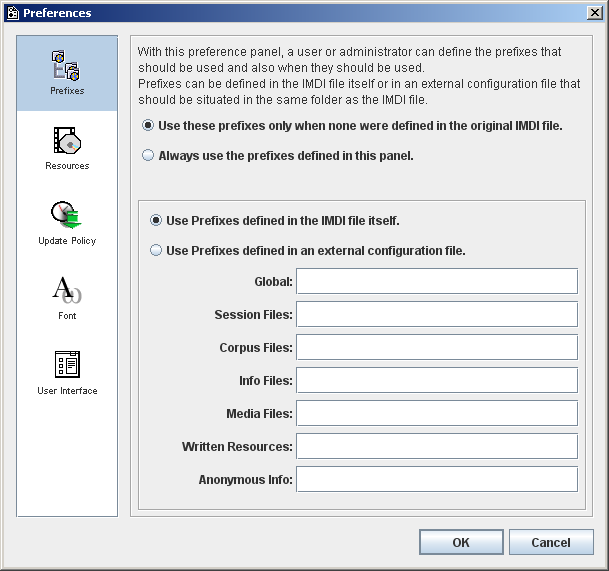
Click on to access the Preferences dialog window.
In the Preferences dialog window, the following four options are available:
Prefixes
Resources
Update Policy
Font
User interface
Click on any of the headings in the left panel to activate the corresponding option.
Prefixes
This option allows you to specify the path to the different types of files (see Chapter 5 for details).
Resources
This option allows you to specify the browse options (see Chapter 5 for details).
Update Policy
The IMDI tools make use of so-called "controlled vocabularies"
(see Section 1.2.3.3). These vocabularies are
stored on the Web, and a copy of them is stored in the cache of your
desktop computer (in the folder <user-directory> \
IMDI-TOOLS \ CVCACHE). The Web version is changed
sometimes, but the IMDI tools will continue to use the
locally-stored version until the cache is updated again. By default,
the cache is updated whenever you run an IMDI tool. However, you can
change this policy, and determine if and when the vocabularies
should be updated.
Click on Update Policy to determine this policy. The following options are available:

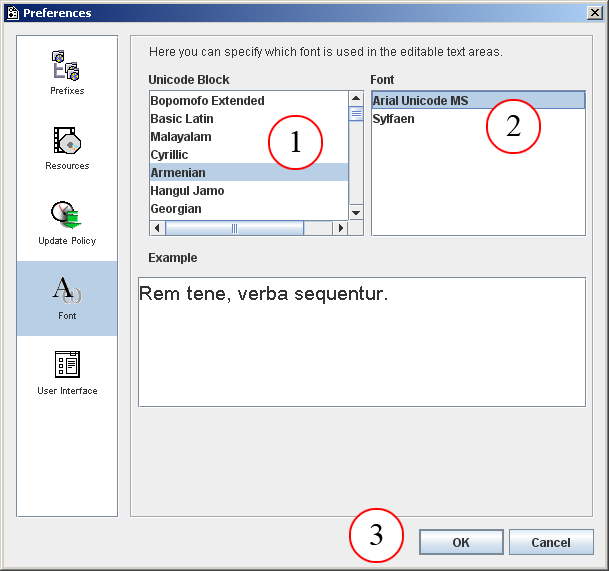
Font
This option allows you to display special character sets and fonts. To select a set and a font, do the following:
Under Unicode Block (in the left panel), select a unicode block by clicking on it. The available fonts are then displayed under Font (in the right panel).
Under Font, select a font by clicking on it.
Click on to implement the new font.
User Interface
Remove the checkmark before Show ToolTip Boxes to disable the online floating help boxes when editing a text field.