The menu is used to create, open, close, save, print and exit IMDI file(s). It contains the following options:
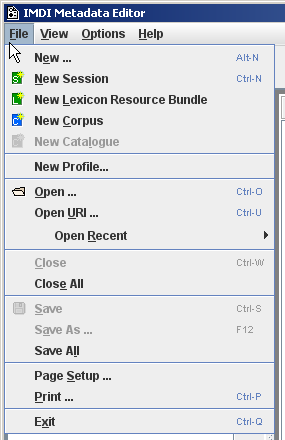
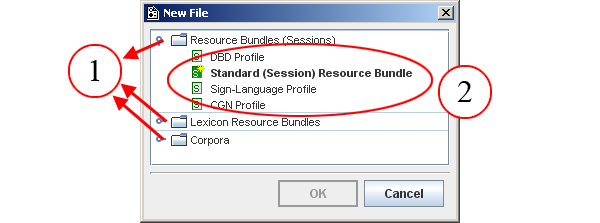
allows you to create new IMDI files, and to assign them to a type and a profile (see Section 1.2.3.1 for details).
Choose first a type (e.g., Resource Bundles (Sessions), Lexicon Resource Bundles, or Corpora) and then a profile (e.g., Standard (Session) Resource Bundle). Click on the profile, then click on . The new file will be assigned to this type and profile.
Click on to create a new IMDI Session file. It will be automatically assigned to the default profile for Resource Bundles (Sessions) (see Section 1.2.3.1; see Chapter 2).
Click on to create a new IMDI Lexicon file. It will be automatically assigned to the default profile for Lexicon Resource Bundles (see Section 1.2.3.1; see Chapter 3).
Click on to create a new IMDI Corpus file. It will be automatically assigned to the default profile for Corpus bundles (see Section 1.2.3.1; see Chapter 5).
With this option you can setup a personalized profile, a template for new imdi sessions. See Chapter 3 for more information on this.
Click on to open an IMDI file. Browse to the folder that contains the IMDI file and double-click on it to open it.
Opening non-imdi files
Of course, you can only open files of the IMDI Editor format. If you try to open a file of a different format, an error message will appear.
Opening files from which the original profile was deleted
If you open a file assigned to a profile that has been deleted, the default profile for that type will be used instead. E.g., you may have an IMDI Session file that was originally assigned to the Sign-Language Profile, but later on you deleted this profile. If you now open this IMDI Session file again, it will be assigned to the default profile for session files (e.g., to the Standard (Session) Resource Bundle Profile) (see Section 1.2.3.1 for details).
Opening old IMDI files
If you open a file created with an old IMDI standard, it will be converted to the IMDI 3.0 standard (see Section 2.7 for details).
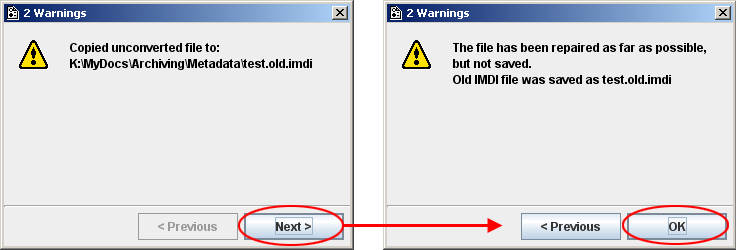
Opening broken IMDI files
When the editor opens an IMDI file and there is an error with
respect to validation to the IMDI XML Schema (the "rules" upon which
each IMDI file is based), the editor will try to repair the file.
First the old IMDI file is saved with the extension
.old.imdi (e.g.
myfile.old.imdi) and then the repairs are
applied:
![[Note]](images/note.png) | Note |
|---|---|
The repaired file is not automatically saved. |
The automatic repair will make it difficult to inadvertently save IMDI files that are not valid with repect to the IMDI XML Schema.
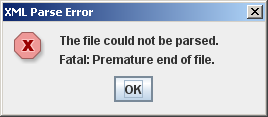
Sometimes the IMDI file is so severely damaged, e.g. it is not well formed XML or some basic elements are missing, that it can not be repaired. The editor will warn you when this is the case:
Click on to download an IMDI file from the Web. A dialog window pops up. Enter the corresponding URI into the window and click on (see also Section 1.2.1.6).
Go to to view a list of the IMDI files that you have recently worked on. Click on any file from the list to open it (see also Section 1.2.1.6).
Click on to close the currently active IMDI file (i.e., the file that is highlighted in the Browse panel; see Section 1.3). All other open IMDI files will remain open.
If the file to be closed has not been saved yet, a warning appears. Click on to save the file before closing; click on to not save the file; click on to return to the file.
Click on to close all IMDI file (see also Section 1.2.1.10).
Click on to save the currently active IMDI file (i.e., the file that is highlighted in the Browse panel; see Section 1.3).
If you save an IMDI file for the first time, the Save dialog window appears. Browse to the folder where you want to save the file, assign a name to it, and then click on .
| Note |
|---|---|
Note: When you save an IMDI file, the IMDI Editor will check
if the folder contains a file named |
| Note |
|---|---|
Note for researchers working at the MPI for Psycholinguistics, Nijmegen: The name of the IMDI file should be the same as the name of the corresponding annotation and media files (see Section 2.5). The same name should also be entered in the field Session name (see Section 2.1.1). Furthermore, the file name has to be Unix compatible: do not use file names longer than 14 characters, do not use non-letter or non-number characters (except for the underscore: _), and do not use blank spaces. |
Click on to save the currently active IMDI file (i.e., the file that is highlighted in the Browse panel; see Section 1.3) under a different name (see also Section 1.2.1.12).
Click on to save all open IMDI files (see also Section 1.2.1.12).
Click on to specify the layout of the printed IMDI file (i.e., paper size, source, orientation, and margins).
Click on to print the currently active IMDI file (i.e., the file that is highlighted in the Browse panel; see Section 1.3).
Click on to exit the IMDI Metadata Editor window. All open IMDI files will be closed. If some files are not yet saved, a warning appears that contains the following kind of information:
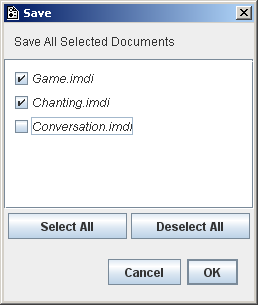
Figure 1.8. Save on exit
The dialog window contains a list of all files that are not yet saved. Checkmarks indicate the selected files (by default, all files are selected). To remove a checkmark (i.e., to deselect a file), click in the box. Click to select or to deselect all files. Click to save all selected file. The deselected files will not be saved. Click on to return to the Editor window.